
Print Management
The Genius Server is a print server, which can manage print jobs sent from a computer to a printer.
A document, which is sent to the server, is stored into a queue. A queue is a list of print jobs that are waiting to be printed.
The Genius Server distinguishes two printing types:
Pull printing: a printing feature through which a user sends print jobs to the Genius Server where the jobs are stored until the user requests them at any device connected to the Genius Server which supports pull printing. For further details, refer to Pull Printing Queue section.
Direct printing: a printing feature through which the user sends print jobs to the server which stores the jobs inside the direct print queue and sends them to the device configured as soon as the device is available. Print jobs can be printed either in chronological order of arrival (FIFO, first-in, first-out) or starting from the most recent (LIFO, last-in, first-out), through username FIFO or username LIFO. For further details, refer to Direct Printing Queue section.
Administrators can configure multiple rules for managing queues, e.g., users or user groups can be assigned to specific queues (e.g., Pull-Print-BW) or devices (e.g., the one on their floor) to use ressources more efficient.
Other supported printing features are:
Delegation printing: the job owner can authorize another user or user group to print their documents.
Creation of printing rules: the user can define specific rules in order to manage print jobs.
Accounting: accounting of printed pages. Price lists can be defined via contingents.
Queue Management
In this section, administrators can manage printing queues and print jobs.
Pull Printing Queue
The pull printing feature allows the user to print a document to the Genius Server where the print job data is stored until it is purged or printed by the user.
The default name of the pull printing queue is pull-printing but other queues can be created (as described below). All pull printing queues share the same strategy configurable in Configuration tool -> Printing -> Pull printing -> Pull printing print strategy (for further details, refer to the [Advanced] Printing section).
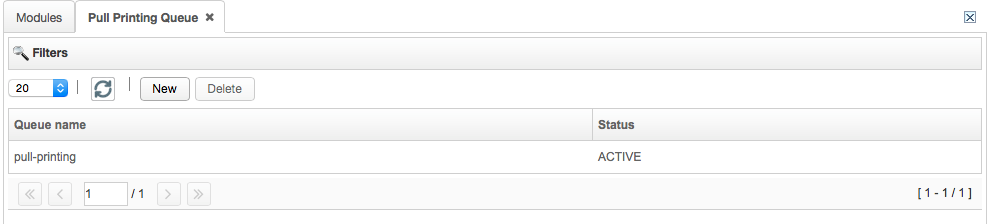
To create a new queue, press the New button.

Then fill in the required fields:
Queue name: name of the queue.
Status: the status of the queue. It can be:
ACTIVE: the queue can receive print jobs.
SUSPEND: the queue is disabled. The system does not forward the print jobs to the queue. Print jobs are stored in the Incoming queue.
To save the queue, click on Save and Close button. To delete a queue, select the item, press the Delete button, then Delete again to confirm. To modify the print queue status, select the queue and press the Resume button if the queue is suspended or the Suspend button of the queue is active.
Pull Printing Group
The Genius Server solution allows the administrator to assign a group of devices to one or more pull printing queues.
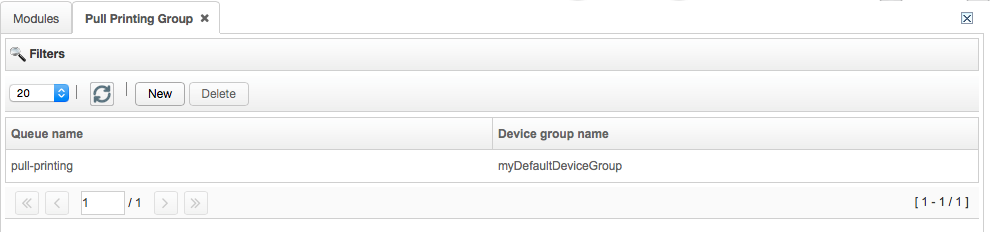
To create a new association, press the New button.
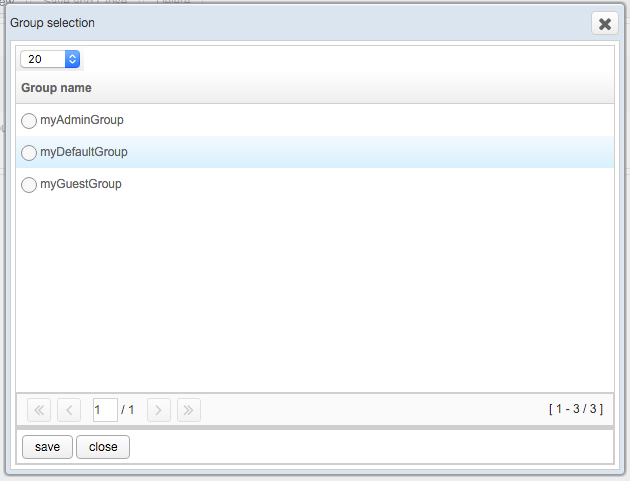
To specify a queue or device group, press the magnifying glass button next to corresponding text box.
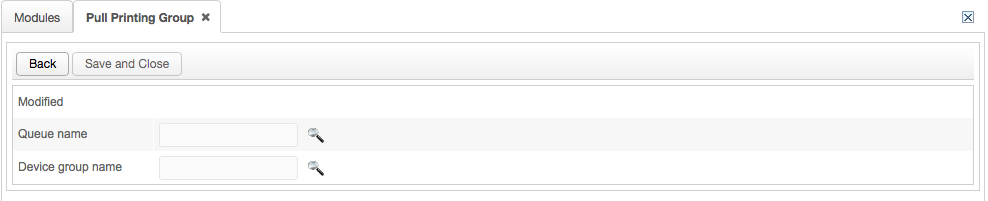
Then select the queue or the group and press the Select button. To save, press the Save and Close button. To delete a group of devices, select the group and press the Delete button.
Direct Printing Queue
Direct printing queues are automatically created as soon as a print job is sent to a printer through the Genius Server. The device needs to be specified in the printer configuration, by entering the corresponding IP address or hostname of the printer. This address will be the same as shown in the queue.
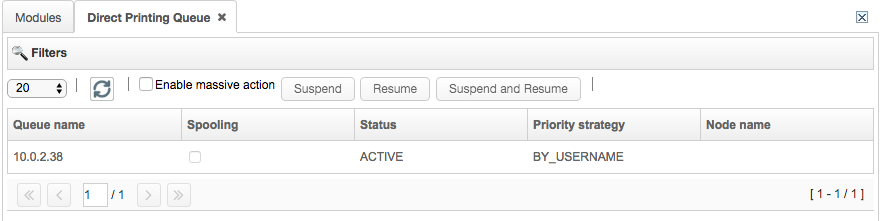
For direct queues, the administrator can set:
Queue name: the name of the queue.
Spooling: if checked, the spooling feature is enabled.
Status: the status of the queue. As with pull printing queues, a queue can have the status active (ACTIVE) or suspeneded (SUSPEND). If an external problem occurs (e.g. network problems, database unreachable, etc.), the queue stops responding and all the print jobs in PROGRESS or in WAITING stop being processed. Print jobs are strictly connected to an accounting session, which remains open. After a few minutes the Genius Server automatically recovers the accounting session. If a rapid recovery is necessary, the administrator can restore the session manually clicking on the Suspend and Resume button. Pressing this button leads to the open accounting session turning into ERROR, the queue into ACTIVE, the print jobs into WAITING, and the spooling process will be stopped. At this point, the printing queue starts running again, so the printing process is restored.
Priority strategy: print job strategy in forwarding jobs are:
FIFO, first-in, first-out: print jobs are printed in order of arrival.
LIFO, last-in, first-out: print jobs are printed in a chronological order, starting from the most recent.
BY_USERNAME: print jobs are grouped and printed in order of arrival.
BY_USERNAME_LIFO: print jobs are grouped and printed in a chronological order, starting from the most recent.
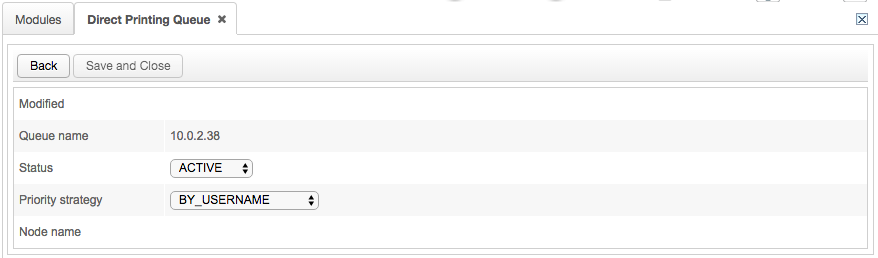
The server tracks the status of the direct queue spooling. Spooling is a process during which the server forwards print jobs to a buffer in order to reach the device where the jobs will be printed. In the direct queue list, the spooling status is signaled through a check mark.
Job Management
When a print job arrives at the Genius Server, the server pushes it into the incoming queue before being processed and addressed to the correct queue.
Incoming
In the incoming list, both the print jobs waiting to be processed and routed to the assigned queue and those in ERROR are displayed.
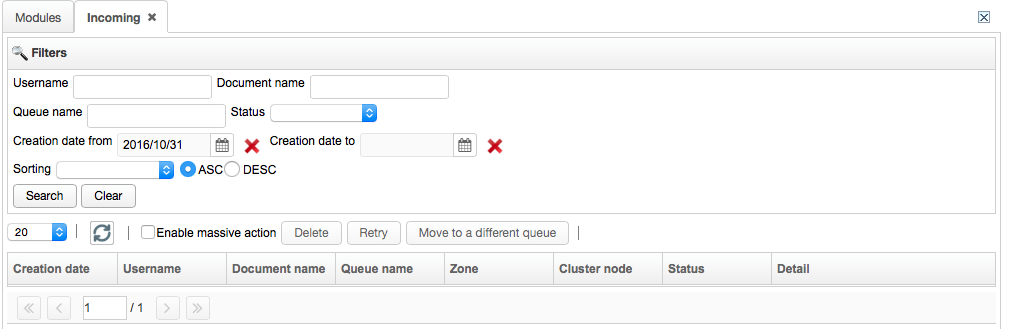
Creation date: the creation date of the job.
Username: the name of the user.
Document name: the name of the document.
Queue name: the name of the queue.
Zone: the name of the zone.
Cluster node: the name of the cluster node.
Status: the incoming print job status can be:
RECEIVING: the server is receiving the print job.
RECEIVED: the print job is received and stored in the incoming queue.
DISPATCHING: the server is dispatching the print job to the correct queue.
DISPATCHED: the print job is dispatched.
ERROR: the print job is in error. Errors are of different types:
BINARY_DATA_NOT_CREATED,
DOCUMENT_JOB_NOT_COMPLETELY_RECEIVED,
USER_NOT_EXISTING,
USER_CREATION_FAILED,
PRINT_DOCUMENT_WITHOUT_OWNER,
DEVICE_NOT_EXISTING,
DEVICE_NOT_DETECTED,
DUPLICATE_DEVICE,
QUEUE_IS_EMPTY,
LICENSE_NOT_AVAILABLE,
UNKOWN_ERROR,
SWAPPED_DEVICE,
CONTINGENT_EXHAUSTED,
CONTINGENT_COLOR_EXHAUSTED,
CONTINGENT_EXHAUSTED_PREV,
CONTINGENT_COLOR_EXHAUSTED_PREV,
QUEUE_SUSPENDED,
MAIL_ADDRESS_NOT_RESOLVED,
MAIL_ATTACHMENTS_NOT_VALID,
MAIL_QUEUE_NOT_VALID,
MAIL_ATTACHMENT_NOT_SUPPORTED,
BLOCKED_BY_RULE,
MAIL_ADDRESS_TOO_MANY,
HTTP_PRINT_DOCUMENT_NOT_SUPPORTED,
PRINT_DOCUMENT_EXPIRED,
PRINT_RULES_EXECUTION_ERROR,
PRINT_DOCUMENT_ANALYSIS_ERROR,
PRINT_PCL_CONVERT_ERROR,
ZONE_NOT_WRITABLE_CODE,
ZONE_UNREACHABLE_CODE and
RELAY_DUPLICATION_ISSUE.
but the most common are:
DOCUMENT_JOB_NOT_COMPLETELY_RECEIVED: The cause for this is probably a network error: e.g., disturbances in the connection between Genius Server and the user's device that sends the job, or a device is switched of whil sending/receiving the print job. To solve the problem, verify network connections and the availability of the device.
PRINT_DOCUMENT_WITHOUT_OWNER: The print job has been received, but the information about the owner has not been processed. This results in the Genius Server not being able to assign the print job. The cause for this error is probably a faulty Microsoft Print Server configuration or a faulty Genius Server configuration. To solve the problem verify the server and/or the system configuration.
UNKOWN_ERROR: This error can have multiple causes which cannot be specified further. When this error occurs the system adminstrator should be contacted, also the error logs need to be checked.
PRINT_DOCUMENT_EXPIRED: This error is caused by a print job that has been stored in the incoming queue for too long. It cannot be printed anymore and needs to be sent again.
Note
DOCUMENT_JOB_NOT_COMPLETELY_RECEIVED, PRINT_DOCUMENT_WITHOUT_OWNER and PRINT_DOCUMENT_EXPIRED are usually external problems since they are results of wrong system configurations. UNKOWN_ERROR is an internal problem that usually does not occur.
Detail: the details of the queue.
Direct
Print jobs that belong to the direct print queue are displayed here.
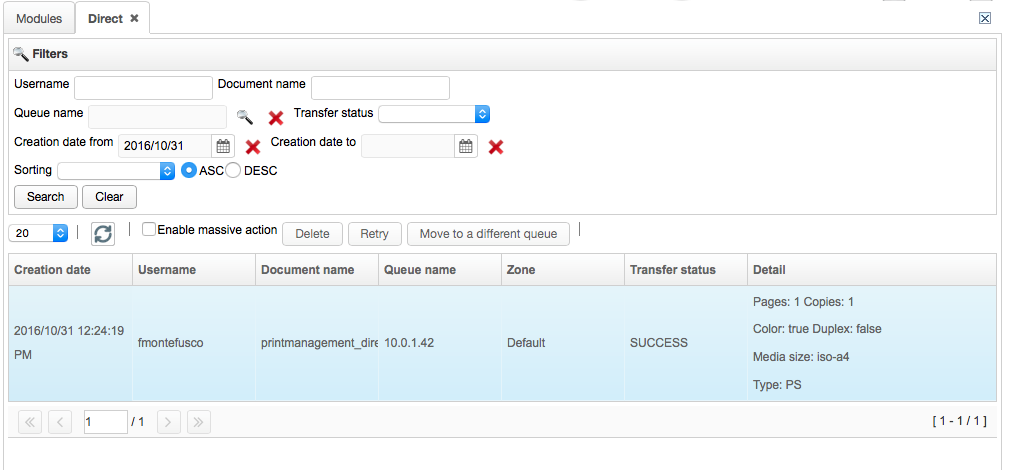
Creation date: the creation date of the job.
Username: the name of the user.
Document name: the name of the document.
Queue name: the name of the queue.
Zone: the name of the zone.
Cluster node: the name of the cluster node.
Transfer status: the transfer status of the queue. It can be:
WAITING: the print job is waiting to be spooled.
IN_PROGRESS: the print job spooling is in progress. If an error occurs (e.g. an MFP device is being rebooted or the Genius Server is turned off), print jobs are not printed until the problem is solved. After that, the print jobs IN PROGRESS status turns into WAITING and a new accounting session automatically opens.
SUCCESS: the print job has been correctly spooled.
ERROR: the print job is in ERROR, something went wrong.
Detail: the details of the queue.
Pull Printing
In the pull printing list, the print jobs sent to the pull printing queues are displayed.
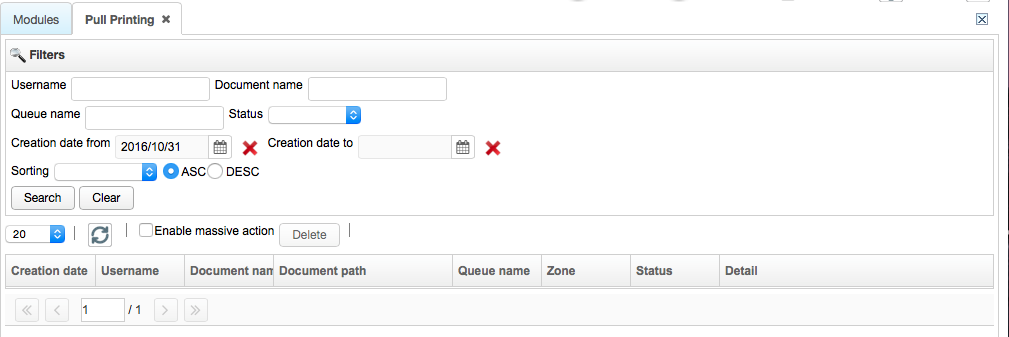
Creation date: the creation date of the job.
Username: the name of the user.
Document name: the name of the document.
Document path: the folder path in which documents are stored.
Queue name: the name of the queue.
Zone: the name of the zone.
Cluster node: the name of the cluster node.
Status: the incoming print job status. It can be:
PRINTABLE: the print job can be printed.
DELETING: the system is removing the print job from the queue.
DELETED: the print job has been removed.
EXPIRED: the print job has been in the queue for too long and is now expired.
Detail: the details of the queue.
Printed Pull Printing
Here, the printed pull printing jobs are shown.
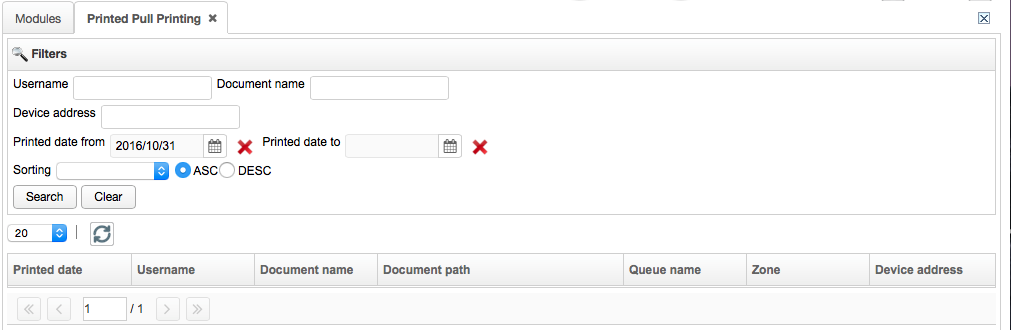
Printed date: the date in which the print job has been printed.
Username: the name of the user.
Document name: the name of the document.
Document path: the folder path in which documents are stored.
Queue name: the name of the queue.
Zone: the name of the zone.
Device address: the IP address of the device.
Spool
This section gives information regarding the spool status of direct or pull-printing print jobs. Usually print jobs will not appear for long in this list.
The lists can be refreshed by clicking the refresh button.
If jobs don't disappear from the list (e.g., due to errors), they can be selected and deleted. If you want to delete multiple jobs at once, make sure to activate Enable massive action first.
Direct Spool
An overview of the spooled direct print jobs. Print jobs will be shown here when they wait to be printed to a direct queue. Usually this happens if other print jobs are already being processed in that queue.
Available information are:
Creation date: the creation date of the print job.
Username: the username of the owner.
Document name: the document name.
Queue name: the name of the queue the print job has been printed to.
Zone: the zone name.
Transfer status: the transfer status of the document.
Detail: details for the print job.
Pull-Printing Spool
The table shows information regarding spooled pull printing jobs. Jobs will appear here, after users use the Print All action. The jobs are displayed for the time it takes to process the job.
Available information are:
Creation date: the creation date of the print job.
Username: the username of the owner.
Document name: the document name.
Document path: the path to the document.
Queue name: the name of the queue the print job has been printed to.
Device address: the device's address.
Zone: the zone name.
Status: the status of the spooled job.
Delegated Identity
When using delegation print, a user (delegator) allows another user or group (delegatee) to see and print their pull printing jobs. Administrators can manage any delegator or delegatee. Delegatees are also called delegated identity inside Genius Server.
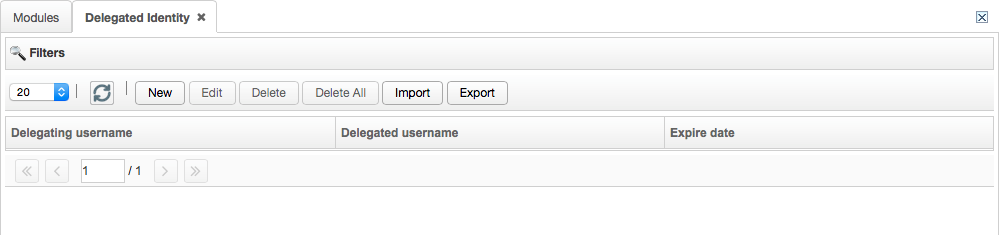
Administrators can define delegation processes and select delegating users (delegators) and delegated users (delegatees) from internal or external providers.
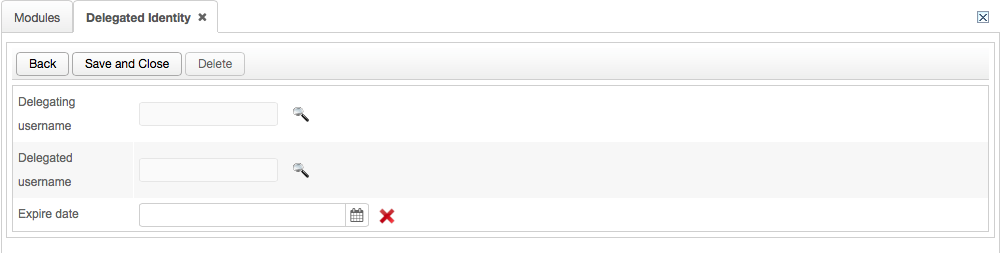
To add a new delegation process, press the New button, and fill in the configuartion fields:
Delegating username: the username of the delegating user. Press the magnify glass icon, select the username and press the Select button to confirm (required).
Delegated identity: the username of the delegated user. Press the magnify glass icon, select the username and press the Select button to confirm (required).
Expiration date: the date of expiration of the delegation process.
To save, press the Save and Close button.
In contrast to the administrator, users can only select their delegated identities.
To import a delegated identity, select the identity, press the Import button, select one of the two options (Create not existing entities or First line contains headers), and press the Upload button and select the file. To export a delegated identity, select the identity, and press the Export button. To delete a delegated identity, select the identity, press the Delete button, then press Delete to confirm. To delete all the delegated identities, select the identity, press the Delete all button, then press Delete to confirm.
Note
Enable Delegated identity on Genius Conf (Printing section) before setting the print rules.
Delegated Group
In delegated groups, an identity (delegating) allows one or more groups (delegated groups) seeing or printing her pull printing jobs.
Administrators can select any delegating identity and delegated group.
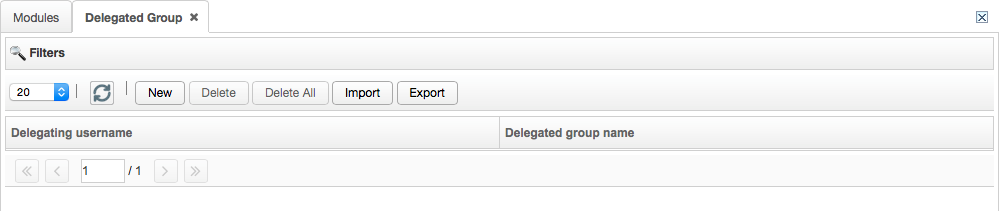
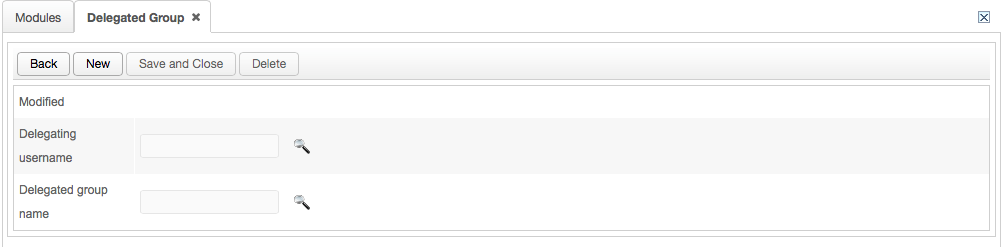
To add a new delegation group, press the New button, and fill in the configuration fields:
Delegating username: the username of the delegating identity.
Delegated group: the username of the delegated group.
To save, press the Save and Close button.
In contrast to the administrator, users can only select their delegated groups.
Note
Enable Delegated group on Genius Conf (Printing section) before setting the print rules.
Hint
Example:
Delegating identity: Jeanne Héros
Delegated identity: Jo Delegate
Delegated group: Human resources group
Jeanne Héros sometimes receives applications on linkedin, so she prints the CV and brings it to human resources. To speed up the process she decided to create a delegated identity and a delegated group so she can send a printjob and Jo Delegate, the secretary, or someone of the human resources group can directly print the CV.
Pull Printing Auto Release
This section only appears, if the corresponding setting is set to on on the /conf website (Configuration -> Advanced Configuration -> Base -> Printing -> Pull printing -> pull printing auto release enabled).
An overview is shown - if this feature is configured the first time, the overview is empty. Click on New to configure this feature. Note that you need to include the device group name for which this feature shall be activated as well as the user group name. You can choose if the print jobs should be deleted after pull print auto release and, if delegated print jobs are to be included.
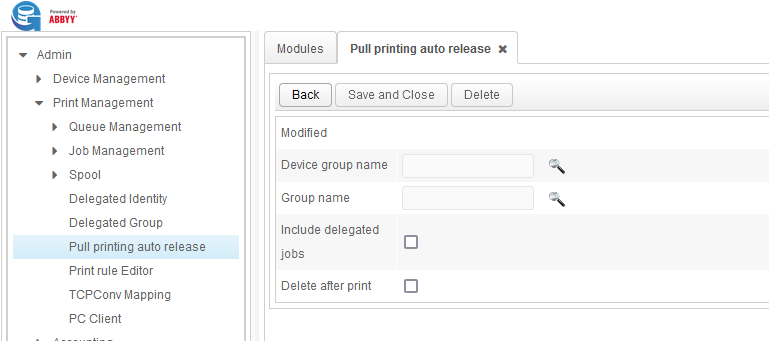
Do not forget to press Save and Close after making changes.
The newly configured feature appears in the list. It can be edited by clicking Edit and deleted by selecting it and clicking Delete.
Also, this feature can be configured for more user groups and device groups. They wil all appear in this list. If you want to delete all at once, click Delete All.
Print Rule Editor
Through the print rule function users can manage print jobs according to their needs as shown in the examples below:
to send heavy documents: if the user sends a heavy document to the Genius Server, the server automatically forwards it to another-specified-device (e.g. a device whose printings are less expensive).
to manage user's print job rights.
to send an email to user(s)/administrator when a rule is applied.
Print rules can be set for the incoming and/or spooling phases:
Incoming print rules are applied before the print jobs arrives in the incoming queue. If the rule is valid, the print is processed according to the action specified in the rule.
Spooling print rules are applied before the spooling process.
Note
Enable Rules on Genius Conf (Printing section) before setting the print rules.
Incoming Print Rules
To define the incoming rules, take the following steps:
Drag the rule icon from the Palette and drop it between the start and the end tags on the Print rule Editor, as displayed below:
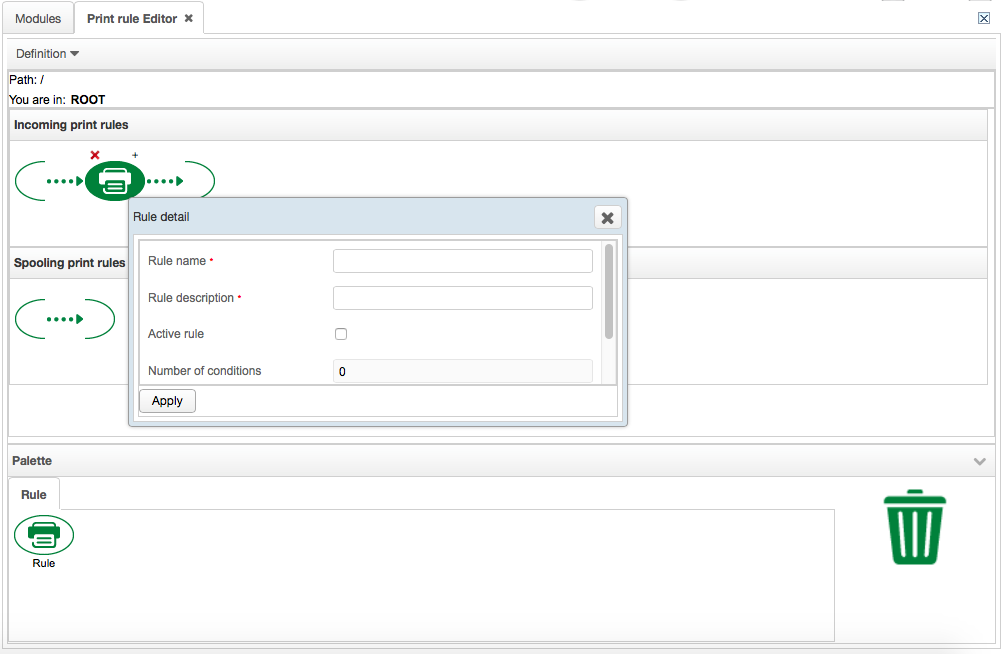
A window opens and rule details are shown:
Rule name: name of the rule (required).
Rule description: description of the rule (required).
Active Rule: if checked, the rule is applied.
The other information is a summary of the rules:
Number of conditions: number of rule conditions.
Number of actions: number of rule actions.
Number of components in error: the number of rule components which are in error.
To save the rule details, press the Apply button.
An error message is displayed. To skip the error, press the button X and then the + on the right top of the rule.

To set rules and actions, press the cross button.
The editor page opens:
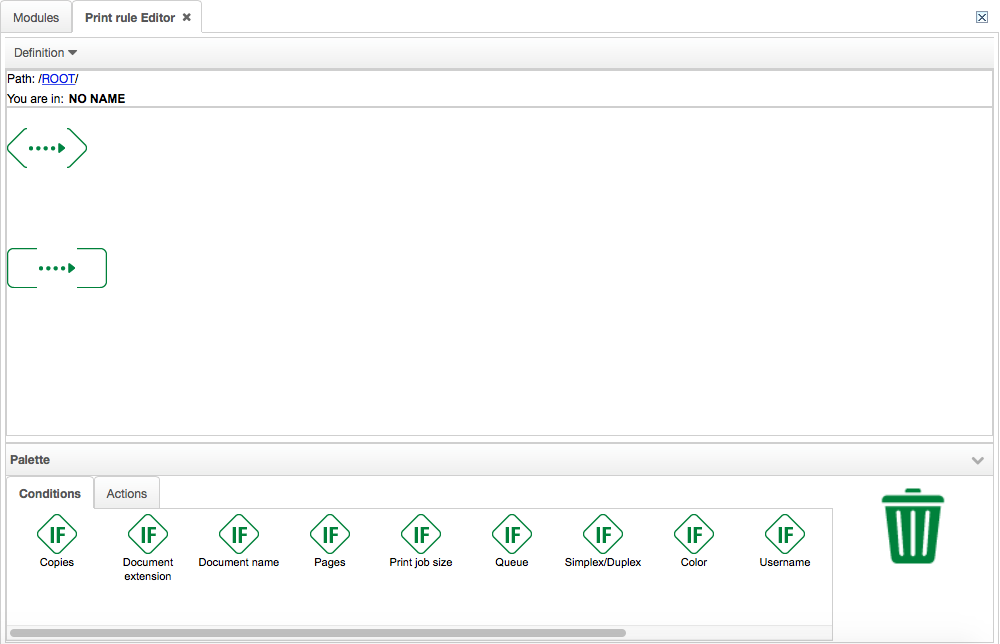
Select the desired conditions. To select them, drag and drop the icons from the underlying palette. A form for entering details opens:
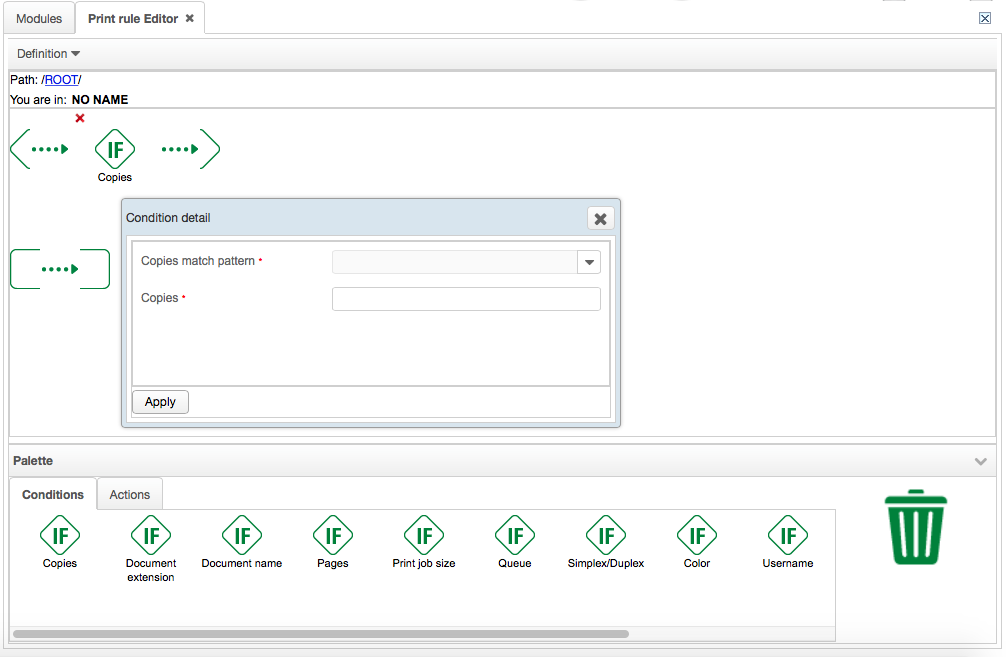
Enter the values then press the Apply button.
Available conditions are:
Copies: a filter for the number of copies (users must enable the Print Job Analyzer, from Configuration tool -> Advanced -> Job analysis -> Internal job analysis enabled):
Copies match pattern: filters are BIGGER_THAN or LESSER_THAN a number of copies.
Copies: number of copies selected for applying the filter.
Document extension: filter for the document extension:
Extension match pattern: filters are EXACT (exact name extension) or REGEX (regular expression to specify one or more file extensions. For further details about regular-expression constructs, refer to The Official Java documentation).
Document extension: the file extension preceded by the point where to apply the filter (e.g. .pdf).
Document name: filter for the document name:
Document name match pattern: available values are EXACT (document exact name), BEGIN_WITH (the document name begins with ...), END_WITH (the document name finishes with ...) and REGEX (the regular expression which matches document names. For further details about the regular-expression constructs, refer to The Official Java documentation).
Document name regex: if the document name match pattern is EXACT, enter the name of the document. if it is BEGIN_WITH, enter the first word(s) of the document name. if END_WITH, enter the final word(s) of the document name. and if REGEX, enter the regular expression.
Pages: the filter for document pages (users must enable the Print Job Analyzer, from Configuration tool -> Printing -> Job analysis -> Internal job analysis enabled):
Pages match pattern: the two filters are BIGGER_THAN and LESS_THAN a number of pages.
Pages: number of document pages selected for applying the filter.
Print job size: filter for the print job size:
Print job size match pattern: the two filters are BIGGER_THAN or LESS_THAN a print job size.
Print job size: document size in byte.
Queue: filter for the queue name:
Queue match pattern: values are EXACT (exact queue name), BEGIN_WITH (the queue name begins with ...), END_WITH (the queue name finishes with ...) and REGEX (the regular expression which specifies one or more queue names. For further details about regular expression constructs, refer to The Official Java documentation)
Queue: if the queue name match pattern is EXACT, enter the name of the queue. if it is BEGIN_WITH, enter the first word(s)or letter(s) of the queue name. if END_WITH, enter the final word(s) or letter(s) of the document name. and if REGEX, enter the regular expression.
Side: a filter for the print job side (users must enable the Print Job Analyzer from Configuration tool -> Printing -> Job analysis -> Internal job analysis enabled). You can select between:
Duplex: Double side.
Simplex: One side.
Color: a filter for the document color (users must enable the Print Job Analyzer from Configuration tool -> Printing -> Job analysis -> Internal job analysis enabled). You can select between:
Color: a color document.
B/W: black and white document.
Username: a filter for the print job owner (users must enable the Print Job Analyzer from Configuration tool -> Printing -> Job analysis -> Internal job analysis enabled).
Username match pattern: values are EXACT (the exact username), BEGIN_WITH (the username begins with...), END_WITH (the username finishes with...) and REGEX (the regular expression which specifies one or more queue names. For further details about regular expression constructs, refer to The Official Java documentation).
Username condition: enter the username of the print job owner.
Always true: all the previous rules are always true.
User in group: filter for the group.
Group condition: the name of the group (e.g. myAdminGroup).
Print job media size: filter for the print job format:
Match pattern: values are EQUAL (the format is the same as the one selected in the underlying string), NOT_EQUAL (the format is different from the one selected in the underlying string).
Media size type: a selection of formats where to apply the condition.
Now, click on Action in the palette.
Select an action to be automatically applied if the condition(s) selected is valid. To select the action(s), drag and drop the icon(s) from the underlying palette.

Block print: the print job is blocked and does not leave the incoming queue.
Encryption: the print job is encrypted.
Change queue: the job is sent to another queue (enter the name of the queue).
Change user: the job has a new owner (enter the new username).
End: actions and rules placed after the end node are not taken into account.
Color to B/W:
ENFORCE_GRAYSCALE: to print the job in grayscale.
ENFORCE_GRAYSCALE_COLOR_CONVERSION: to print the job in grayscale. It converts all the information about colors into PCL 6 jobs (very slow). Only use this setting if ENFORCE_GRAYSCALE does not work, e.g. for Xerox Phase printers.
Convert to Duplex: to print the job in duplex (to print on both sides of each page).
Add Kyocera stapling for Samsung stapling: to print and staple the job sent from a Samsung device in a Kyocera one.
Convert to Simplex: to print the job in simplex (to print on one side of each page).
Send mail notification: to send an email to the recipient (strategy, recipients and subjects are required fields):
Strategy (required):
NOTIFY_TO_PRINTJOB_USER: an email is sent to the print job owner.
NOTIFY_TO_EMAIL_ADDRESSES: an email is sent to the recipients.
NOTIFY_TO_BOTH: an email is sent both to the print job owner and recipients.
Recipients: enter recipient's email address separated by a comma (required).
Subject: enter the subject of the email (required).
Body: enter the text of the email (optional but recommended).
Command line: enter the absolute path of a script to execute (e.g. ghost script command). The print job absolute path is the parameter of the script.
Start BPM starter definition: it starts a specified BPM definition.
Delegate user: it allows to delegate a user.
Delegated strategy: the delegation identity's username. It can be PJL_DELEGATION or FIX_DELEGATION.
Fix delegated username: the username of the fixed identity. It means that it is enabled only if FIX_DELEGATION is selected. To have an owner of the pull printing, create a delegated user.
PJL attribute: the PJL attribute related to the username which is used to read username from PJL header (eg @PJL COMMENT DOCNAME).
PJL normalize expression: the PJL expression used to manipulate the username. (e.g. @PJL COMMENT DOCNAME="Lersch AD11474" "${util:find(username,'[aA][dD][0-9]+')}" to clean in "ad11474").
Delegation lifetime (minutes): the duration of the delegation (in minutes).
Pull printing delegation: it allows the delegation of a pull printing.
Delegated strategy: the delegation identity's username. It can be PJL_DELEGATION or FIX_DELEGATION.
Fix delegated username: the username of the fixed identity. It means that it is enabled only if FIX_DELEGATION is selected. Print jobs are duplicated for that username.
PJL attribute: the PJL attribute related to the username which is used to read username from PJL header (e.g. @PJL COMMENT DOCNAME).
PJL normalize expression: the PJL expression used to manipulate the username. (eg. @PJL COMMENT DOCNAME="Lersch AD11474" "${util:find(username,'[aA][dD][0-9]+')}" to clean in "ad11474" ).
Delegation lifetime (minutes): the duration of the delegation (in minutes).
Multiple conditions and actions can be set for the same rule. If all the specified conditions are true, actions are performed.
Add Lexmark-to-Canon conversion: converts commands from a Lexmark driver for output on Canon devices. If this command is added, the following commands are converted:
color mode: no conversion necessary.
collation: appropriate Canon PJL instructions are added.
stapling: any Lexmark stapling instruction found leads to a Canon PJL instruction for stapling on the long edge being added. Note that stapling_landscaped will be stapled on the top right instead of top left.
simplex/duplex: PCL-XL instructions are kept except for portrait/duplex, in which case vertical and horizontal binding are switched.
input tray selection: tray ids for non-standard trays are replaced in PCL XL:
tray 3: 253 → 18
tray 4: 254 → 19
tray 5: 255 → 20
Go to the root page pressing the ROOT button.
If the rule is valid, a check mark is displayed on the node.
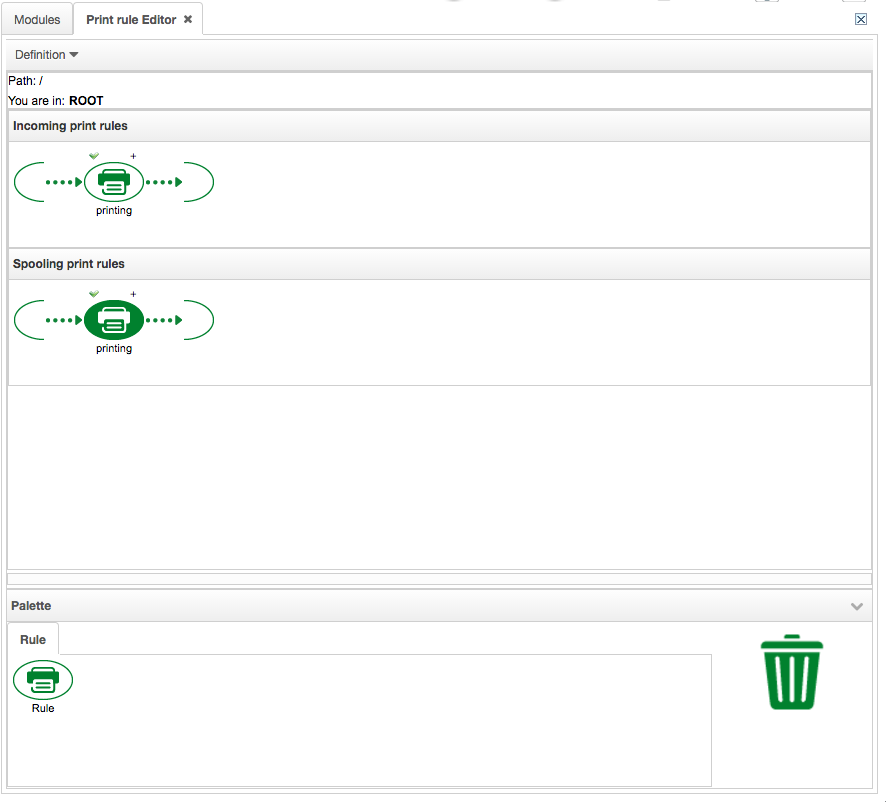
To apply changes, click on the Definition menu button and press the Save button.
The administrator can add other rules following the same procedure. Rules are evaluated starting from the first rule on the left. If a rule is applied and the end action is executed, the remaining rules are automatically skipped.
Spooling Print Rules
To define the spooling rules, take the following steps:
Go to Print Rules Editor, drag the Rule icon from the Palette and drop it in the spooling print rules editor.
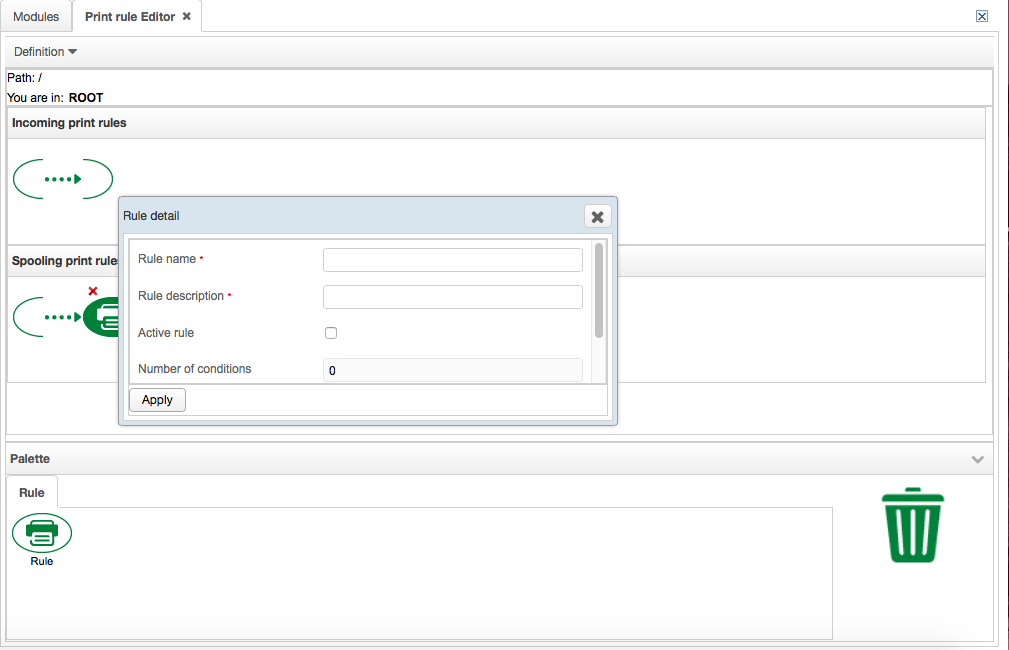
A window to fill in is displayed. For rule details, refer to Incoming Print Rules section.
To save the rule detail, press the Apply button.
An error message is displayed. To skip the error, press the button X and then the + on the rule.

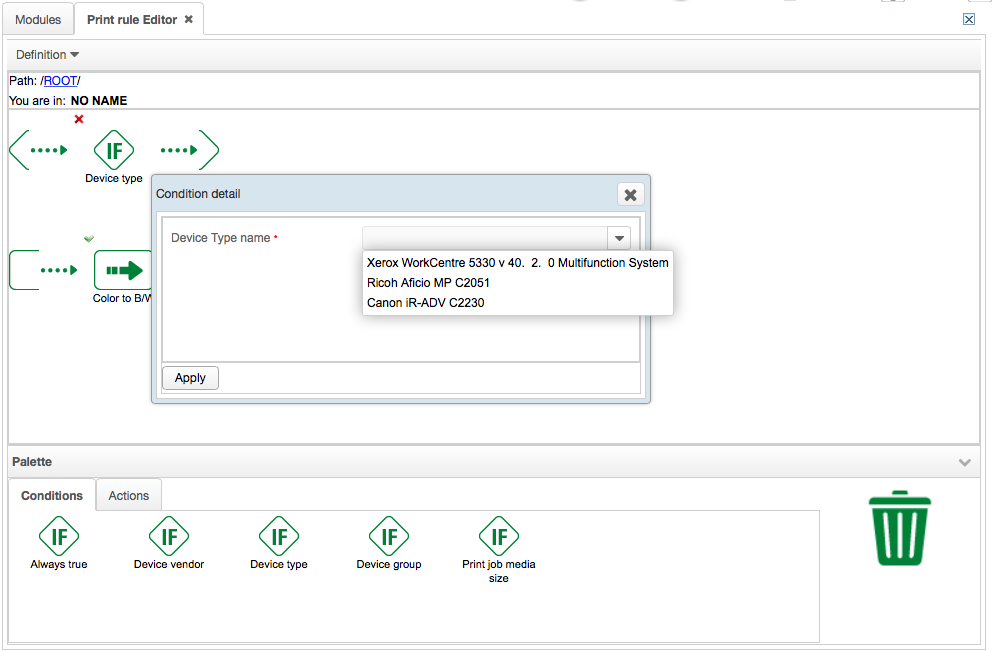
Select the condition(s) and drag and drop an icon (e.g. Device type) from the palette at the bottom. A form to fill in opens. Conditions are:
Always true: the rule is always true.
Device vendor: select a vendor from the drop down list. Users must detect devices first.
Device type: select a device from the drop down list. Users must detect devices first.
Device group: select a device group from the drop down list. Users must detect devices first.
Print job media size: the filter for the print job format:
Match pattern: values are EQUAL (the format is the same as the one selected in the underlying string), NOT_EQUAL (the format is different from the one selected in the underlying string).
Media size type: select the format where to apply the condition.
Queue: filter for the queue name:
Queue match pattern: values are EXACT (exact queue name), BEGIN_WITH (the queue name begins with ...), END_WITH (the queue name finishes with ...) and REGEX (the regular expression which specifies one or more queue names. For further details about regular expression constructs, refer to The Official Java documentation)
Queue: if the queue name match pattern is EXACT, enter the name of the queue. if it is BEGIN_WITH, enter the first word(s)or letter(s) of the queue name. if END_WITH, enter the final word(s) or letter(s) of the document name. and if REGEX, enter the regular expression.
Select the correct value for each condition, and press the Apply button.
In the editor menu, click on the action palette.
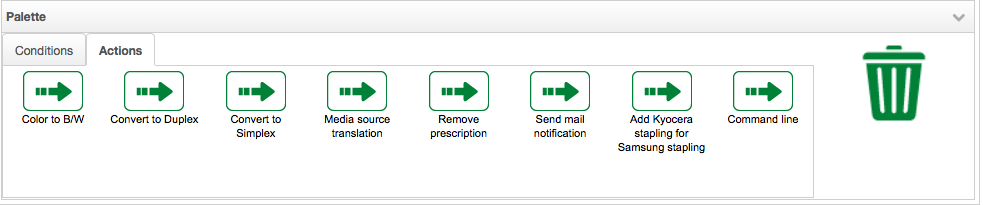
Select an action to be automatically applied if the condition(s) chosen is valid. To select the action(s) drag and drop the icon(s) from the underlying palette.
Color to B/W:
ENFORCE_GRAYSCALE: to print the job in grayscale.
ENFORCE_GRAYSCALE_COLOR_CONVERSION: to print the job in grayscale. It converts all the information about the colors into PCL 6 jobs (very slow).
Convert to Duplex: to print the job in duplex (to print on both sides of each page).
Convert to Simplex: to print the job in simplex (to print on one side of each page).
Media source translation: to allow the change of one value into another in order to print using a specific driver on another device as shown in the image below:
Remove prescription: to discard Prescribe - the Kyocera native Printer Description Language (PDL) - in order to print using a device different from Kyocera MFP.
Send mail notification: to send an email to the recipient (strategy, recipients and subjects are mandatory fields):
Strategy (required):
NOTIFY_TO_PRINTJOB_USER: an email is sent to the print job owner.
NOTIFY_TO_EMAIL_ADDRESSES: an email is sent to the recipients.
NOTIFY_TO_BOTH: an email is sent both to the print job owner and the recipients.
Recipients: recipient's email address separated by a comma (required).
Subject: the subject of the email (required).
Body: the text of the email (optional but recommended).
Add Kyocera stapling for Samsung stapling: when using a Samsung driver to print to a Kyocera MFP, use this setting to enable stapling options.
Command line: enter the absolute path of a script to execute (e.g. Ghost script command). The print job absolute path is the parameter of the scripts.
Change target host (fiery): the target host name can be a fixed string or an expression. Using this action creates a sort of dynamic asset for that MFP. Since the Accounting and busy check is still performed on the original device, this action is useful only in a limited area. It can be used for devices consisting of an MFP and a fiery controller for example. The print job can be printed on the MFP and processed by the fiery controller.
Here is an example xml configuration for a change queue after spooling action:
<print-rules>
  <spooling-print-rule active="true" description="fiery" name="fiery" order="1">
      <actions>
          <action-change-target-host final-modification="false" name="act-CHANGE_TARGET_HOST-f00035fd-4f2a-4dc4-897e-6bced1aa2606" order="1">
              <target-queue-name>${asset.fiery}</target-queue-name>
          </action-change-target-host>
      </actions>
      <conditions>
          <condition-always-true name="cnd-ALWAYS_TRUE-df9d284b-041d-4a3b-8e17-11b998aab5a3" order="1"/>
      </conditions>
  </spooling-print-rule>
</print-rules>
Replace PJL Instruction: with this setting, PJL instructions can be replaced. There are two options:
Replace a fixed string with another fixed string, e.g., "sourceUser" with "replacedUser" or
use a regular expression as part of the PJL instruction, e.g.,
@PJL SET USERNAME=\"[A-Za-z0-9]\"
Reverse Epson page order: use this to reverse the page order on Epson devices.
Add Lexmark-to-Canon conversion: converts commands from a Lexmark driver for output on Canon devices. If this command is added, the following commands are converted:
color mode: no conversion necessary.
collation: appropriate Canon PJL instructions are added.
stapling: any Lexmark stapling instruction found leads to a Canon PJL instruction for stapling on the long edge being added. Note that stapling_landscaped will be stapled on the top right instead of top left.
simplex/duplex: PCL-XL instructions are kept except for portrait/duplex, in which case vertical and horizontal binding are switched.
input tray selection: tray ids for non-standard trays are replaced in PCL XL:
tray 3: 253 → 18
tray 4: 254 → 19
tray 5: 255 → 20
Add Ricoh-to-Canon conversion (BETA): converts commands from a Ricoh PCL XL driver for output on Canon devices. Still in a beta version. If this command is added, the following commands are converted:
color mode and bw: works via print rule and at the device.
stapling: any Ricoh stapling instruction found leads to a Canon PJL instruction for stapling being added. Eco stapling is possible but only CPCA.
4x Punch: is supported for long edge left and top in landscape mode. Currently, in the beta version, the document is punched twice.
simplex/duplex: instructions are converted correctly.
input tray selection: trays are converted correctly.
Multiple actions and conditions can be added to the same rule. If all specified conditions are met, actions will be performed.
By pressing ROOT in the editor, you will get back to the rule overview. If the rule that you just created is valid, a check mark will be shown above it. If not, a red X is shown.
To apply the changes, click on Definition and then on Save.
In this way, multiple rules can be set. They are evaluated starting from the first rule on the left. If a rule is applied and the end action is executed, the remaining rules are automatically skipped. For further details, refer to Incoming Print Rules section.
Hint
Usage example:
Participating Character(s): Andrea Formaggio and Ted E. Bear.
Printing rules: Color to B&W. Less then 10 pages → end.
Andrea Formaggio cares about the environment and economy so he decided to assign some print rules to his coworker Mr. Ted E. Bear who is notorious for printing every e-mail he recieves. Also, Ted likes to print in color even if it is not necessary. With the rules that Andrea Formaggio created, Ted cannot do this anymore. Whenever Ted sends a printjob in color, it wil be printed in black & white. Also, he can print a maximum of 10 pages per day. After this limit no print jobs will be performed until the reset.
Print Job Analyzer
The print job analyzer is a Java library based software that helps parsing and modifying print jobs. In a lower level of abstraction, a printjob can be seen as the output of a printer driver, e.g. PostScript or PCL 6 code and therefore handled by the analyzer.
Information the parser collects are:
Page description language (PDL),
Number of pages,
Number of copies,
Simplex/duplex (tumble),
Color model (a job printed using RGB code charts or CMYK color model that might contain only shades of gray),
Media source index (if a print job uses several different media source index, only the first one is reported),
Media size (paper format) and
Document name, username from PJL header, if search patterns are provided.
Print job settings that can be modified:
color to grayscale,
simplex to duplex,
media source substitution,
number of copies, collation mode (PJL to PCL6 only) and
document name and username anonymization in PJL header if search patterns are provided.
Warning
The features print job analysis and modification are not available for PCL 5 print jobs.
Supported input format and output devices
The library supports print jobs that use the following languages:
PJL,
PostScript with certain DSC comments,
PCL XL (PCL 6 without any PCL 5 code),
CPCA (Canon) with PostScript or PCL XL embedded and
Prescribe (Kyocera is not analyzed. It can be discarded in order not to affect the compatibility with other vendors, refer to the Spooling Print Rules section - Remove Prescribe spooling Action)
All the PostScript drivers known include the necessary DSC comments.
The following table shows manufacturer support for print job manipulation.
Manufacturer |
PostScript |
PCL XL |
|---|---|---|
Canon |
+ |
+ |
Kyocera |
+ |
+ |
Lexmark |
+ |
+ |
Ricoh |
+ |
+ |
Samsung |
+ |
+ |
Xerox |
+ |
WorkCentre, ColorQube others: lower performance |
Limitations
Canon
Some CPCA drivers: Duplex/tumble are reported as duplex/non-tumble.
Konica Minolta
Konica Universal Print Driver PostScript (2.60.0.0): changing the number of copies, they are always printed uncollated.
Kyocera
Kyocera Classic Universal Driver PCL 6 (1.53): the number of pages and copies is not correctly reported – n copies of m pages is reported as n × m pages.
Kyocera Classic Universal Driver PostScript (2.9.3): media source translation does not work.
Kyocera KX Universal Driver PostScript (6.1.1413): print jobs are correctly read but the analysis of some properties is not correct.
Samsung
Samsung Universal Print Driver PCL 6 (2.50.05.00:10): the number of copies cannot be detected or changed if the driver is configured as “Generic Color|Mono Printer PCL 6”.
wrong: the number of copies can be detected for PCL6 mode if the collation is off, as a follow up force collation does not work, remove collation sets number of copies to 1.
Samsung Mac PostScript driver for CLX-92x1/93x1 (1.26.01), possibly other Mac PostScript drivers: the number of copies cannot be detected or changed.
Xerox
WorkCentre 6400 (other model can be included): duplex enforcement on a duplex/tumble print job results in duplex/non-tumble output.
User Mapping

In the User Mapping section it is possible to map all usernames that are not in the active directory and/or users that are not in the authentication providers. Furthermore, it is possible to choose a target username to allow the user to print and to account the print job to the target username.
To create a new user mapping, press New and fill in the following fields:
Source Network: the hostname or IP Address from which the source username is coming from.
Note
Using the symbol "*" in the Source Network, means that any hostname or IP Address is valid.
Source Username: the username of the user that sends the print.
Target Username: the username of the user that authenticates on the MFP and performs the print (the print is accounted to the target user).
To save the new user, press Save and Close. To discard, press Back and press again Back to confirm. To delete a single user, select the user and press Delete. To delete all users, press Delete All. To import users, press the Import button and then select the following options:
Update existing records: if enabled, the existing records are updated with the not existing users listed in the .csv file.
First line contains headers: if enabled, the first line of the .csv file, that contains headers, is not imported.
Then press the Upload button, choose a csv file and press Open. Once uploaded, press the Close button.
To export the user mapping, press the Export button and a csv file is downloaded.
Hint
Usage example:
Participating Character(s): Joy Full
Joy Full prints her pay slip, the print is coming from a legacy server as "j.full". The source username "j.full" has been mapped and the target username is "joy.full" (that is a user that exists in the active directory). Joy Full authenticates on the MFP as "joy.full" and prints her pay slip. The print is accounted to the target username "joy.full".
Mobile Print
This feature allows to print user's email together with pdf attachments.
The Genius Server supports two ways of receiving email: SMTP or the polling system.
SMTP server
The Genius Server behaves like a SMTP server that is listening to a configured port, which receives emails.
To enable this feature, go to Configuration tool -> Advanced -> Printing -> Mail printing -> SMTP Server enabled and configure the relay server for redirecting the printed emails to the Genius Server.
How to use mail printing by SMTP mode
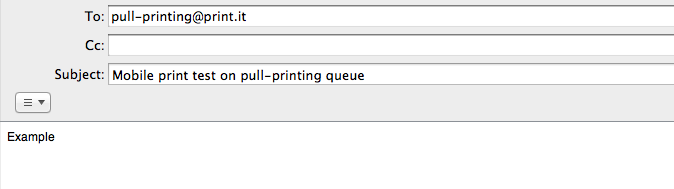
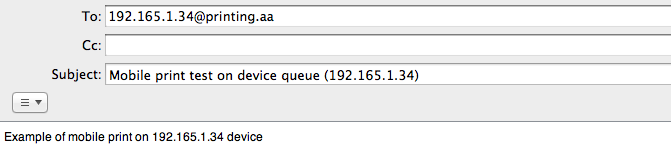
Prepare an email (pdf attachment if necessary) using your client mail. The email is sent to "<name-queue>@<domain>":
<name-queue> is the name of a direct queue or pull printing queue, which receives the print job (e.g. pull-printing).
<domain> is an invented domain (e.g. print.ww).
The formats supported by the mail printing function are:
.doc
.docx
.pdf
.ppt
.pptx
.xls
.xlsx
.txt
.html
.eml
Furthermore, it can transform the body of the mail in a PDF document.
The relay server forwards the mail to the Genius Server.
Polling system
The Genius Server can receive emails polling a mail server through IMAP protocol.
To enable the polling system, go to Configuration tool -> Printing -> Mail printing section -> Uncheck the SMTP server enabled box, the go to Genius Conf -> Multitenant -> Tenants -> select the tenant -> Configure -> Switch to Advanced -> Base -> Printing -> Mail printing -> check the Polling enabled box.
Add the information for IMAP protocol in order to interface with a mailbox (for further details, refer to the installation and configuration manual).
Send emails to print to that mailbox. Type the printing queue name in the subject field of the email.
TCPConv mapping
TCPConv is a card reader that contains a software, which is directly linked to the server and is able to solve printing problems related to a network printer without the control panel.
TCPConv adds a device, which is equipped with a USB interface into your local area network (LAN). A typical application is the extension of a network device (i.e. a network printer) by a local peripheral device. Simply enter TCPConv into the existing LAN connection of your device. In order to do so, TCPConv contains two LAN ports, which operate as a network switch.
According to the settings configured in Configuration tool, TCPConv can print either the last pull printing job or all the pull printing jobs sent to the queue. Once the TCPConv has been enabled in Configuration tool (for further details refer to [Advanced] TCP Conv), go to Print Management in the TCPConv Mapping.
In the list, information on both the TCPConv and the device is shown:

TCPConv Address: IP address of the TCPConv.
MFP Device Address: IP address of the MFP Device.
MFP Device Serial Number: serial number of the MFP device.
MFP Device Vendor Number: vendor number of the MFP device.
MFP Device Type: the device with which TCPConv is associated.
To configure the TCPConv, press the New button and fill in the following fields:

TCPConv address: IP address of the TCPConv.
MFP Device: the device with which TCPConv is associated. Click on the Magnify glass icon and select the device.
Login Type: the type of login the user can perform. it is possible to chose between the following ones: * CARD_LOGIN: the user can authenticate swiping his card. * PIN_LOGIN: the user can authenticate entering his PIN.
To save, press the Save and Close button.
The association is not editable and the TCPConv cannot be associated with more than one MFP device at the same time. To change the association, select the TCPConv address from the list, press Delete to delete the previously association and the Delete button again to confirm.
PC Client
This section delivers details on the status of the connected PC Client devices, i.e., the PCs of the users with a running Genius PC Client that is connected to the Genius Server.
The columns describe the:
Unique identifier: this is the unique identifier of the user's PC.
Base REST URL: the base REST URL of the Genius PC Client of this user. Can be used to check if the user's PC can be reached.
Status: the status of the Genius PC Client. It can be CREATED, REACHABLE or UNREACHABLE. CREATED is for a freshly created Genius PC Client, while REACHABLE shows if the Genius PC Client is reachable. UNREACHABLE on the other hand shows, that the client currently is unavailable.
Unreachable reason: the reason as to why the Genius PC Client is unreachable. NONE will be shown for devices that are reachable or freshly created.
Refresh date: shows the latest refresh date, i.e., when the Genius Server and the Genius PC Client tried to communicate the last time.
All of the above are filter options, to search for specific devices. The Refresh date can be filtered as "show only devices before date X" (Refresh date (before)) and "show devices only after date X" (Refresh date (after)).