
Accounting
The accounting module processes data from printed documents and validates user sessions.
To make this feature work, install the Genius Client on an MFP device, so that it can interact with the Genius Server as soon as a user authenticates on that device.
The accounting process is composed of:
Start session: a session starts when a user logs in on a device. During the session, the device is locked.
Initial counter reading: when a session starts, the system tracks the current value of device counters.
Printing: a user prints documents.
Final counter reading: at the end of the session, before closing it, the system tracks the new value of device counters.
Close session: the session is closed.
Session
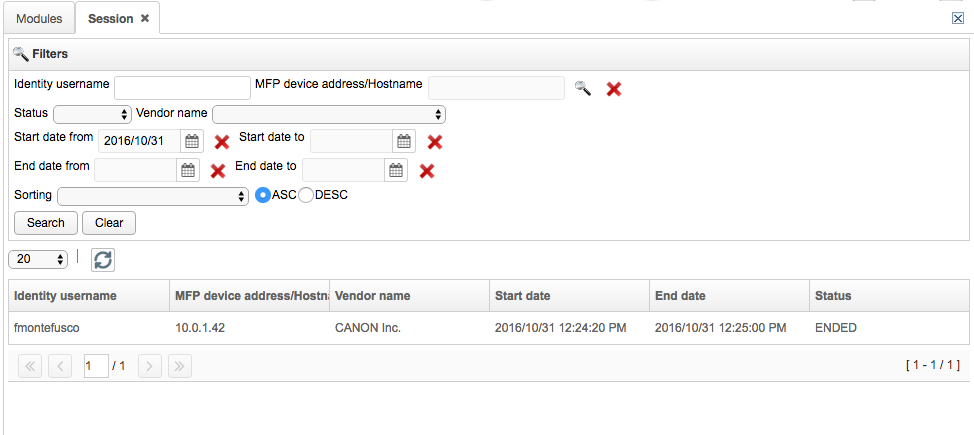
Device accounting session collects information on the user interactions with devices.
Collected information for each session are:
Identity Username: identity name to which the session refers.
MFP device address/Hostname: IP address or hostname of the device.
Vendor name: device vendor.
Start date: session starting date and time.
End date: session ending date and time.
Status: session status. It can be:
IDLE: the moment in which a user has just logged in and the counters are being read. Immediately after, the status changes into STARTED.
STARTED: a user is logged on the device, the session is started, the device is locked and the counters are read.
ENDING: the session is closing and the system is reading counters.
ENDED: a user is logged out, the session is closed, the device is unlocked.
ERROR: an error occurs in the session (e.g. the printer switched off when the session has been opened).
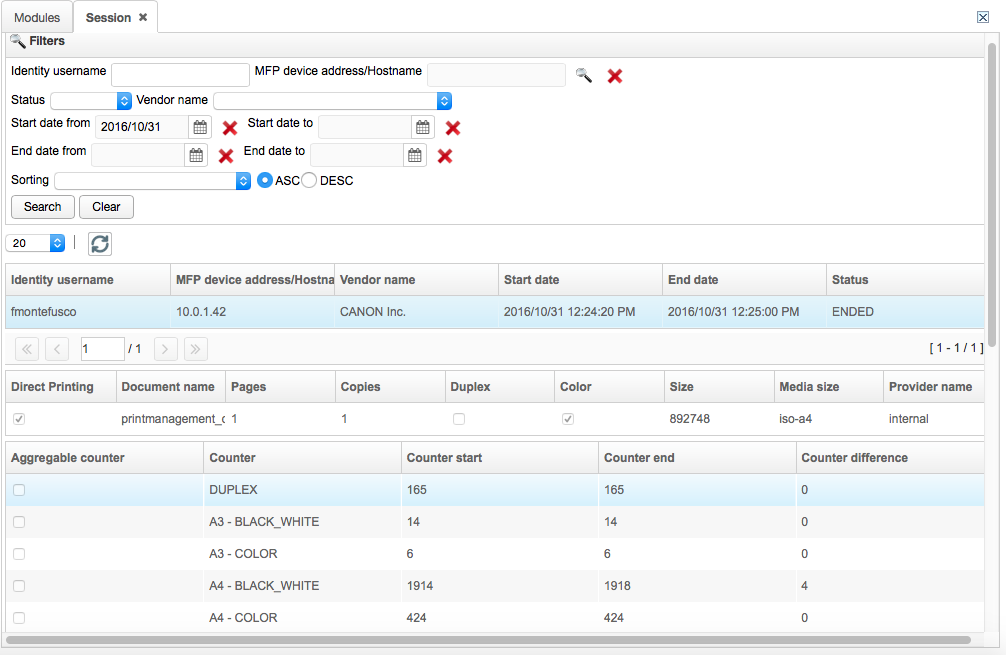
Other information related to the session regards the device counters. These are:
Aggregable Counter: the counter is considered in the pivot table.
Counter: the type of the counter (A3 Color, A4 B/W. etc).
Counter start: the counter value when the session starts.
Counter end: the counter value when the session closes.
Counter difference: the counter shows the difference between the starting counting value and the last read.
Pivot Table
The pivot table collects information about identity printing activities and permits to estimate the printer usage. Values in the table are aggregated by an ETL engine that provides aggregation of data at scheduled times. Configure the scheduler in Genius Conf ->Multitenant -> Tenants -> select the tenant -> Configure -> Switch to Advanced -> My Module -> Accounting -> Base -> Accounting ETL execution cron.
Data managed by the pivot table are listed below:
Color and Black & White counters: number of printed pages (color and Black & White).
Counter function: type of function (Print, Copy, Scan, Fax reception, Fax transmission).
Counter side: paper side (Single or Double side).
Counter media: paper format (A4, A3, A5, B4, B5, Folio, Ledger, Legal, Letter, Dlt).
Counter value: counter value (number of print jobs and copies).
Information about devices are:
Device vendor number: vendor number provided by the device manufacturer (e.g. for Ricoh is "367").
Device serial number/vendor: serial number and vendor number of the device.
Device address/hostname: IP address or hostname of the device.
Device cost center: cost center assigned to a device.
Device active: the amount of active devices.
Information about identities are:
Identity cost center: cost center assigned to an identity.
Username: identity username.
Other information:
Date: function counter measurement, identity's activity on printers, grouped by date.
Usage
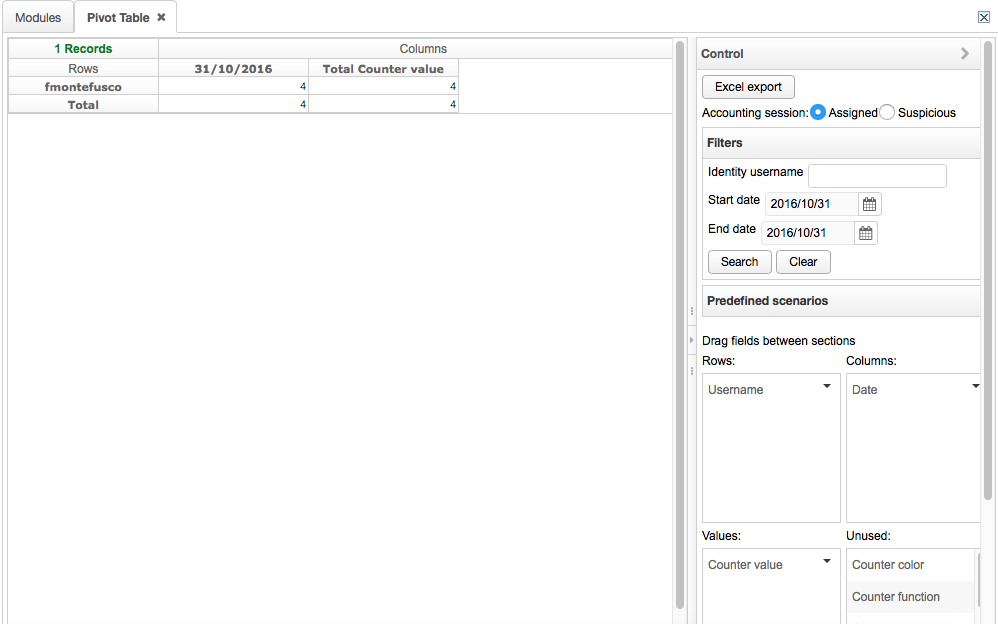
This paragraph explains how to use the pivot table and helps the administrator create their own custom results. To generate a pivot table, use the control palette on the right.
The palette consists of:
Excel export: a button for exporting results in Excel documents.
a filter section, which is used to filter pivot table results by:
Identity username: the user's ID.
Start date: by default, the current date.
End date: by default, the current date.
Note
To clear the search fields, press Clear. To visualize the table, press Search.
Predefined scenarios: customizations used to display results. They are of three kinds:
Global identity/date: the default scenario which shows highlighted information on all the identity activities and on which date.
Global device/date: highlighted information on the devices used and on which date.
Global device/identity: highlighted information on the devices used and the identity's activity.
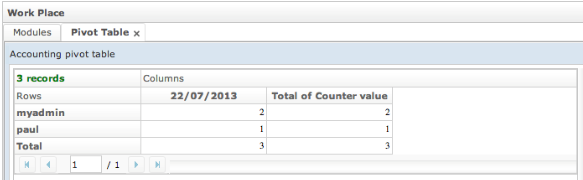
Users can show all data collected by the system and group them by date, device vendor number, paper size, color, etc. In the pivot table below the fields on column section displayed are: Date, Device vendor number, Counter media and Counter color (field order modifies the table visualization).
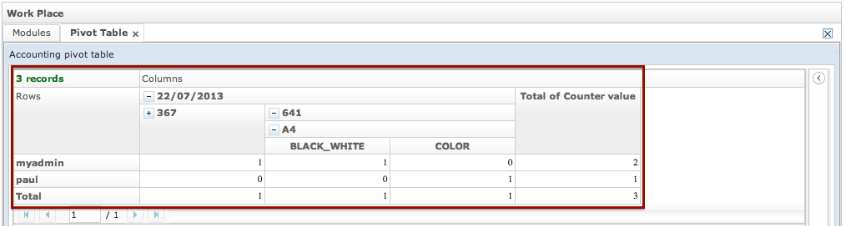
On the Rows box the identity name (Username field) is added and the value is the Counter value.
Note
To put an unused field into a section, drag and drop the field to the desired section.
Remote
Using the Remote Accounting module, the server monitors how many documents a user prints on printers which are not network printers, and therefore cannot interact with Genius Server. At the same time the server processes data from these documents. This kind of printer is directly connected to user's PC through a USB cable.
To make this feature work, install a Printing Agent on user PCs. This agent tracks all the documents a user prints, retrieves the information, and sends it to the Genius Server in which they are stored.
To enable the Remote Accounting feature, take the following steps:
Configure the Genius Server.
Install the agent on the user's PC.
Allow the interaction between the Genius Server and the agent configuring the IP address of Genius Server in the agent itself. For further detail, refer to the Genius PC Client manual.
Go to Configuration tool -> Configuration -> Advanced -> MyModule -> Accounting -> Remote Accounting and enable the Remote accounting box.
To save, press the Save button and OK to confirm. Now press the Show All button, then Home. The remote accounting is now configured and enabled. To have the new feature displayed on the Genius Server, restart the server you are working on. At this point go to Web Admin Console -> Accounting -> Remote, a list of configured agents with their information opens:
Submitted date: date and time of the printing.
Username: the user who performs the printing.
Document name: the name of the printed document.
Source Host: the PC from which the print job has been sent.
Color: how the job is printed, if in color or in black and white.
Media size: the size of the page (A3, A4, etc.).
Media side: how the job is printed, if in simplex or in duplex.
Number of copies: the number of copies printed.
Number of pages: the number of pages of the document.
Document size: the size of the document in KB.
Device name: the name of the printer.
Note
If the driver cannot provide one or more piece of information about the counters, it is displayed as NOT-AVAILABLE.
Limitations
The remote accounting has some limitations:
All the documents sent to a printing queue are traces, including documents which are sent to a virtual printer to create a .PDF (e.g. PDF converter). A distinction can be made reading the Device Name in the Remote Accounting list. Otherwise, to get around the problem, the admnistrator can apply a regular expression not to have .PDF and .XPS documents counted among the printed documents. To enter a regular expression go to Configuration tool -> Configuration -> Advanced -> MyModule -> Remote Accounting -> Remote accounting regex blacklist.
The name of the printer is not univocal: the user can change the name of the printer so that his print jobs result as printed on different devices, even if it is only one.
The displayed information is the one provided by print drivers and Windows. It means that user's selections are displayed on the list, even if the printer does not actually meet the needs of the user (e.g. if a user sends a document to be printed in color but the printer only prints in black and white, the information displayed on the list is COLOR).
Contingent
Using this module, users can assign a price list to devices, defining prices for color and black & white pages. Users have a customizable monetary limit, and different actions can be taken when they exceed their budget.
Before you use the contingent feature, enable it in Configuration tool, and check the Enabled boxes in Accounting (MyModule part), in the contingent section.
Pricelist
A price list contains prices assigned both to black & white and color pages and can be associated to one or more devices.
How to define a price list and assign it to devices?
To create a new price list, press the New button.
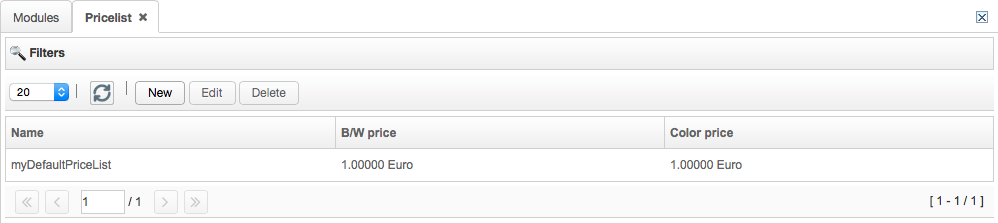
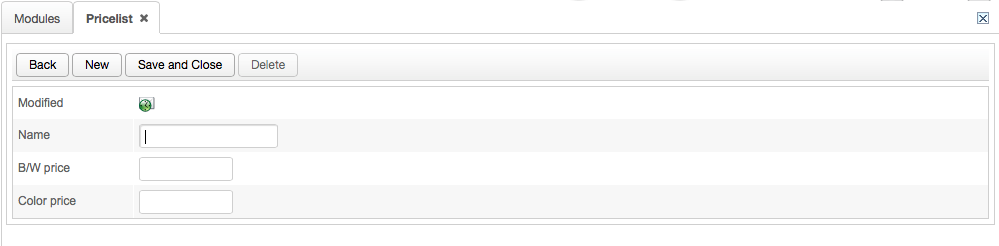
Add price list information:
Name: name of the price list.
B/W price: the quoted price in current currency for black & white pages. Set the current currency Genius Conf -> Multitenant -> Tenants -> select the tenant -> Configure -> Switch to Advanced -> Accounting -> Contingent section.
Color price: quoted price for color pages. Set the current currency in Genius Conf -> Multitenant -> Tenants -> select the tenant -> Configure -> Switch to Advanced -> Accounting -> Contingent section.
To impose a limit on the quantity of printed pages irrespective of color and black and white, users can create a generic price list and assign the value "1" to Black & White and color prices.
To Save, press the Save and Close button.
How to add devices to a price list?
Select a price list clicking on it.
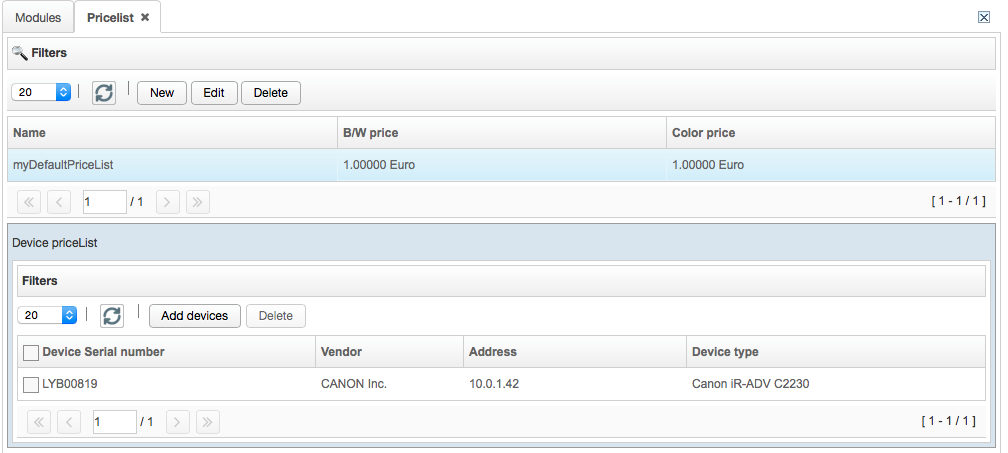
Press Add devices.
Click one device or all devices and then press Select button.
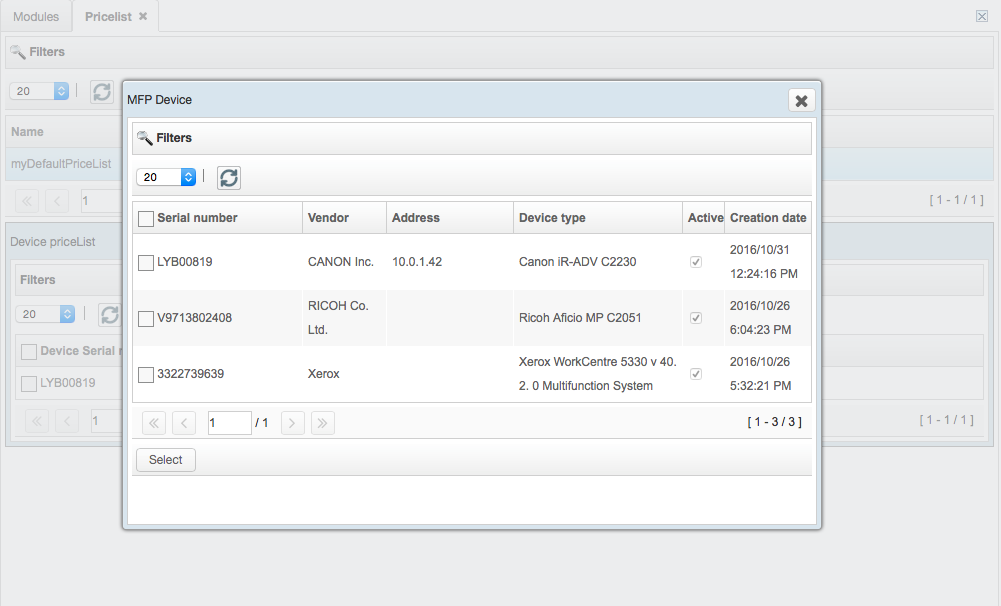
Press OK or X to close the information window.
An information summary opens:
To edit a price list, select an item and press the Edit button. To delete a price list, select an item and press Delete button.
Definition
A contingent definition is used to assign a maximum cost threshold per identity. Users can define different actions when the credit contingent is exhausted.
How to create a new contingent definition?
From the menu bar, press Definition:
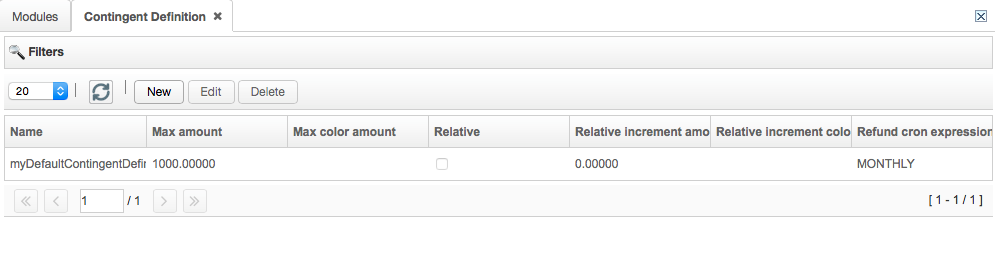
Press the New button
Add information on the definition:
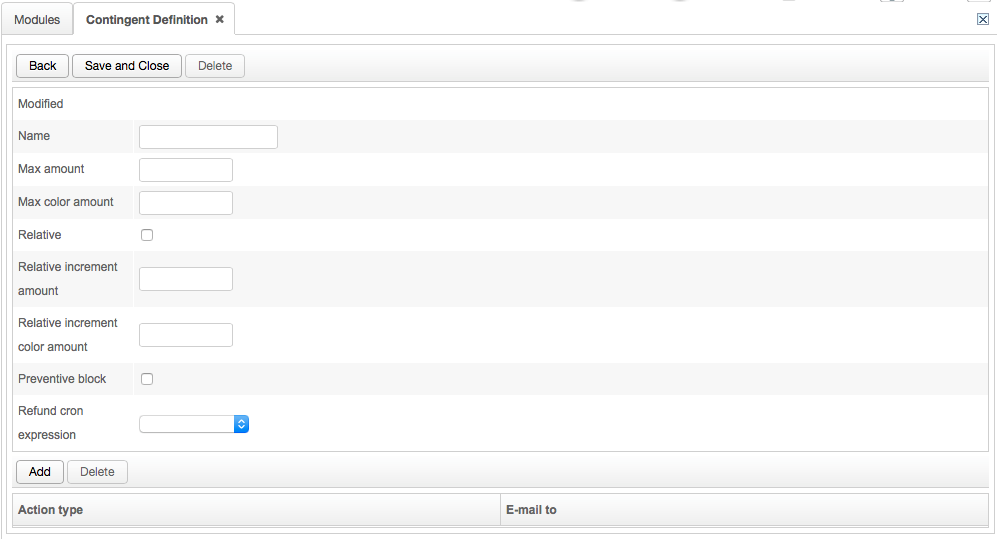
Name: name of the definition.
Max amount: max. value of the credit amount, which is quoted in current currency. Current currency is modifiable in Configuration tool -> Accounting module -> Contingent section. The remaining amount value cannot exceed the limit of the maximum amount.
Max color amount: max. amount of color copies and prints available.
Relative: if checked, it enables the relative increment, or rather the refund value of the credit amount, which is specified in Relative increment amount field. If Relative is unchecked, the refund resets the credit amount to the maximum amount.
Example:
- Relative enabled:
On February, an identity has a credit of 10€.
The relative increment amount is 100€, the max amount is 1000€, the refund is every month.
On March, the remaining amount is 110€. If on February there is a debt of -10€, on March the remaining amount is 90€.
- Relative disabled:
On February, an identity has a credit of 10€.
The relative increment amount is 100€, the max. amount is 1000€, the refund is every month.
On March, the remaining amount is 1000€.
Relative increment amount: if the Relative field is checked, it enables the increment value added to every identity's remaining amount. Identities amount cannot exceed the max amount value.
Relative increment color amount: if the Relative field is checked, it corresponds to the increment value added to every identity's remaining color amount. Identities amount cannot exceed the max color amount value.
Preventive block: if checked, a print job is blocked if its total number of pages (=pages * number of copies) exceeds user's available amount. Copy jobs cannot be blocked by preventive block.
Refund cron expression: the scheduled time for credit refund. It occurs:
WEEKLY: weekly amount update, the refund is every monday.
MONTHLY: monthly amount update, the refund is every first day of month.
TWO_MONTHLY: bi-monthly amount update, starting from 1st January.
QUARTERLY: every four months amount update, starting from 1st January.
SEMIANNUAL: biannual amount update, starting from 1st January.
ANNUAL: annual amount update, starting from 1st January.
Press the Add button.
The action type screen opens: enable actions when a user's contingent is depleted.
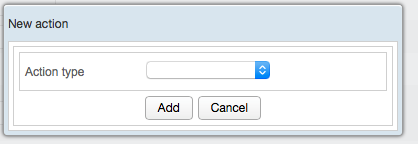
BLOCK: to block user's printing activity.
EMAIL_TO_USER: to send an email to the user.
EMAIL_TO: to send an email to a recipient who should be informed of the depleted contingent. Enter an email address.
Press the Add button.
To save, press the Save and Close button.
To edit a price list, select an item and press the Edit button. To delete a price list, select an item, press the Delete button, and then press Delete again.
Identity Account
Identities are entities who have printed at least once using the Genius Server. Entities can be both users from internal or external providers and unregistered users.
Using this section, contingent definitions can be assigned to identities. MyDefaultContingentDefinition is set as the default definition for each identity.
How to change a definition assigned to an identity?
From the menu bar, press Identity Account.
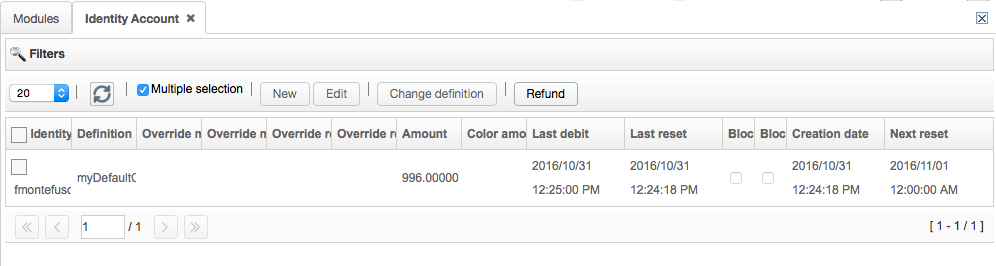
Select the identity row and click on Change definition.
Click on the definition row and press Select.
Press the OK button.
How to edit a user identity?
Uncheck multiple selection.
Select the identity row and press Edit.
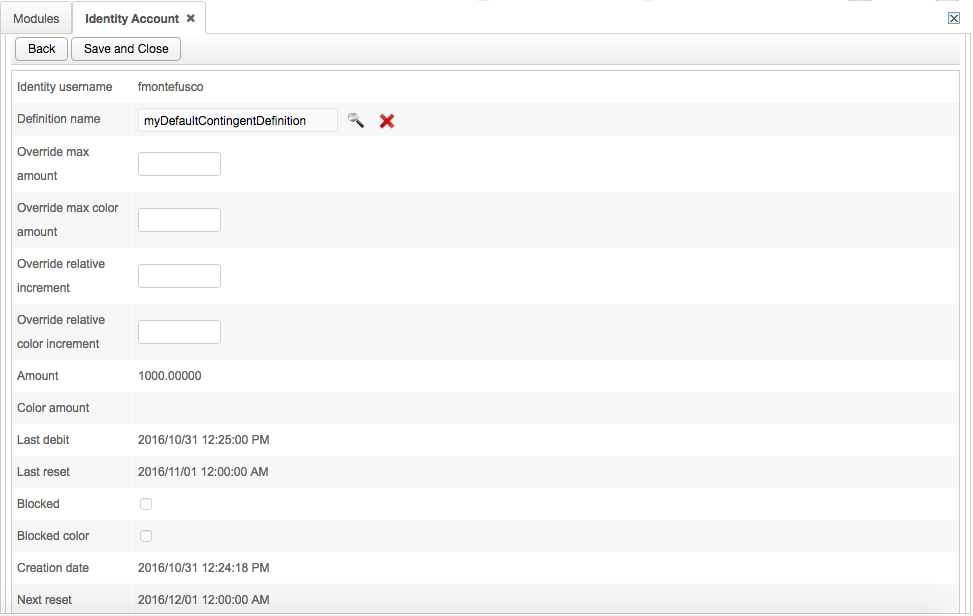
Add information on the identity:
Identity username: name of the identity.
Definition name: name of the definition.
Override max amount: max. amount to be overridden.
Override max color amount: max. color amount to be overridden.
Override relative increment: relative increment to be overridden.
Override relative color increment: relative color increment to be overridden.
Amount: identity's credit amount.
Color amount: identity's credit color amount.
Last debit: date of the last identity debit.
Last reset: date of the last identity amount reset.
Blocked: if checked, the user cannot neither print nor copy.
Blocked color: if checked, the user cannot neither color print nor color copy.
Creation date: date of the identity account creation.
Next reset: date of the next identity amount reset.
To save, press the Save and Close button.
Manual User Refund
It is also possible to manually refund a user. To do this, the administrator needs to:
If multiple users need to be refunded at the same time, check: multiple selection, else it's optional.
Select the identity you wish to refund and press the Refund button.