
Authentication management
Users can authenticate in three different ways, using
Username and password: credentials associated to a user and directly entered on the MFP.
a Card: a card reader needs to be connected to a Multifunction Printer (MFP). The card reader compatibility is for RFID technology and for vendors as EM, ATMEL, NXP, ST, TI, HID, LEGIC, INSIDE etc. according to ISO 14443A, ISO14443B, ISO15693 eISO18092/ECMA-340 (NFC) standards.
a PIN: a numeric code associated to a registered user. The PIN is entered directly on the MFP.
Hint
There is also a fourth possibility: the strong authentication, which is not active by default. It needs to be activated insider the Configuration Tool and leads to an authentication method where the user has to swipe their card and enter a specific card pin, in order to login.
Users can be registered both on internal and external providers. External providers are the Active directory, databases or can be based on LDAP. These providers allow the user to authenticate after they are configured in the Configuration Tool.
An internal provider works as well as an external provider except for the authentication, which is internal, and for the data, which are stored in the Genius Server database.
Internal providers are useful both for small companies that do not have an external authentication system and to track external users who work for a company (e.g. consultants, collaborators).
Note
The default provider is internal, therefore the Genius Server uses this kind of providers if external providers are missing.
Note
A user authenticates first on a provider, then on another. The provider order is set in Configuration tool.
Identity
Identities are a set of information that describes user's interaction with the system, e.g. when a user prints a document, she starts a BPM task or logs in.
Identities can be added to one or more groups, and a group (refer to Provider Group) can be defined in internal or external provider.
Identity Used
The "identity used" section shows a list of users (internal, external or unregistered), which have interacted with the system. After the first interaction between a user and the system, the list is automatically compiled. Once the user is on the list, he cannot be removed from the list. Identities' details are:
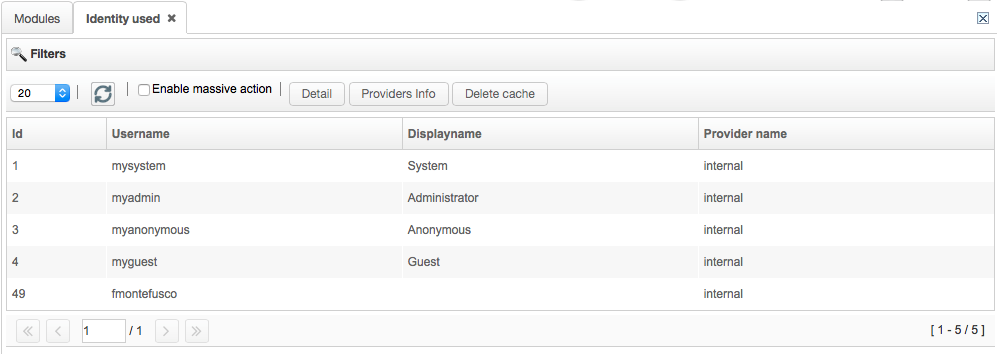
ID: numeric user ID.
Username: name of the user.
Display name: name to be display.
Provider name: provider type. It can be internal or external.
To visualize more details, select an identity and press the Detail button. Further details displayed are:
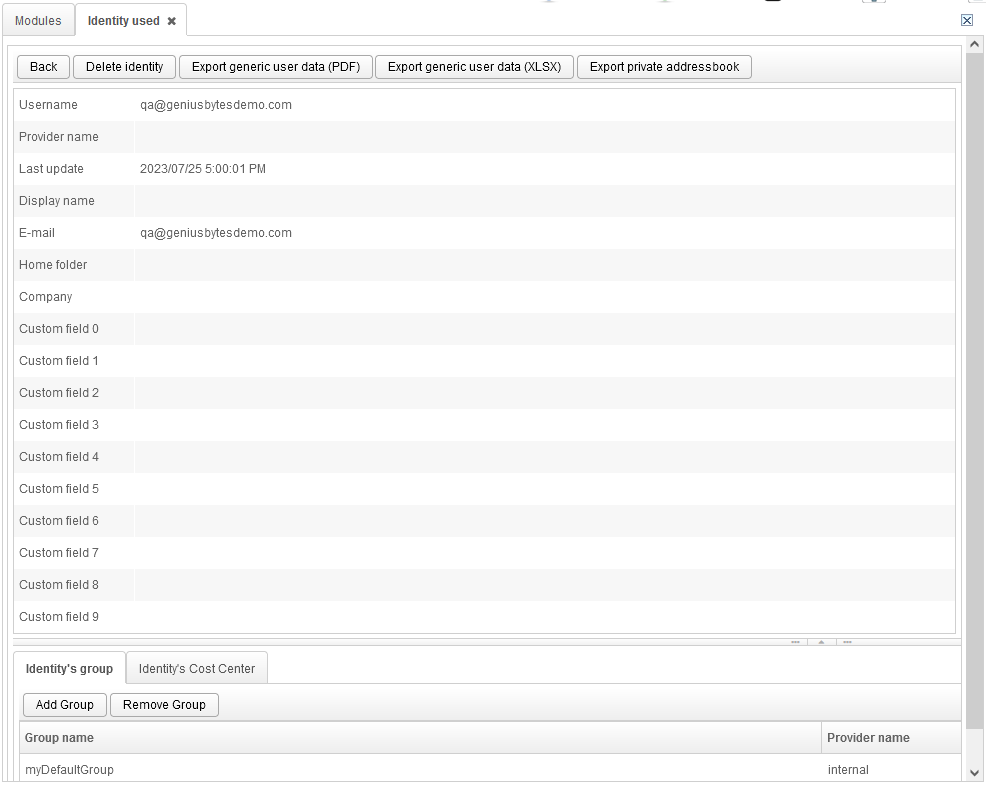
At the top of the screen you can see the buttons: Back, Delete Identity, Export generic user data (PDF), Export generic user data (XLSX) and Export private addressbook.
The Back button brings you back to the overview.
Delete Idenity deletes the selected identity.
With the Export generic user data button, either a .pdf oder an .xlsx file is created which contains all userdata visible on the details page, as well as the number of PINs or cards registered to that user. Of course no passwords/PINs/cards are shown due to security reasons.
With the Export private addressbook button, a .pdf file is created which contains the addressbook of that user.
Username: username for the authentication.
Provider name: authentication provider type, which is internal or external.
Last update: the date of identity's last update.
Display name: the name which is displayed.
Email: email address.
Home folder: name and path of the home folder.
Company: the company that the user belongs to.
Custom field 0-9: customizable fields to fill in:
External provider (values are set in Configuration tool).
Internal provider (values are set when a new user is created or edited).
At the bottom of the page, two additional tabs can be viewed:
Idenity's group tab shows to which groups the identity belongs. Note that it is also possible to add and remove internal groups by clicking the corresponding buttons add group or remove group.
Identity cost center shows the cost center(s) of the user. Additionally it is shown which cost center is the default for that user.
Caching Mechanism
To minimize time during the authentication process, the Genius Server collects user's information (except for password, card and PIN) that is on the provider. To ensure the upoloading of the information, a Genius Server service cancels caches at scheduled times. If provider data change frequently, the administrator should increase the refresh rate of the data cache. The timing for schedulers can be set in the Configuration Tool at -> Advanced -> Authentication -> Identity details -> Cache lifetime in minutes. For details on the topic of schedulers or cron expression, please refer to the corresponding chapters inside this manual. For internal users, a change on user's information field involves the automatic cache deletion.
Note
To delete caches manually, check Enable massive action, select the user(s), press the Delete cache button and then confirm. User's information is updated during the following interaction of the user to the system.
Card
Card tokens are associated to a user identity. Cards are assigned to users by the Web Console administrator or by the automatic card registration on printers (MFP). To enable the card registration on a MFP, go to Configuration Tool -> Authentication -> Card -> Creation card from client enabled. If the property Delete existing on new card in Configuration Tool -> Authentication -> Internal users is enabled, a user can have only one card stored in the system (if a new card is created, it replaces the old card token association). Otherwise, a user can have more than one card stored in the system.

Token: alphanumeric code of the card token which is associated to the user.
Card PIN: the numeric code associated to the card.
Username: the name of the user. Press the magnifying glass to have the list of internal cards associated to users displayed:
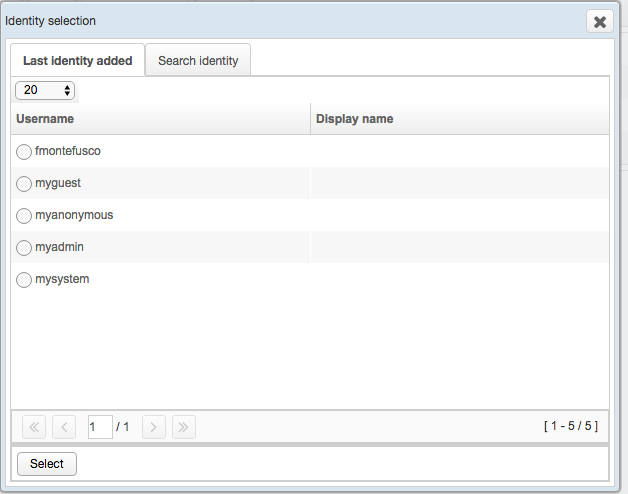
In this way, administrators can assign a card token to a user of the internal or external provider.
Note
The searching is performed with the LIKE operator. For the internal provider, the search is case sensitive. For the external provider, it depends on the provider configuration.
Registration date: the date of the card registration.
To add a new card, press the New button, and fill in the configuration fields:
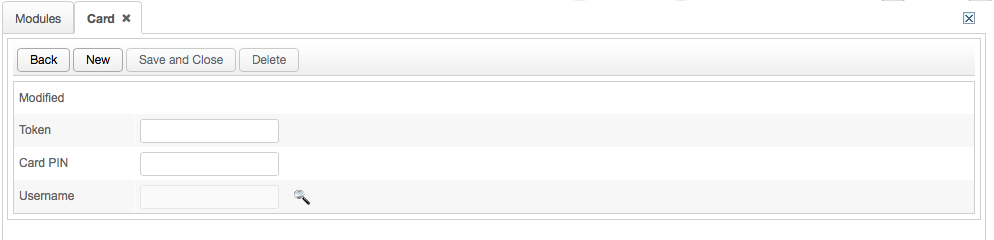
To edit a card, select the card, press the Edit button, and modify the fields required. To delete a card, select the card, press the Delete button, and Delete again to confirm.
PIN
A PIN is a set of characters (alphanumeric and special characters are allowed), which are associated to a user identity. A PIN can be created using the Administrator Web Console or directly on the MFP if the setting CREATION_PIN_FROM_CLIENT is set inside the Configuration Tool (MyModule -> Authentication -> PIN). A user can have more than one PIN stored in the system.

Token: alphanumeric code which is associated to the user.
Username: the name of the user. Press the magnifying glass to have the list of internal PIN associated to users displayed:
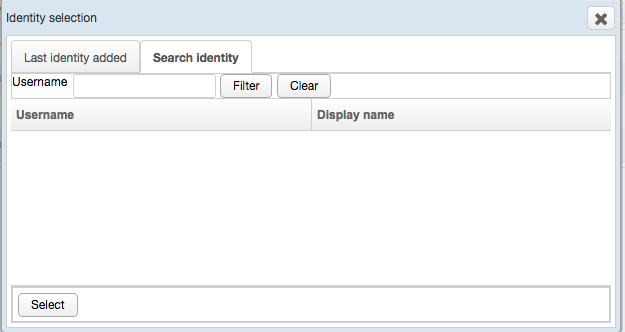
In this way, administrators can assign a PIN to a user of the internal or external provider.
Note
The searching is performed with the LIKE operator. For the internal provider, the search is case sensitive; for the external provider, it depends on the provider configuration.
Registration date: the date of the PIN registration.
To add a new PIN, press the New button, and fill in the configuration fields:

To edit a PIN, select the PIN, press the Edit button, and modify the fields required. To delete a PIN, select the PIN, press the Delete button, and Delete again to confirm.
Grant
Permission grants are privileges assigned to groups of users or groups of MFP devices to enable them to use special Genius Server features and functionalities. Generally, a grant has one or more Roles assigned (e.g. the BPM administrator role).
Users can define a custom grant and assign the desired Roles to it.
The default grants are:
myAdminGrant: administrator's privileges.
myDefaultGrant: default user's privileges.
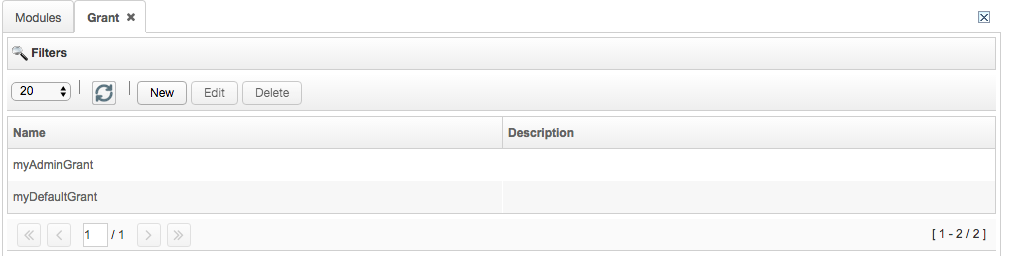
To edit a grant, or to assign roles to the grant type, double click on it or select it and press the Edit button.
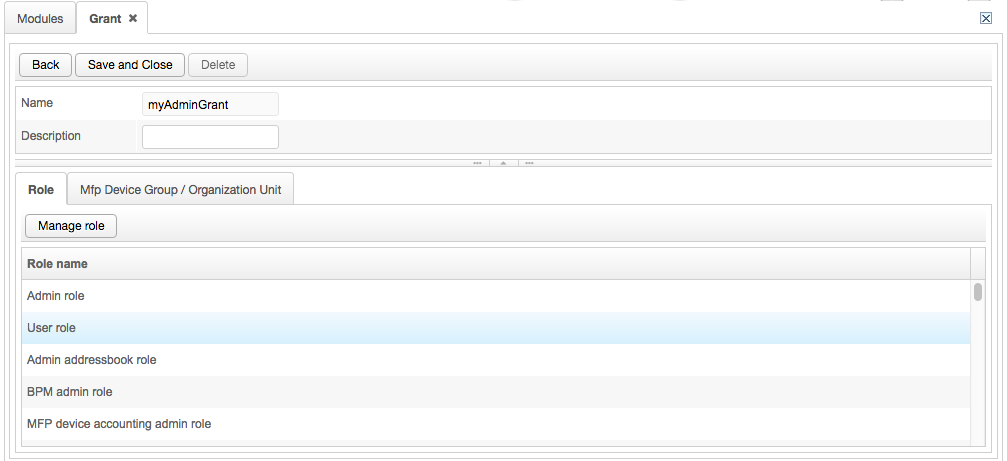
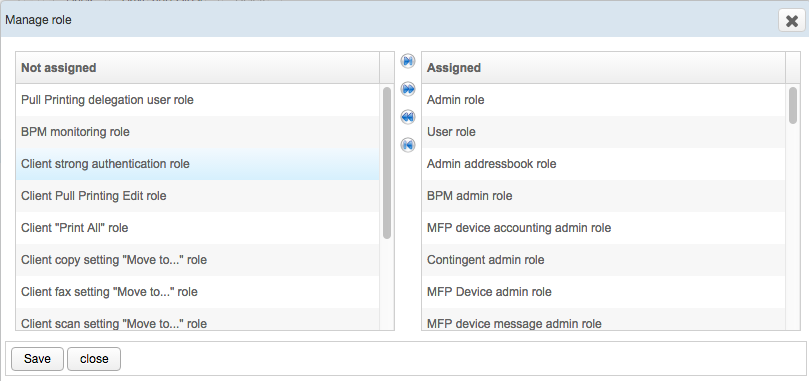
To add or remove Roles, press the Manage role button in the Role tab. Select roles to add from the list on the left side and the ones to delete from the list on the right side. To save changes, press the Save button.
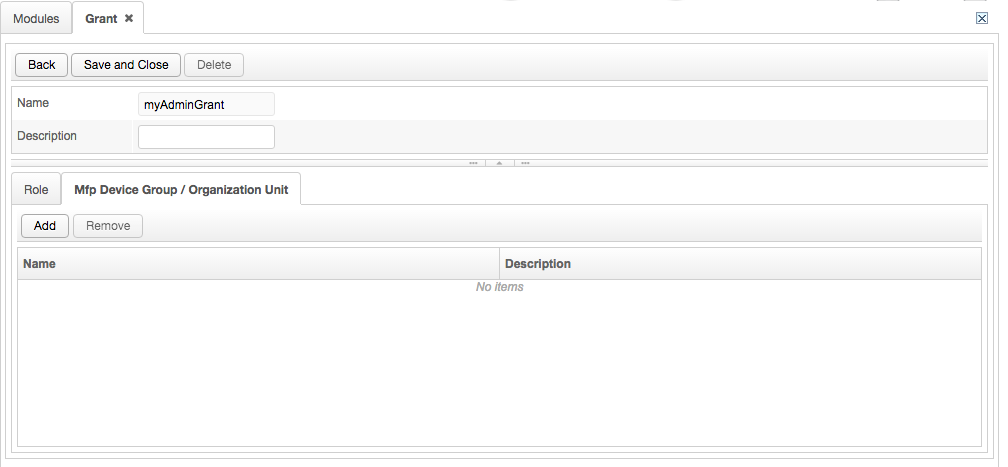
To assign grants to an Mfp Device group, click twice on the item in the grant type list and select the Mfp Device group tab. To define a group of devices, refer to the Device Management section.
Warning
Don't forget to press the Save and Close button once you finished all changes!
Restoring Default Grant
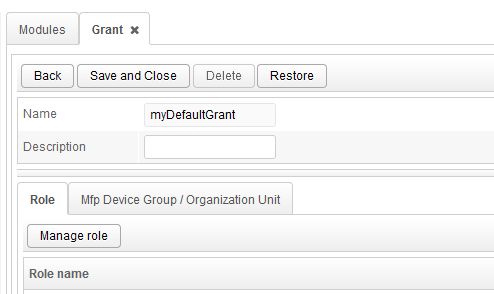
If changes have been made to the default grant and you want to restore them to the original values, double click the myDefaultgrant and click on the button Restore. Genius Server will promptly reset the changed myDefaulGrant settings and reset them to the original values.
Roles
A role enables the usage of different Genius Server features (e.g. pull printing on devices or administration permissions). A role can be assigned to one or more groups.
User role enables all entries to generic users.
User accounting role on GWeb enables a user to visualize his own copy and print budget on the web client (Genius Web)
User addressbook role on GWeb enables a user to manage address book contacts on the web client (Genius Web)
User BPM role on GWeb enables a user to perform BPM process features on the web client (Genius Web).
User card role on GWeb enables a user to manage his own card(s) on the web client (Genius Web).
User PIN role on GWeb enables a user to manage his own PIN(s) on the web client (Genius Web).
User DMS role on GWeb enables a user to manage documents on the web client (Genius Web).
User notification role on GWeb enables a user to manage his own notifications on the web client (Genius Web).
User print role on GWeb enables a user to manage his own print jobs on the web client (Genius Web).
User direct print role on GWeb enables a user to manage his own direct print jobs on the web client (Genius Web).
User reporting role on GWeb enables a user to manage his own reports on the web client (Genius Web).
Client login role enables users to login on clients (MFP device, office, mobile).
Client strong authentication role enables users to use the strong authentication on MPF devices.
Client pull printing role enables the user to perform pull printing features on clients (MFP device, office, mobile).
Client pull printing in color mode role enables the user to perform pull printing features on clients (MFP device, office, mobile) in color.
Client MyTask role enables the user the visualization of BPM tasks on clients (MFP device, office, mobile).
Client new process role enables the visualization of BPM definitions on clients (MFP device, office, mobile).
Client print all role enables the user to use the Print All feature on MFPs. For further details, refer to the MyMFP manual.
Client monitoring role enables the visualization of monitored BPM processes (Task and definition) on clients (MFP device, office, mobile).
Client error log role enables the visualization of errors in BPM processes (Task and definition) on clients (MFP device, office, mobile).
Client copy color role enables the user to use the embedded color copy function on MFP devices.
Client copy BW role enables the user to use the embedded BW copy function on MFP devices.
Client fax role enables the user to use the Scan2Fax feature on MFP devices.
Client save settings role enables the user to save his own settings on MFP devices.
Client save language role enables the user to save the language on MFP devices.
Device BW print role enables native B/W print on MFP devices.
Device color print role enables native color print on MFP devices.
Device BW copy role enables native B/W copy on MFP devices.
Device color copy role enables native color copy on MFP devices.
Device fax role enables to use native fax on MFP devices.
Device scan role enables to use native scan features on MFP devices.
Device usb role enables to use native usb features on MFP devices.
Device Scan2USB role enables to use the native scan to usb feature on MFP devices.
Device Scan2Mail role enables to use the native scan to mail feature on MFP devices.
Device Scan2Folder role enables to use the native scan to folder feature on MFP devices.
Device print from USB role enables to print from usb devices using the native feature of MFP devices.
Device native browser role enables to access the native browser of MFP devices.
Device native settings role enables access to native device settings.
Device native home role enables access to the native home menu.
Admin role enables all entries to an administrator user.
Easy device admin role enables a device administrator to enter data.
Admin addressbook role enables an administrator user to manage the Addressbook Admin web interface.
Authentication admin role enables an administrator user to manage the authentication (refer to the "Authentication Management" section).
BPM admin role enables an administrator user to manage BPM web interface.
MFP device accounting admin role enables an administrator user to manage the Accounting web interface.
Contingent admin role enables an administrator user to manage the Contingent web interface
MFP device admin role enables an administrator user to manage MFP devices.
MFP device message admin role enables an administrator user to manage the alert messages of the MFP device.
MFP device monitoring admin role enables an administrator user to manage the monitoring of the MFP device.
Organization admin role enables an administrator user to manage the "Organization" web interface.
Print admin role enables an administrator user to manage the Print Management web interface.
Pull Printing delegation admin role enables an administrator user to delegate his pull-printing jobs (Admin section on the web interface). Delegated identity and Delegated group entries are displayed for printing in the left side menu.
Pull Printing delegation user to group role enables users to delegate their pull-printing jobs to user groups (Refer to the User section on the web interface).
Pull Printing delegation user to user role enables users to delegate their pull-printing jobs to other users (Refer to the User section on the web interface).
DMS admin role enables an administrator user to manage the documentation.
Reporting admin role enables an administrator user to manage the Reporting web interface.
BPM monitoring role enables a user to monitor BPM processes.
Service admin role enables an administrator user to manage Service features.
Licence admin role enables an administrator user to manage licences (refer to the License Management section).
Notification admin role enables an administrator user to manage notifications.
DMS super user role allows to work on all DMS documents and folders even if ACLs are present (refer to [Advanced] Data Confidentiality to enable this setting).
Client Pull Printing edit role enables to modify own or delegated pull printing jobs on the client.
Client Pull Printing History role enables the pull printing history on the client.
Client copy setting "Move to..." role enables the user to use the Move to modality on MFPs for copy settings.
Client fax setting "Move to..." role enables the user to use the Move to modality on MFPs for fax settings.
Client scan setting "Move to..." role enables the user to use the Move to modality on MFPs for scan settings.
Client feature "Move to..." role enables the user to use the Move to modality on MFPs for features.
Client "New feature folder" role allows the user to create a new folder on the client. This folder can be used to organize features. To move features into this folder the "Client feature "Move to..." role must be activated.
Client search role enables the "Search" feature on MFPs.
Client save global settings role enables the user to save settings on MFP devices.
Device "client custom 1" role enables access to a link to a custom application, see MFP Manuals for more details.
Device "client custom 2" role enables access to a link to a custom application, see MFP Manuals for more details.
Device "client custom 3" role enables access to a link to a custom application, see MFP Manuals for more details.
Device "client custom 4" role enables access to a link to a custom application, see MFP Manuals for more details.
Device "client custom 5" role enables access to a link to a custom application, see MFP Manuals for more details.
ROLE_ON_CLIENT_ACCOUNTING_DISABLED enables multitasking of MFPs, i.e. while user A performs a scan, user B can send a direct print job to the same device. Disables accounting.
User and Group Crypting admin role enables user and/or group hard disk data encryption.
ROLE_CARD_ADMIN enables access to the card authentication management page.
ROLE_CARD_VIEWER enables users with this role to view cards in the web overview.
ROLE_PIN_ADMIN enables access to the PIN authentication management page.
ROLE_PIN_VIEWER enables users with this role to view PINS in the web overview.
Reset System Grants
Users can reset myAdminGrant or myDefaultGrant to the default roles. To do that, take the following steps:
Remove all the roles assigned to the grant type.
Restart the Genius Server. When the server is restarted, default roles are assigned from scratch to the grant type.
Usage
Grant to group
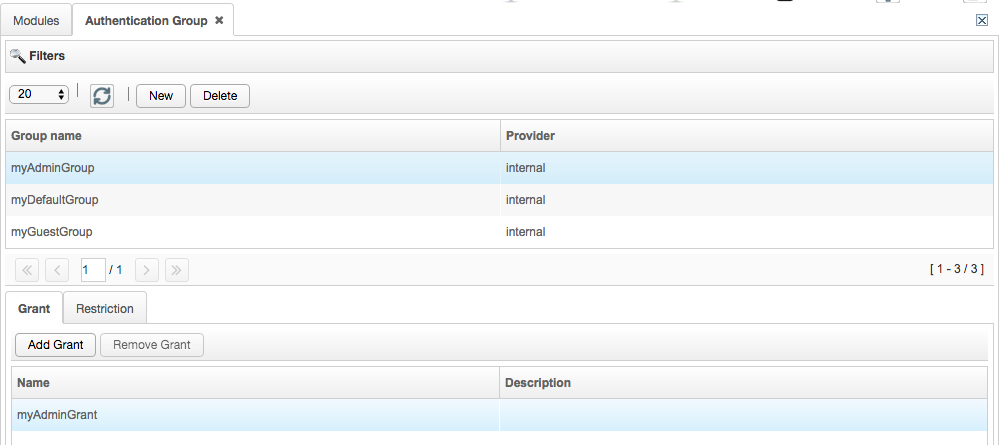
To assign a grant type to a group (e.g. assign the administrator roles to a group of users), take the following steps:
Go to the group page.
Select the desired group.
Press the Add Grant button, to add a grant type to the group. In the grant page, select a grant type (e.g. myAdminGrant assigns administrator roles) and press Select.
Restrictions
In opposition to grants, restrictions are used to limit permissions on user groups and MFP device groups.

To add a new restriction, take the following steps:
Go to the Restriction page, and press the New button and fill in the Name and Description fields.
To save, press Save and Close.
From the restriction list, select the item and press the Edit button and in the Role tab press Manage role.
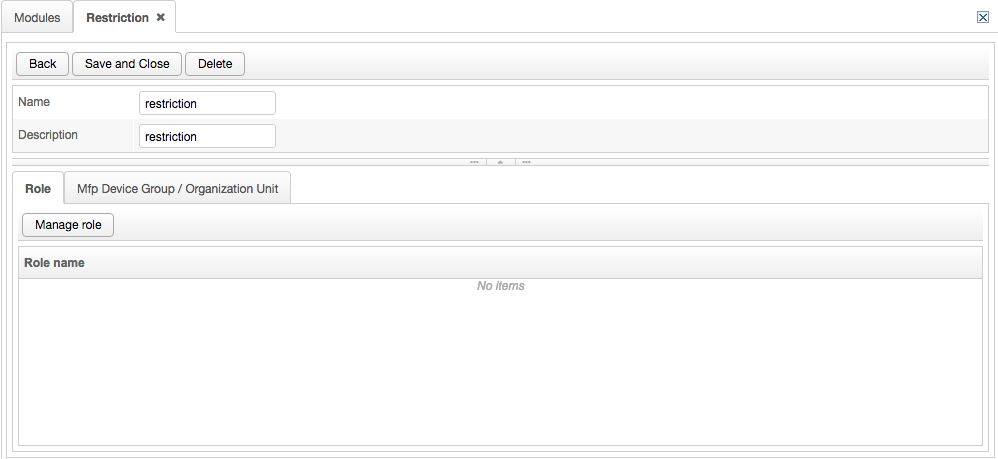
Select the restriction to apply. For further details on the restriction, refer to the Roles section.
To confirm the selection, press the Save button.
To assign restrictions to a Mfp Device Group, take the following steps:
From the restriction list, select the item and press the Edit button and in the Mfp Device Group/Organization Unit tab press Add.
Select the group to assign the restriction and press Select.
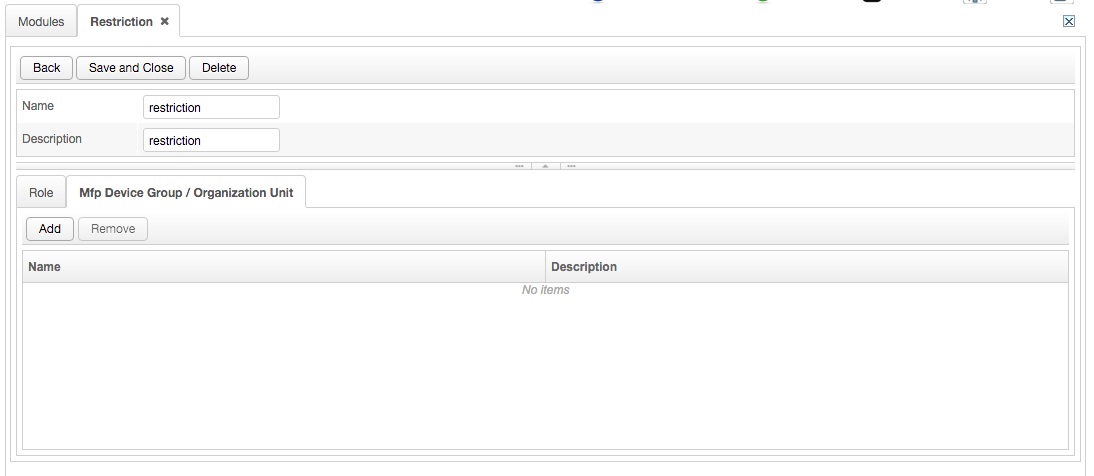
Press the Save and Close button to confirm.
Note
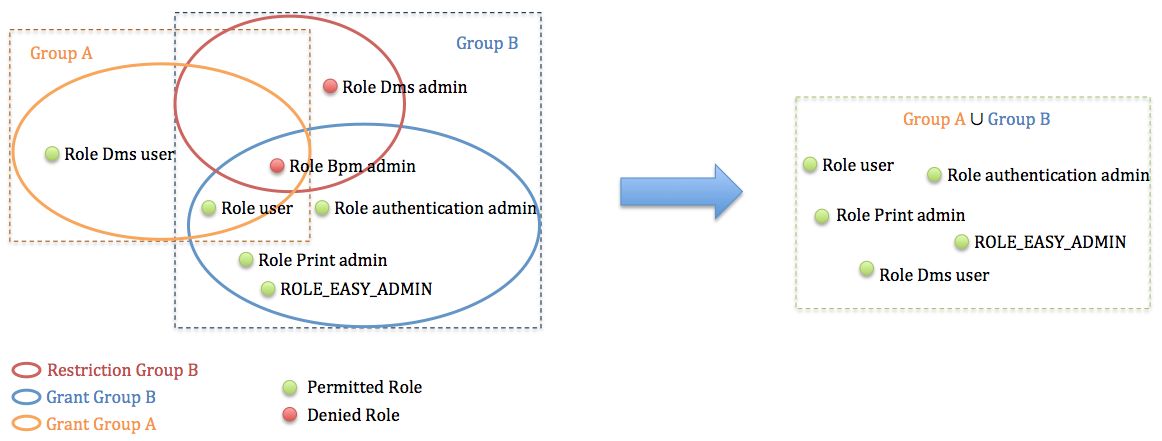
Restrictions limit roles even if they are added to grants of the same group or inherited from other groups.
The image below represents two groups with grants and restrictions. Group A has only DMS user role grant assigned. Group B, instead, has both grants and restrictions for BPM admin and users. The restriction of Group B limits the BPM admin role too, therefore this role is not permitted to any user assigned to both Group A and Group B, even if the two groups have this role added to grant.
Usage
Restriction on copy function
A possible use case is about the possibility to assign restrictions to MFP devices (e.g. disable the copy function on MFP device group).
The role for copy function is:
Role on client copy
To create the restriction, add both the role "Role on client copy" and the desired device group.
Provider Group
A provider group exists in the internal or external provider (AD/LDAP).
A group is associated to a set of Grant. Grants permit to use the different Genius Server features. Users need to be assigned to one or more groups to inherit the grants.
When a group is imported from an external or internal provider, grants are not assigned.
Users can import a group from a provider taking the following steps:
From the Authentication Management menu, press Group.
Press the New button.
Enter the name or the beginning of the name of the provider group. The search is performed with the
LIKEoperator. For internal providers, it is case sensitive. for external providers, it depends on the provider configuration.And press the Search button.
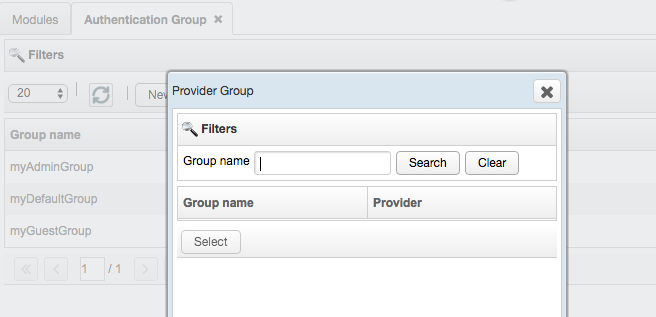
If one or more groups meet the search requirements, they are displayed on the list.
Select the group and press the Select button.
The group is now imported.
To assign grants to the selected group:
Select the group, then press the Add Grant button. To add a new grant, refer to the Grant section.
Select a grant from the list and press the Select button.
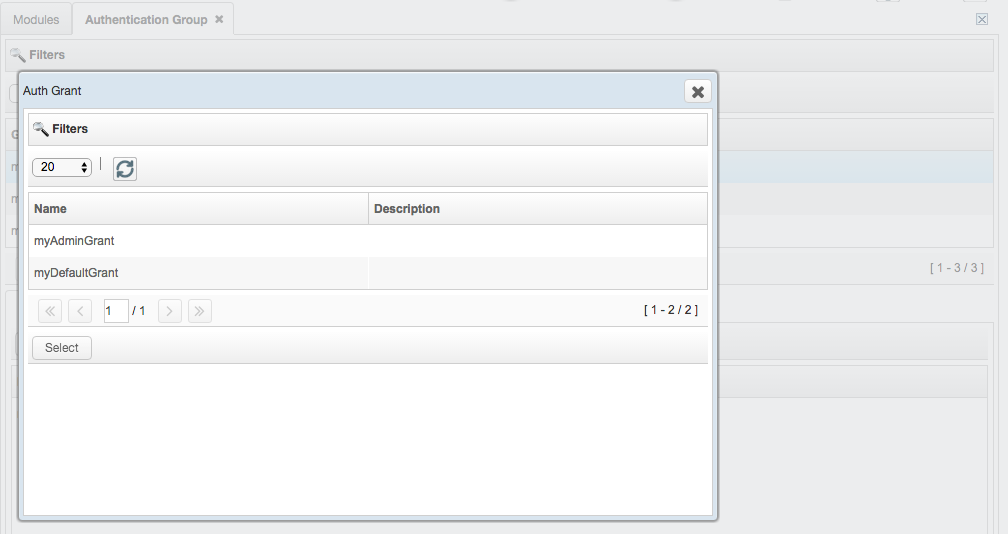
If you select the group again, you can see its assigned grants.
To assign restrictions to a selected group:
Select the group, go to the Restriction tab and press the Add Restriction button.
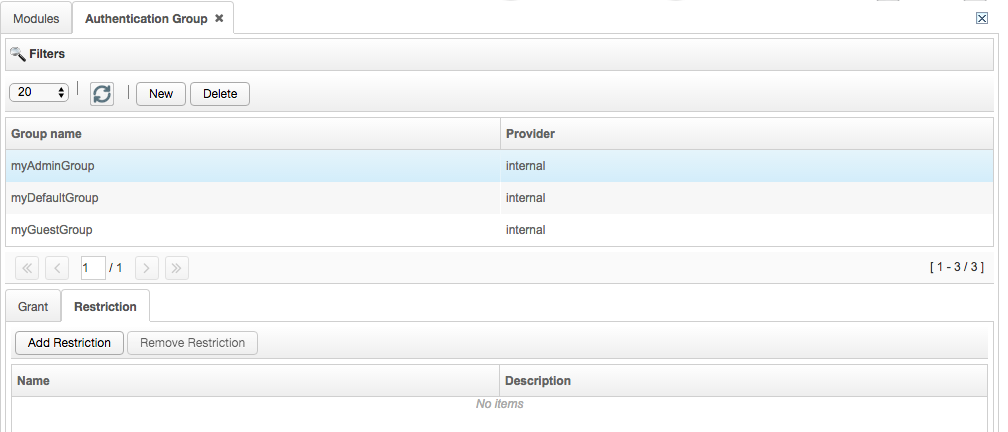
Select the restriction from the list and press the Select button. To add a new restriction, refer to the Restrictions section.
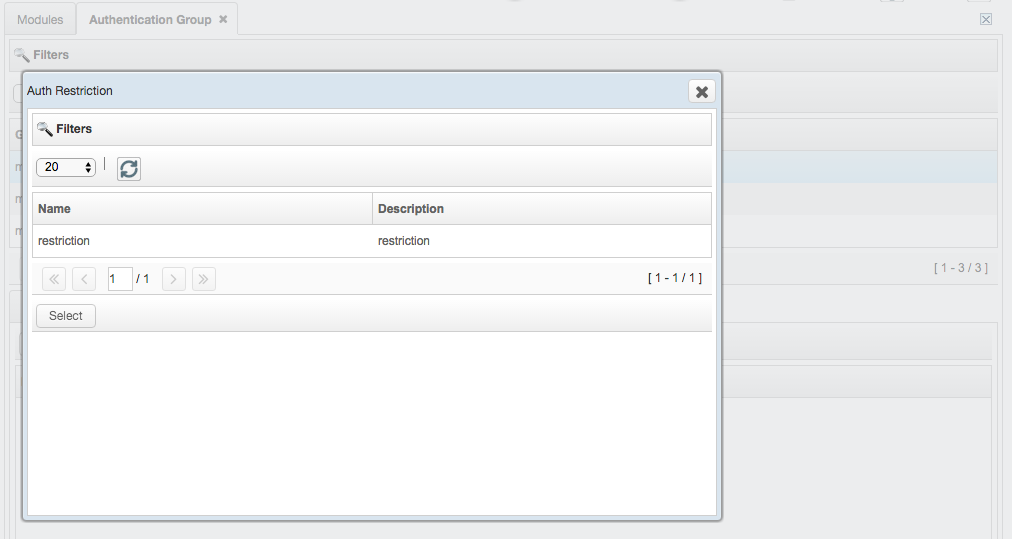
If you select the group again, you can see its assigned restrictions.
To remove a group, select the item and press the Delete button. To confirm the deletion, press the Delete button.
Identity group mapping
Users of external providers preserve groups association for groups already imported by the Genius Server itself. After the import of an external group, update the user's cache to associate users already in the system to a group.
Genius Server Provider
The internal provider allows the administrator to define users and groups.
User
Internal user identity can be defined on the Genius Server selecting a user from the Genius provider sub list. To add a new identity press the New button:
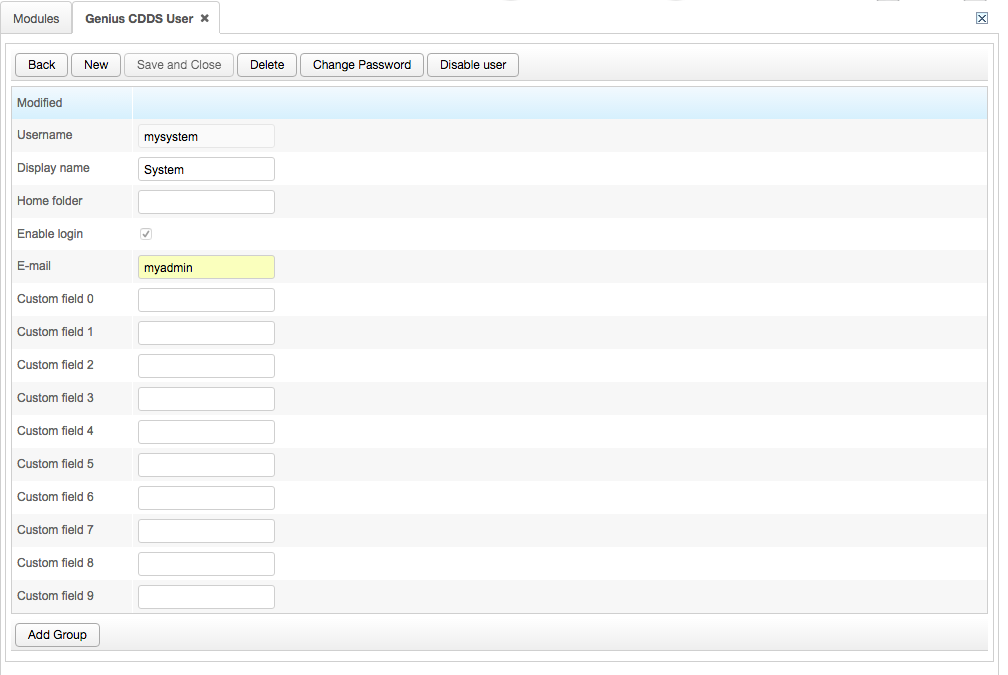
User identity details:
Username: name of the user (required).
Display name: name to be displayed (required).
Home folder: path of the folder.
Can login: if checked, the user can login.
Email: user's email.
Password: user's password (required).
Custom field 0-9: fields to fill in to enter addition information.
Add group button: to add a group.
To change the password, press the Change password button and enter the same password twice, then press Save to confirm. To disable the user, press the Disable user button. To save, press Save and Close.
Default users are:
mysystem: user for system tasks.
myadmin: user with system administration roles.
myanonymous: this kind of user replaces the other users when anonymization is enabled. To permit anonymization, refer to Configuration tool -> MyModule -> Accounting -> Base.
myguest: user can authenticate without entering credentials.
Genius Server Group
A group consists of a number of users. A Genius Server user may belong to none, one or many groups. There are three predefined groups:
myAdminGroup: the group with system administration roles.
myDefaultGroup: the group with user roles.
myGuestGroup: the group without preset roles.
By default, all users belong to myDefaultGroup. A user can be also assigned to other groups and inherit their roles.
To define a new group, press the New button and enter the group name. To assign an internal user to a group, press the Add button, and select the user clicking on the username twice.
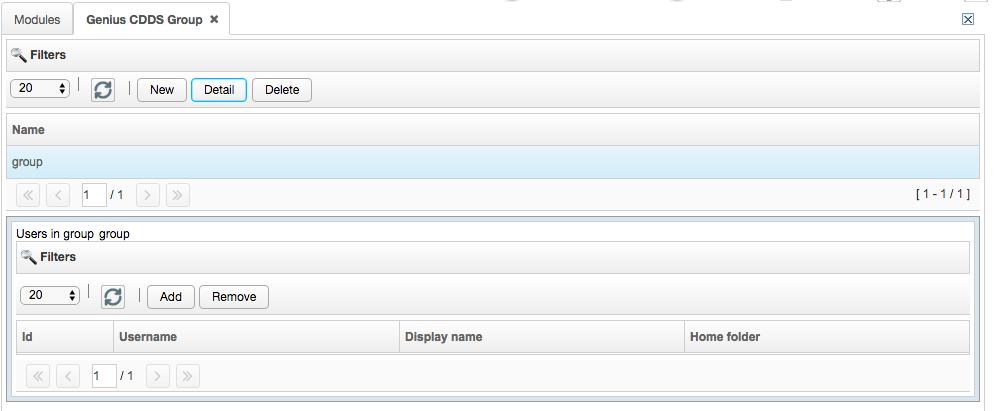
To add a role to the group, import the new group from the Authentication Management menu -> Group. For further details, refer to the Provider Group section.
Custom external provider
Genius Bytes supports ad hoc providers, such as Sharepoint and SOAP/WS.
Scenarios
LDAP, Database and Internal Provider
In a possible scenario, a company uses an external provider for user's authentication with credentials and a database provider for card authentication. Under "Authentication Providers" (Advanced) in Genius Conf, users can add and configure the two providers. User's search is performed in a specified order in Genius Conf.
In a company, a user - for example an employee - uses his card for the authentication on multifunction devices. When the card is swiped on the card reader, the system queries the database provider to search the token card. If it is found, the user is authenticated.
Another employee, who does not have a card, can login using his credentials. The server performs a query to search the user in the LDAP provider. If the user is found, he is authenticated.
For users who come from the external provider, when the user logs on the system for the first time, the system caches his identity information. Data caches are updated in a scheduled time.
To delete caches manually, in "Used Identity" page, check Enable massive action, select the identity and pressing the Delete caches button.
Consultants and collaborators can be added on the internal provider. Their authentication is internally made.