
Device Management
Discovery
Through the Bulk Detection feature, a specific procedure which allows you to discover printers on a massive scale, the Genius Server can find MFP devices connected to the same network. When a device is detected, all the necessary information about the MFP is automatically collected (e.g. vendor, serial number, MAC address).
Using this solution, the admin can define a process to detect new devices connected to a network in a scheduled time.
Read the next paragraphs for more details on the detection process.
Hostnames
In this section it is possible to create a list of hostnames.

To manually add a hostname, press the New button.
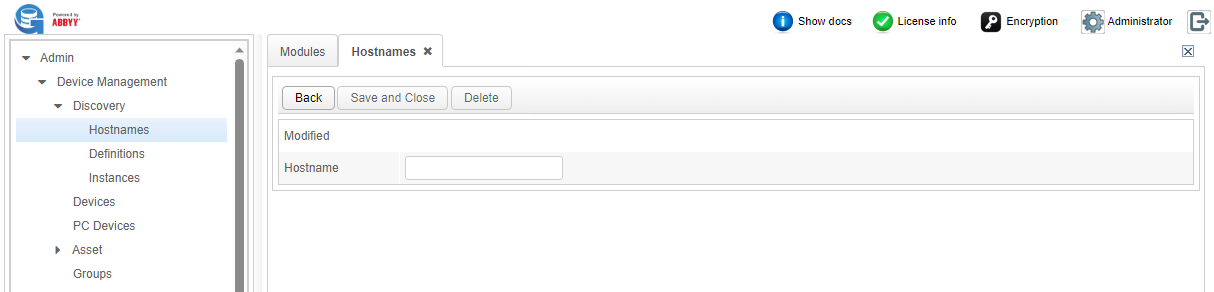
Enter the hostname and press Save and Close to confirm or Back to cancel.
To delete a hostname, select it and press Delete.
To import a list of hostnames, press Import and then enter the following fields:
Separator char: the character that separates a hostname from another one. It can be:
Comma,
Tab,
Pipe or
Semicolon.
Column containing hostname info: the number of the column that contains the hostname (e.g. 1).
Hostname regular expression: a regular expression to define which hostnames fetch (e.g. to fetch only hostnames that start with AB, write AB.*).
Skip lines: the number of the line to skip (by default is 0, so no line is skipped).
Then press the Import button, choose a csv file and press Open. Once uploaded, press the Close button.
To export a list of hostnames, press Export and a csv file is downloaded.
Definitions

The detection process requires a Definition. To create a new definition, press the New button.
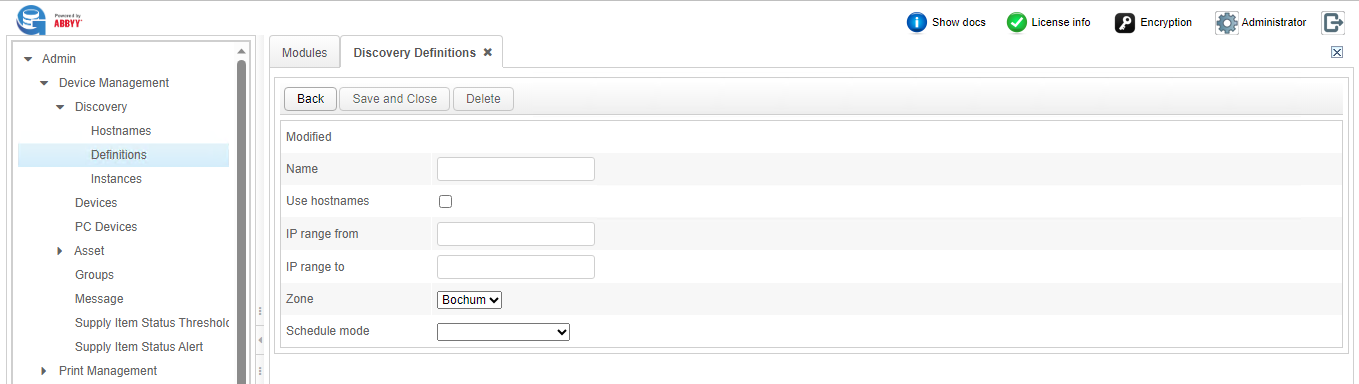
Enter the values in the following fields:
Name: a definition name (duplicates are not allowed) (required).
Use hostnames: if checked, the detection is performed through the hostnames instead of IP Addresses. When enabling this setting, another setting appears:
Ignore found hostnames: if checked, the already found hostnames are skipped instead of detecting them one more time.
IP range from: the starting IP address for device detection (required).
IP range to: the last IP address to be included in the detection (required).
Zone: the zone name associated to the devices.
Schedule mode: the execution type. It can be one of two kinds:
RUN_IMMEDIATELY: the discovery process starts as soon as the definition is saved.
RUN_SCHEDULED: the discovery process is scheduled (enter the cron express in the next field).
To save, press the Save and Close button.
To delete a definition, select the item and press the Delete button.
To edit a definition, select the item and press the Edit button, perform the changes and then press Save and Close to confirm or Back to cancel the action.
Note
It is possible to edit only the definitions that have the schedule mode set on RUN_SCHEDULED. The schedule mode cannot be edited.
From a definition, one or more instances can be run. An instance is the execution of a definition (for further details, refer to the next paragraph).
Instances
In this section, it is possible to see all definitions that are running or that have been executed and all their details.
To see all the devices that have been found, select a definition from the list.
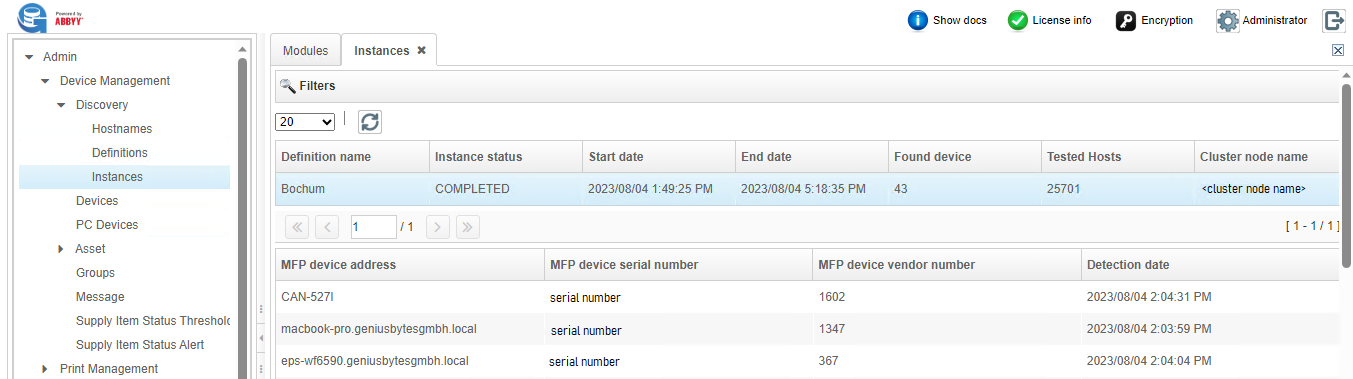
In this section the available information about the executed definitions are the following:
Definition name: the name of the running or completed definition.
Instance status: the execution status (i.e. RUNNING, COMPLETED).
Start date: when the instance execution started.
End date: when the instance execution ended.
Found Device: the number of found devices (only if reachable).
Tested Hosts: the number of tested IP addresses or hostnames (connection attempts).
Cluster node name: the cluster on which the instance runs.
Devices
In this section it is possible to find all devices registered on Genius Server thanks to the bulk detection or to an interaction with the Genius Server.
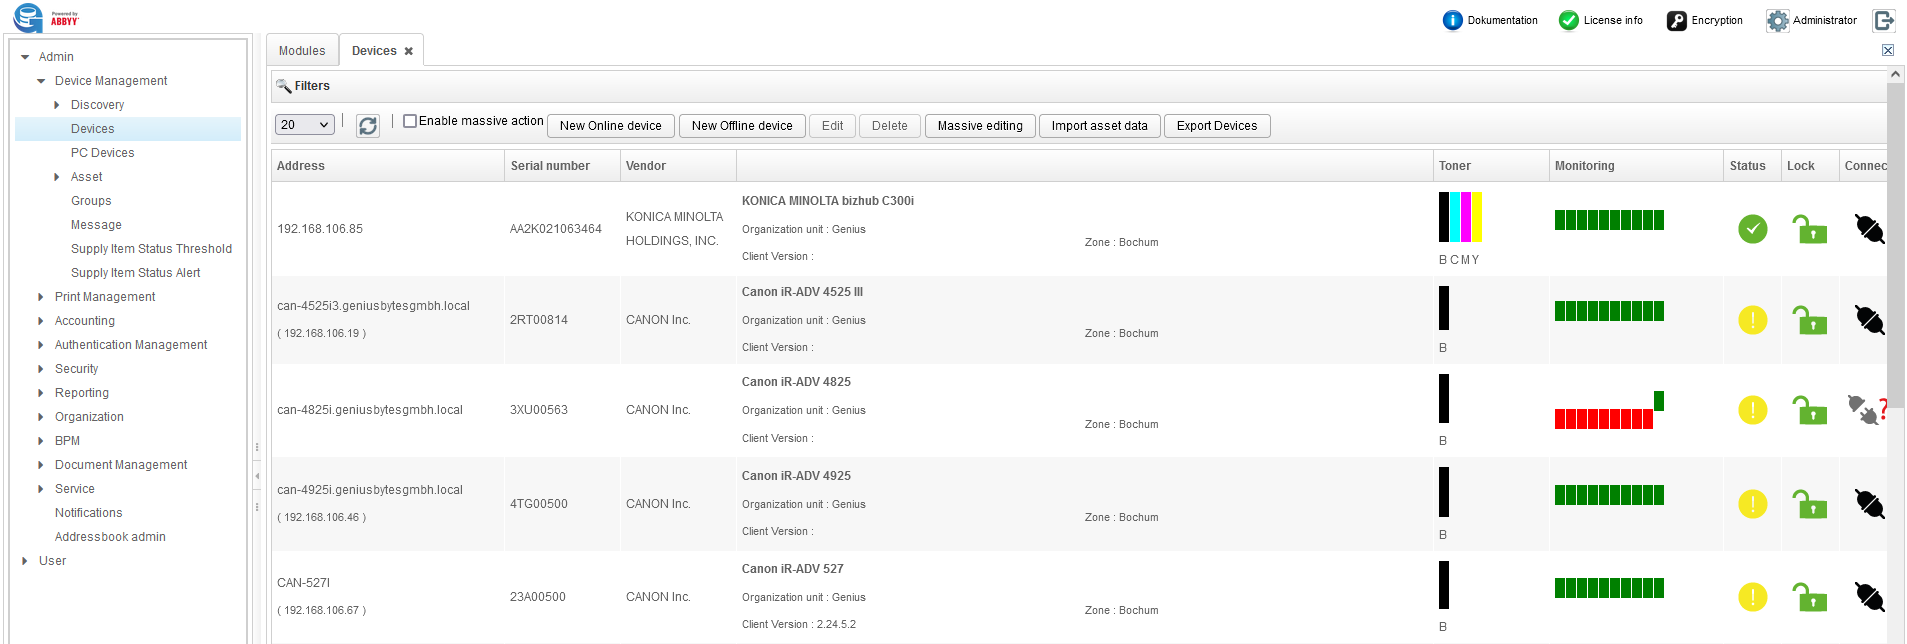
The devices list shows information about every device, such as: IP address, serial number, vendor, device type, Client version, organization unit, toner, monitoring, status, lock and connectivity. It is also possible to filter by most of those attributes, when searching for specific devices.
The Address column shows the IP Address or the hostname of a device.
The Serial number column shows the serial number of a device.
The Vendor column shows the vendor of a device.
The description column shows the device details: model, organization unit (where the device is placed), Zone, Client version installed on it (it is updated at every login process).
The Toner column shows the status of the toner of a device.
The Monitoring column shows the last ten monitoring activities (from the oldest to the latest). If green, the monitoring successfully ended, if red, an error occurred. Moving the pointer on each bar, it is possible to see the monitoring details (e.g. status, reason, start, etc.)
The Status column shows the device status and, clicking on the status icon, the device alerts are displayed (e.g. "Out of paper").
The Lock column shows if the device is locked by a user authentication or not. If yes, moving the pointer on the lock icon it is possible to see the name of the user that is using the device.
The Connectivity column shows if a device is online or offline.
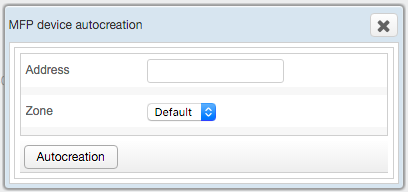
To manually add a new online device, press the New Online device button, enter its IP address in the Address field, choose the Zone and then press Autocreation.
After the detection, the device detail page opens (for further information, refer to Device Editing).
To manually add a new offline device, press New Offline device and complete the following fields:
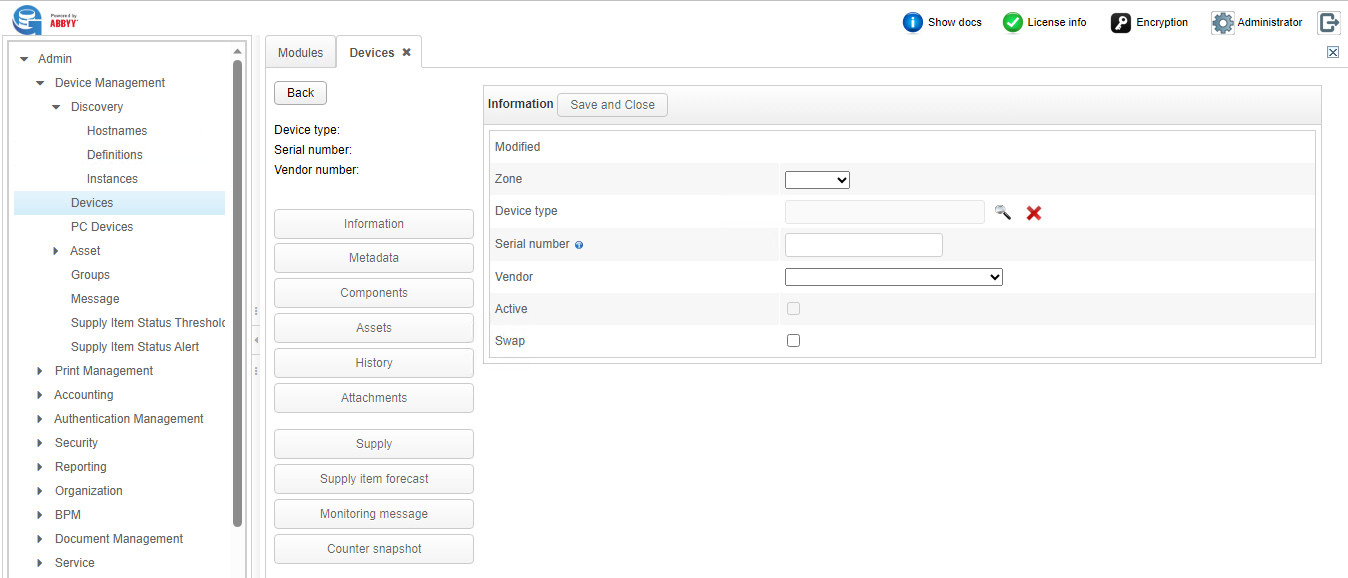
Zone: the zone where the device is placed.
Device type: the device model.
Serial number: the serial number of the device.
Vendor: the vendor of the device.
Active: if checked, the device status changes from offline to online.
Swap: if checked, a device has been replaced.
Press Save and Close to add the new offline device or Back to cancel.
To edit a device, select it and press Edit (for further details, refer to the next paragraph Device Editing).
To delete a device from the device list, select it and press Delete and Delete again to confirm.
To edit settings on all devices, press Massive editing (for further details, refer to Massive editing).
To add device data from a .csv file use Import asset data.
To receive a .csv file of all devices currently registered to Genius Server use the Export Devices button.
To manage the connection between the device and Genius Server, a device can be activated or deactivated. Select a device and press the Deactivate or Activate button.
Note
When the device status has been changed, counters are still reported. For further details, refer to Counter Snapshot section.
Activating a new online device, counters are automatically added.
Activating a new offline device, counters must be added manually: in the value column is preset the minimum value configurable, next to it the last value set. On the top of the window it is possible to choose the Date of Reading.
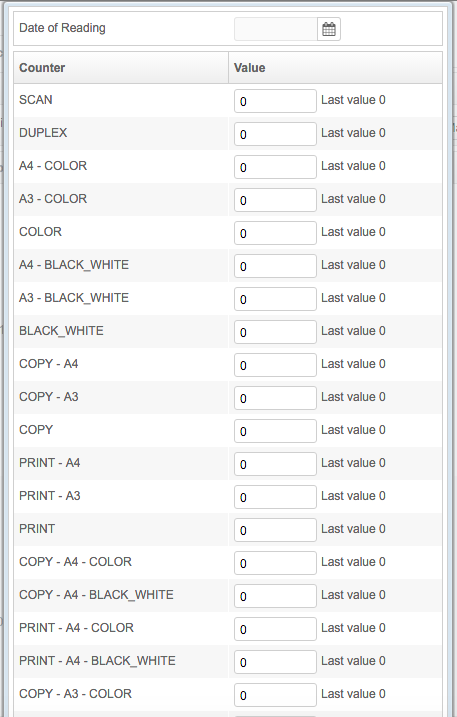
To add counters to an offline device already activated, press the Add counters snapshot, enter a value in each field and then press the Manual counters snapshot button to save.
To mark a device as offline, select a device and press Mark as Offline.
The operation implies a change on device connectivity and the deletion of the IP address. Note that usually the offline devices are those not in use anymore.
To obtain an extra monitoring in addition to the scheduled activity, press the Monitoring update button and then, in the Monitoring column, check all the enabled monitoring activities to see the updated values.
Device Editing
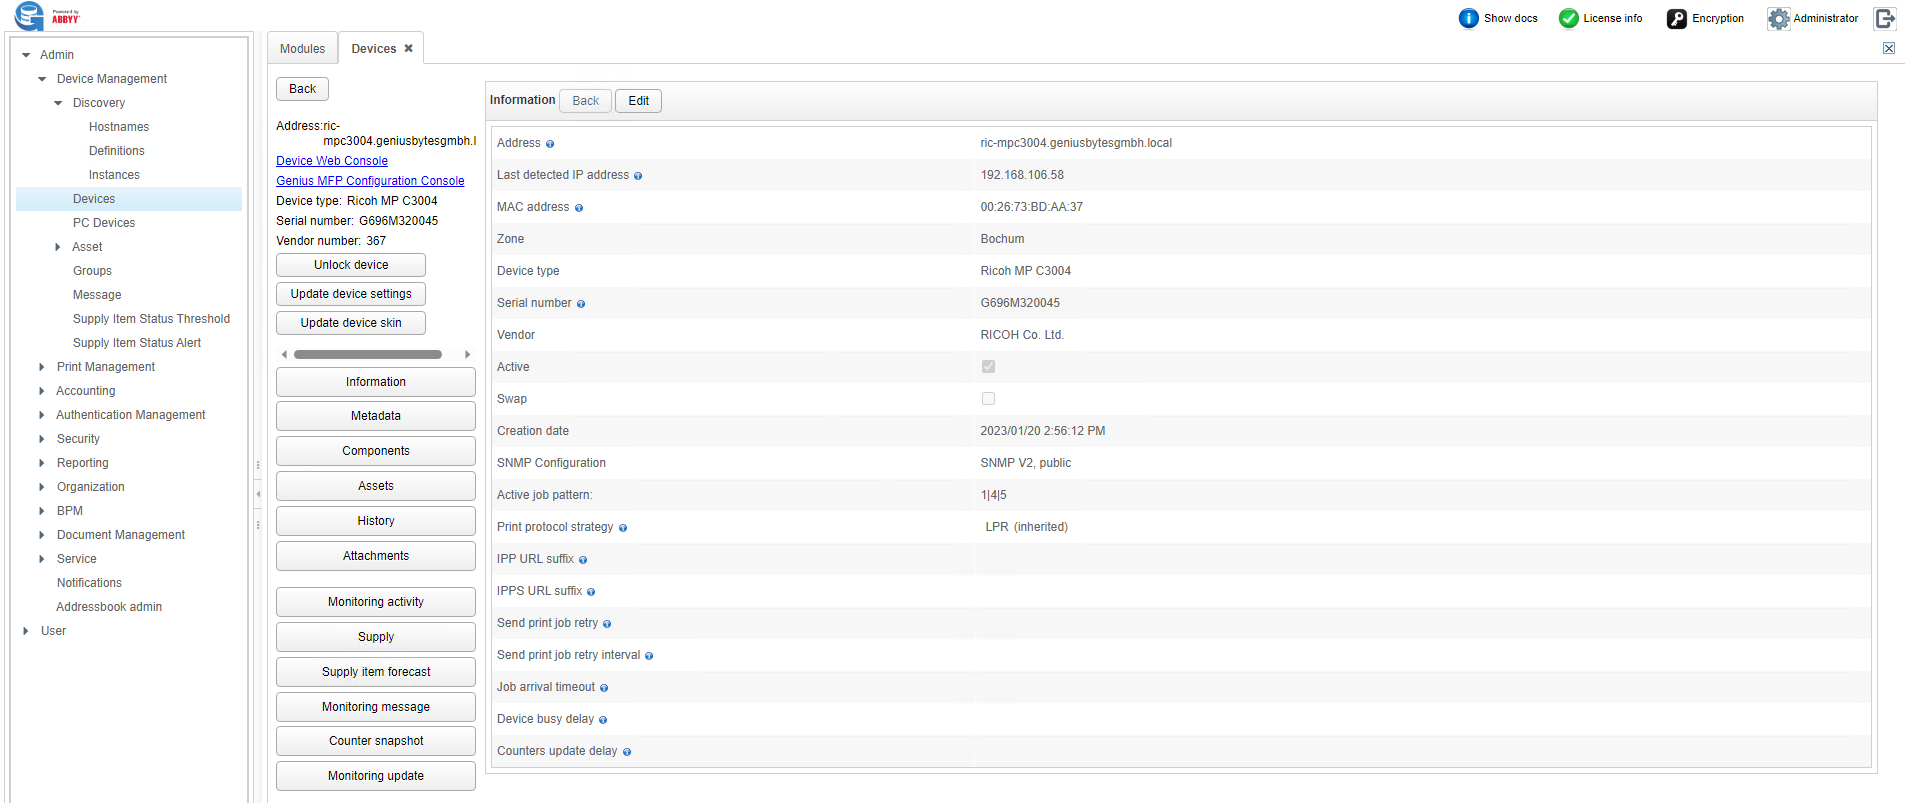
To see and edit generic information, metadata, components, assets and/or attachments of a device, select one of the devices from the list. The following page opens:
Unlock Device
To unlock a device from a user authentication, click on Unlock device. the "Request sent successfully" message opens, then press OK.
Information
To edit or check the information, click on it and press the Edit button. To save changes, press the Save and Close button.
Address: the hostname or the IP address of the device.
Last detected IP address: the last IP address detected by the Genius Server.
MAC address: the MAC address of the device network card.
Zone: the zone name in the cluster environment.
Device type: the name provided by the vendor.
Serial number: the serial number provided by the vendor.
Vendor: vendor name, associated to a Vendor ID. The combination of Serial number and Vendor ID is universally unique.
Active: device status (ACTIVE, INACTIVE).
Swap: a swap device is a temporarily replacement of a standard device (e.g. a device returned for repair).
Creation date: date and time of a device creation in the system.
SNMP Configuration: the SNMP version, the community name used to read data via SNMP. By default, it is "public" and used by V1 and V2 SNMP.
Active job pattern: values used by the system to detect the MFP status. In the default strategy, it represents the busy values read by SNMP busy OID. The default value is 4|5. For Xerox devices that are not Xerox Phaser 3250, it represents a regular expression. The suggested value is ^17.d+$|^12.2$.
Print protocol strategy: the protocol used is defined in Genius Conf -> Multitenant -> Tenants -> select the tenant -> Configure -> Switch to Advanced -> My module -> Device -> Spooling -> Print strategy. The value can be deleted editing the device information page.
IPP URL suffix: it disables the URL suffix for IPP device URL. You can define the value in Genius Conf -> Multitenant -> Tenants -> select the tenant -> Configure -> Switch to Advanced -> My module -> Device -> IPP Spooling -> IPP url suffix.
IPPS URL suffix: it disables the URL suffix for IPPS device URL. You can define the value in Genius Conf -> Multitenant -> Tenants -> select the tenant -> Configure -> Switch to Advanced -> My module -> Device -> IPP Spooling -> IPPS url suffix.
Send print job retry: it disables the number of retry attempts to print jobs. You can define the value in Genius Conf -> Multitenant -> Tenants -> select the tenant -> Configure -> Switch to Advanced -> My module -> Device -> Spooling -> Send print job retry.
Send print job retry interval: it disable the waiting interval between the various retry attempts. The default value is defined in Genius Conf -> Multitenant -> Tenants -> select the tenant -> Configure -> Switch to Advanced -> My module -> Device -> Spooling -> Send print job interval.
Job arrival timeout: the timeout after the arrival of a print job. This field disables the default timeout. The default value is defined in Genius Conf -> Multitenant -> Tenants -> select the tenant -> Configure -> Switch to Advanced -> My module -> Device -> Spooling -> Job arrival timeout.
Device busy delay: the time of delay before the device is ready. This field disables the default busy delay. The default value is defined in Genius Conf -> Multitenant -> Tenants -> select the tenant -> Configure -> Switch to Advanced -> My module -> Device -> Spooling -> Device busy delay.
Counters update delay: the time of the delay after the device idle status. After it has elapsed, you can read Counters. This field disables the default delay. The default value is defined in Genius Conf -> Multitenant -> Tenants -> select the tenant -> Configure -> Switch to Advanced -> My module -> Device -> Spooling -> Counters update delay.
Metadata
To edit or check metadata, click on it and press the Edit button. To save changes, press the Save and Close button.
Structured information on devices:
Life cycle status: the status of the device, which can be ORDERED, DELIVERED, ON_THE_WAY, IN_USE, IN_REPAIR, DELETED.
Monitoring type: the kind of monitoring use for the device. Values are SERVER, EXTERNAL and EMAIL.
Description: additional descriptive information. Maximum 1000 characters are allowed.
System key username: the person/user in charge of the device. To select a name from the identity list, click on the magnifying glass icon.
External device name: the reference name of this system in customer specific applications as 400, etc. Maximum 255 characters are allowed.
External device number: the unique external customer inventory number of a device. It is an alphanumeric string of maximum 255 characters.
Installation date: the date of device installation.
Firmware version: the version of the firmware installed on the device.
Firmware installation date: the date of the last firmware update.
Time for the Stand-by mode (in minutes): the configured time before switching the device into the stand by mode.
Time for the power save or sleep mode (in minutes): the configured time before switching the device into the power save mode.
Green IT
These settings can help reduce the device impact on the environment.
Energy cost KWh: the price per KWh.
Stand-by timeout: the configured time before the device goes into stand-by mode.
Power save mode timeout: the configured time before the device goes into power save mode.
Current price: the cost of the device when running. You can set the type of the currency value in Genius Conf -> Multitenant -> Tenants -> select the tenant -> Configure -> Switch to Advanced -> My module -> Device -> Green it -> Default price run.
Stand-by cost: the cost of the device when in the stand-by mode. You can set the type of the currency value in Genius Conf -> Multitenant -> Tenants -> select the tenant -> Configure -> Switch to Advanced -> My module -> Device -> Green IT -> Default price standby.
Power safe mode cost: the cost of the device when in the power save mode. You can set the type of the currency value in Genius Conf -> Multitenant -> Tenants -> select the tenant -> Configure -> Switch to Advanced -> My module -> Device -> Green it -> Default price powersafe mode.
Location
Here information about the device's location are stored.
Organization unit, Location name, Location site name, Building, Address, Entrance, Floor, Room, and Room detail are the details available.
Note
The main information about locations (i.e. address, location site name and building) are defined at Organization -> Location.
Components
A device can have some additional components, such as the finisher, the stapler, the option input tray, the scanner, etc. The Genius Server can detect them as soon as the device is added or in any other moment. To add, edit, delete or auto-detect the components of a device, click on the button associated with the required operation (New, Edit, Delete, Detect component).
The image below shows the device components list.
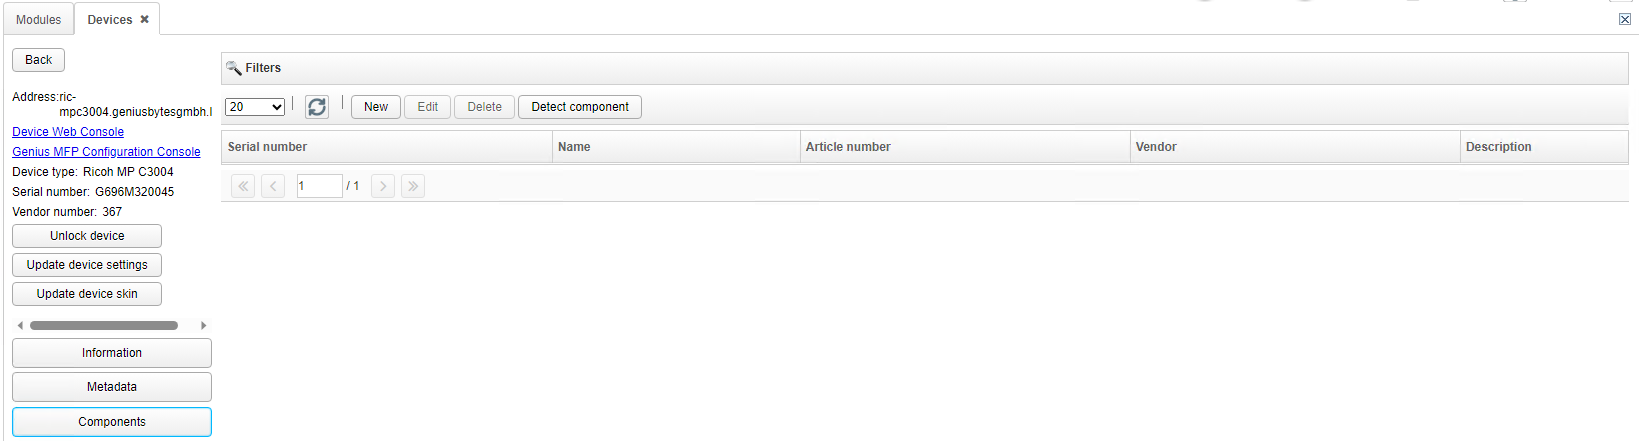
Serial number: the serial number provided by the vendor.
Name: the name of the component.
Article number: component article number (optional).
Vendor: vendor name (required).
Description: the component description (required).
You can define associations between devices and new custom components (components are not automatically recognized by the Genius Server). For further details, refer to Component Type section.
Adding a new association (Component - device)
Before associating a new component to a device, you need to create the component (for further details, refer to Component Type section) and add it to the Component list in the Device typegit * section (for further details, refer to :ref:`assetdevicetype` section). From the component list, press the **New* button.
Select the component (click on the magnifying glass icon to show the list) and enter the Serial Number (optional).
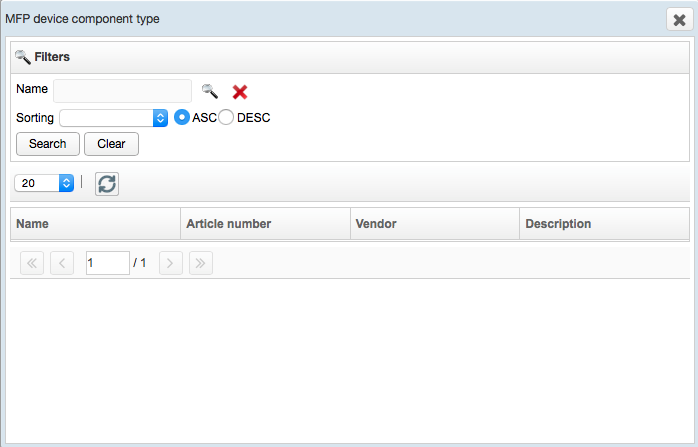
Press Save and close button.
Assets
By default, the most common device assets can be found under Information and Metadata. To add specific information, security issues or inventory details about a device, press Assets, Edit and type the information required.
To add more information, refer to Dynamic Asset section.
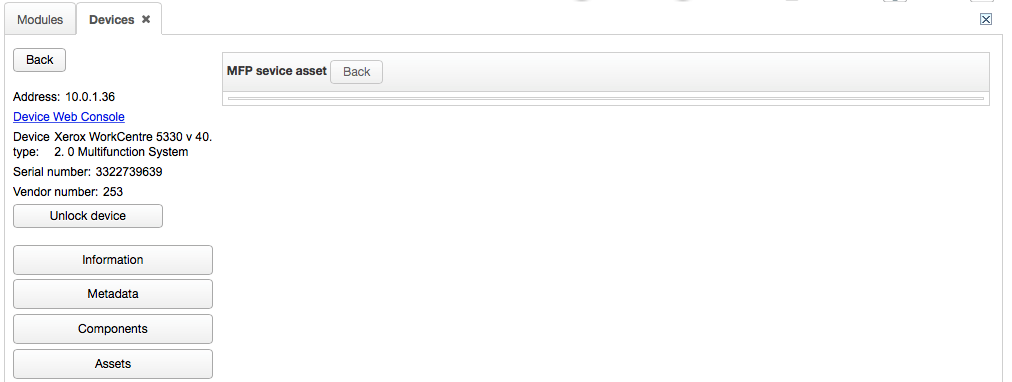
To save the changes, press the Save button.
Attachments
In this page the administrator can download, create and/or delete a document associated with a device.
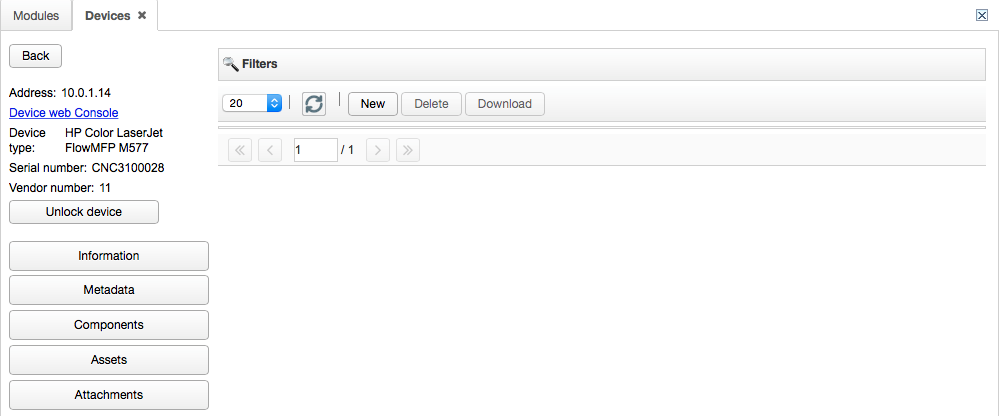
To add a document, press New and fill in the required fields.
File name: the file to upload.
Name: name of the file.
Category: category of the file. It can be:
Device maintenance: an attached file which contains information about the maintenance.
Device documentation: an attached file which contains the documentation.
Device other: the file is not a device maintenance file nor a device documentation file.
The attached documents are available also in the DMS (Document Management System) of the Genius Server (for further information, refer to Content browsing section). To open them, go to Folder Browsing -> Root folder -> Device and click on the device name (vendor name and serial number).
Monitoring activity
In this page the administrator can enable/disable the scheduled activity for every device:
Poll message,
Monitoring supply items,
Monitoring status and
Accounting snapshot.
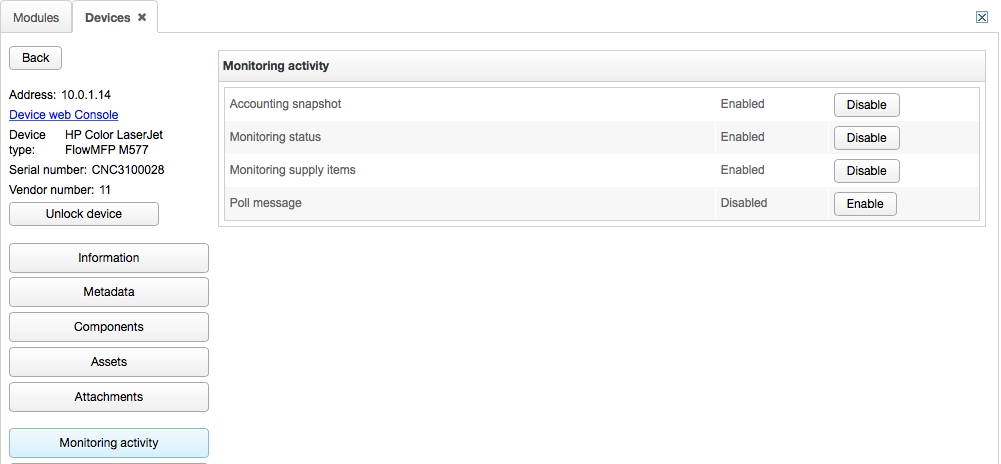
To perform this operation, the monitoring settings must be activated inside the Configuration Tool (found at System -> Monitoring).
Supply
The "Supply" feature provides a list with the total amount of a specific good (cartridges, toners, waste toner, and fusers) of a device, which are available to consumers.
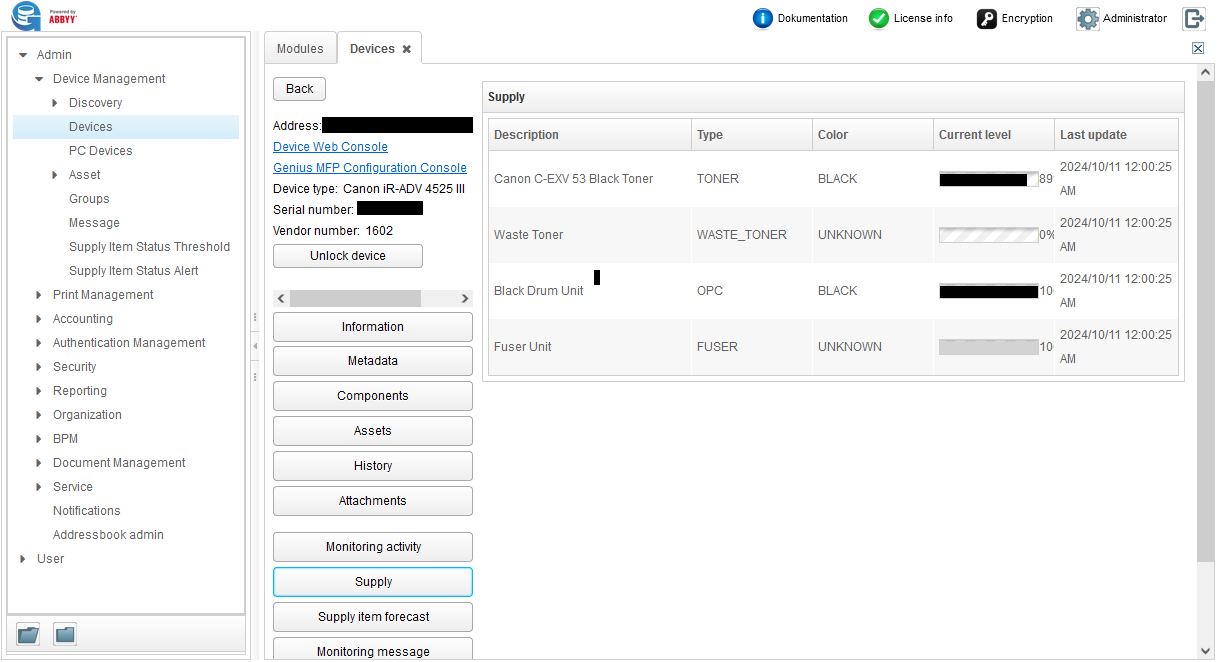
Description: the description of the supply item.
Type: the type of the supply iterm.
Color: the value of the color of the supply item, if known (e.g. magenta).
Current level: the level of the supply items in use, i.e. how much of the item is left.
Last update: last time counters have been refreshed.
To enable the supply items, go in Genius Conf -> Multitenant -> Tenants -> select the tenant -> Configure -> Switch to Advanced -> System -> Monitoring -> Supply items and check the Supply item enabled box.
Supply Items Forecast
The Genius Server manages the supply estimation and its visualization on graphs and reports.
Before using this feature, users must enable the following items in Genius Conf -> Multitenant -> Tenants -> select the tenant -> Configure -> Switch to Advanced -> System -> Supply items and check the Supply forecast.
Monitoring status (status section),
Supply items (supply section) and
Monitoring supply item forecast.
Press Supply item forecast button. A graph is displayed.
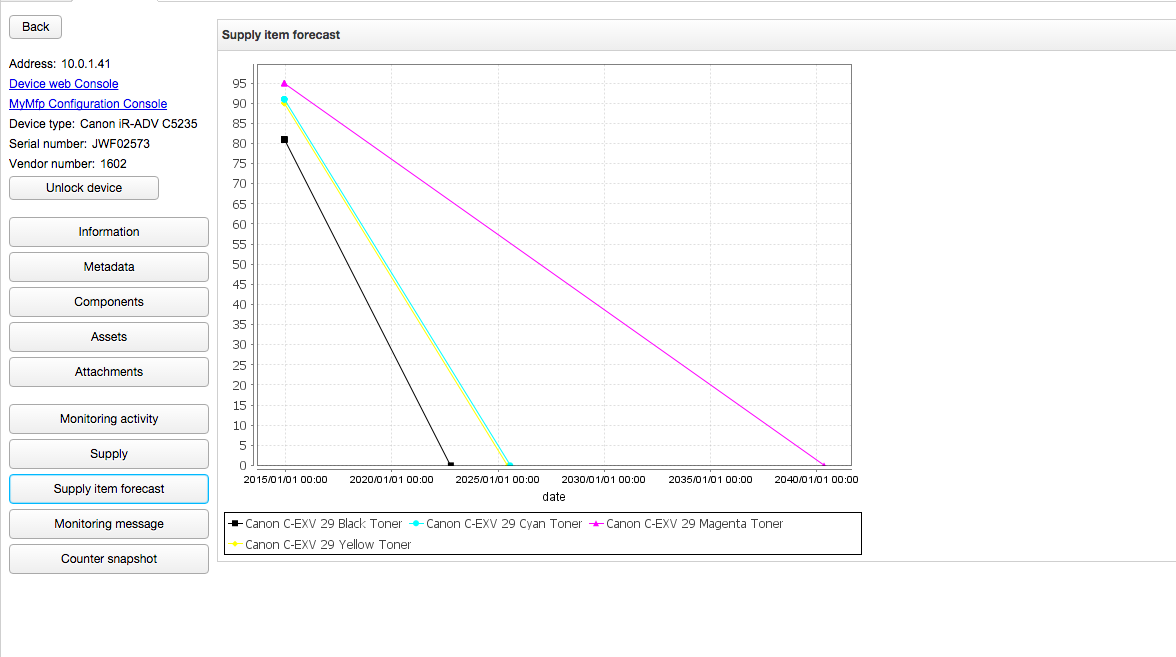
To create a report on the supply item status, refer to the Reporting section.
Monitoring Message
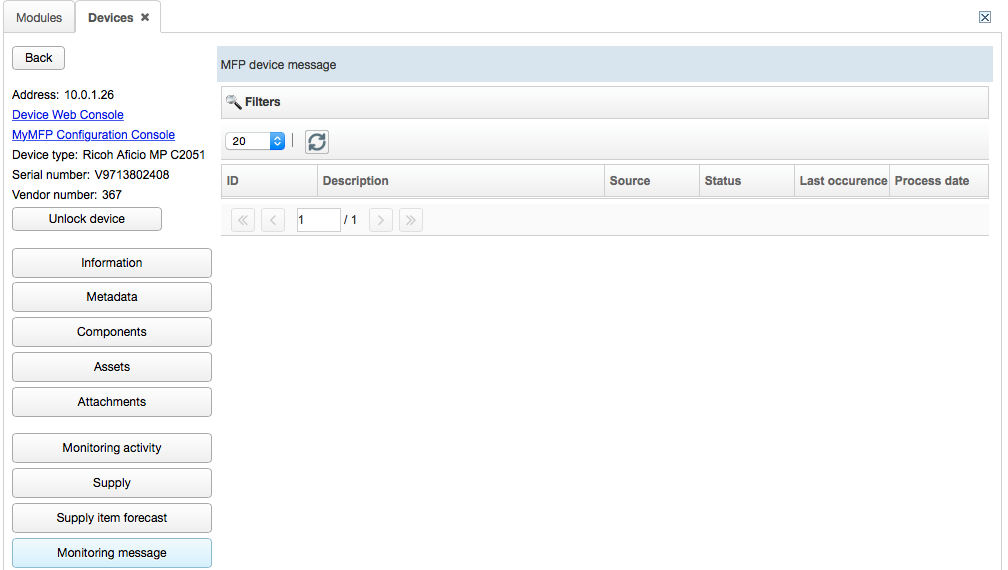
Monitoring messages are poll messages sent by the printer. To allow this feature, go to in Genius Conf -> Multitenant -> Tenants -> select the tenant -> Configure -> Switch to Advanced -> My module -> Monitoring -> Monitoring messages -> enabled.
Counter Snapshot
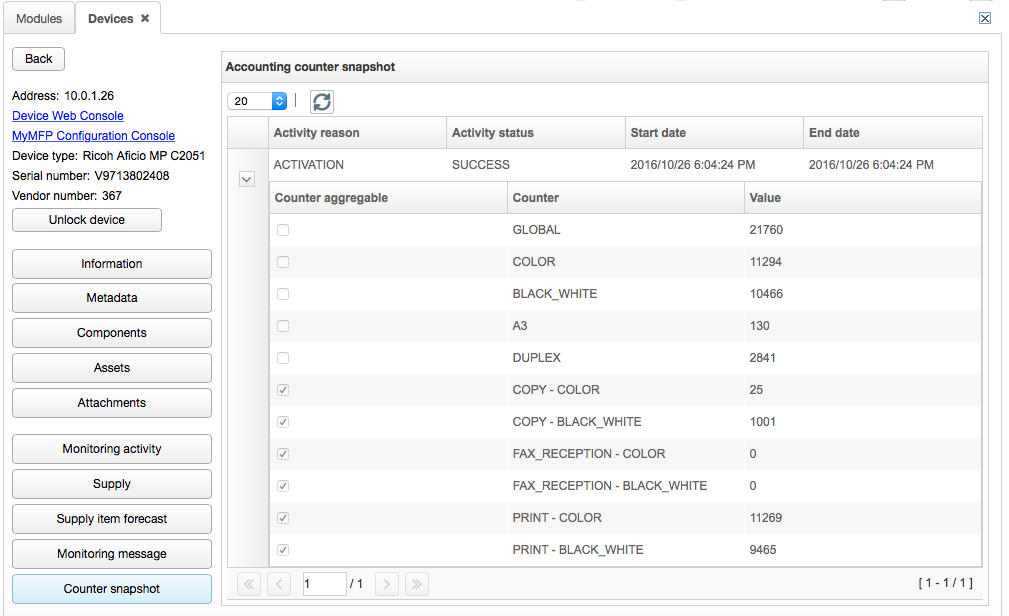
Device Counters collect information on the use of the printer (e.g. number and document size of print jobs and copies, number of scans). This section shows the counter snapshot list related to the printer. Every time a new MFP is added, activated or deactivated, a counter snapshot is reported on the list. The scheduler can generate a snapshot. To allow the scheduler to create a snapshot, enable the engine in the Configuration Tool -> Advanced -> System -> Monitoring -> Counter snapshot.
This section shows the counter snapshot list related to the printer. Every time a new MFP is added, activated or deactivated, a counter snapshot is reported on the list. The scheduler can generate a snapshot. To allow the scheduler to create a snapshot, enable the engine in Genius Conf -> Multitenant -> Tenants -> select the tenant -> Configure -> Switch to Advanced -> System -> Monitoring -> Counter snapshot and check the Counter snapshot enabled box.
Activity reason: the reason why the activity has been planned.
Activity status: the status of the activity.
Start date: the date when the activity started.
End date: the the date when the activity finished.
Press the arrow (>) for the details.
Monitoring Update
To obtain an extra monitoring in addition to the scheduled activity, press the Monitoring update button and then, in the Monitoring column, check all the enabled monitoring activities to see the updated values.
Massive editing
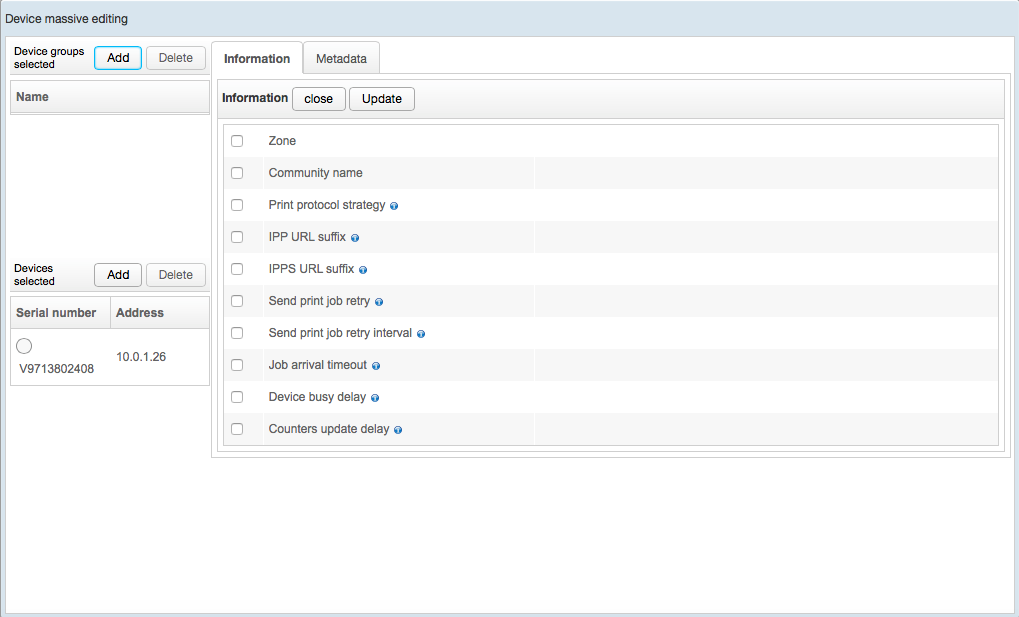
Using this feature, the administrator can modify the Devices and Metadata of devices or group of devices.
From the device list page, click on the Massive editing button as shown in the image below:

Confirm the checkbox(es) you want to enable and enter the new values:
Information
Zone: the zone name in the cluster environment.
SNMP Cofiguration: the community name used to read data via SNMP. By default, it is "public" and used by V1 and V2 SNMP.
Print protocol strategy: the protocol used is defined in Genius Conf -> Multitenant -> Tenants -> select the tenant -> Configure -> Switch to Advanced -> My module -> Device -> Spooling -> Print strategy. The value can be deleted editing the device information page.
IPP URL suffix: it disables the URL suffix for IPP device URL. You can define the value in Genius Conf -> Multitenant -> Tenants -> select the tenant -> Configure -> Switch to Advanced -> My module -> Device -> IPP Spooling -> IPP url suffix.
IPPS URL suffix: it disables the URL suffix for IPPS device URL. You can define the value in Genius Conf -> Multitenant -> Tenants -> select the tenant -> Configure -> Switch to Advanced -> My module -> Device -> IPP Spooling -> IPPS url suffix.
Send print job retry: it disables the number of retry attempts to print jobs. You can define the value in Genius Conf -> Multitenant -> Tenants -> select the tenant -> Configure -> Switch to Advanced -> My module -> Device -> Spooling -> Send print job retry.
Send print job retry interval: it disable the waiting interval between the various retry attempts. The default value is defined in Genius Conf -> Multitenant -> Tenants -> select the tenant -> Configure -> Switch to Advanced -> My module -> Device -> Spooling -> Send print job interval.
Job arrival timeout: the timeout after the arrival of a print job. This field disables the default timeout. The default value is defined in Genius Conf -> Multitenant -> Tenants -> select the tenant -> Configure -> Switch to Advanced -> My module -> Device -> Spooling -> Job arrival timeout.
Device busy delay: the time of delay before the device is ready. This field disables the default busy delay. The default value is defined in Genius Conf -> Multitenant -> Tenants -> select the tenant -> Configure -> Switch to Advanced -> My module -> Device -> Spooling -> Device busy delay.
Counters update delay: the time of the delay after the device idle status. After it has elapsed, you can read Counters. This field disables the default delay. The default value is defined in Genius Conf -> Multitenant -> Tenants -> select the tenant -> Configure -> Switch to Advanced -> My module -> Device -> Spooling -> Counters update delay.
Metadata
Life cycle status: the status of the device, which can be ORDERED, DELIVERED, ON_THE_WAY, IN_USE, IN_REPAIR, DELETED.
Monitoring type: the kind of monitoring use for the device. Values are SERVER, EXTERNAL and EMAIL.
Description: additional descriptive information. Maximum 1000 characters are allowed.
System key username: the person/user in charge of the device. To select a name from the identity list, click on the magnifying glass icon, select the name and press the Select button.
Installation date: the date of device installation.
Firmware version: the version of the firmware installed on the device.
Firmware installation date: the date of the last firmware update.
Time for the Stand-by mode (in minutes): the configured time before switching the device into the stand by mode.
Time for the power save or sleep mode (in minutes): the configured time before switching the device into the power save mode.
Green IT
Energy cost KWh: the price per KWh.
Stand-by timeout: the configured time before the device goes into stand-by mode.
Power safe mode timeout: the configured time before the device goes into power save mode.
Current price: the cost of the device when running. You can set the type of the currency value in Genius Conf -> Multitenant -> Tenants -> select the tenant -> Configure -> Switch to Advanced -> My module -> Device -> Green it -> Default price run.
Stand-by cost: the cost of the device when in the stand-by mode. You can set the type of the currency value in Genius Conf -> Multitenant -> Tenants -> select the tenant -> Configure -> Switch to Advanced -> My module -> Device -> Green it -> Default price standby.
Power safe mode cost: the cost of the device when in the power save mode. You can set the type of the currency value in Genius Conf -> Multitenant -> Tenants -> select the tenant -> Configure -> Switch to Advanced -> My module -> Device -> Green it -> Default price power save mode.
Location
Here information about the device's location are stored.
Organization unit, Location name, Location site name, Building, Address, Entrance, Floor, Room, and Room detail are the details available.
Note
The main information about locations (i.e. address, location site name and building) are defined at Organization -> Location.
To select devices, click Add to choose a group of devices or add the devices one by one. Click on the Update button to confirm changes. The following image shows the editing page:
Note
Default information (e.g. IP address or active job pattern) of a device can not be modified in the massive editing mode.
Note
Typical information of a single device or vendor (e.g. IP address or active job pattern) are not modifiable in the massive editing mode.
Asset
Device type
The device type section shows a list of device types detected by the system (for further details, refer to the Discovery section).

New Device Type
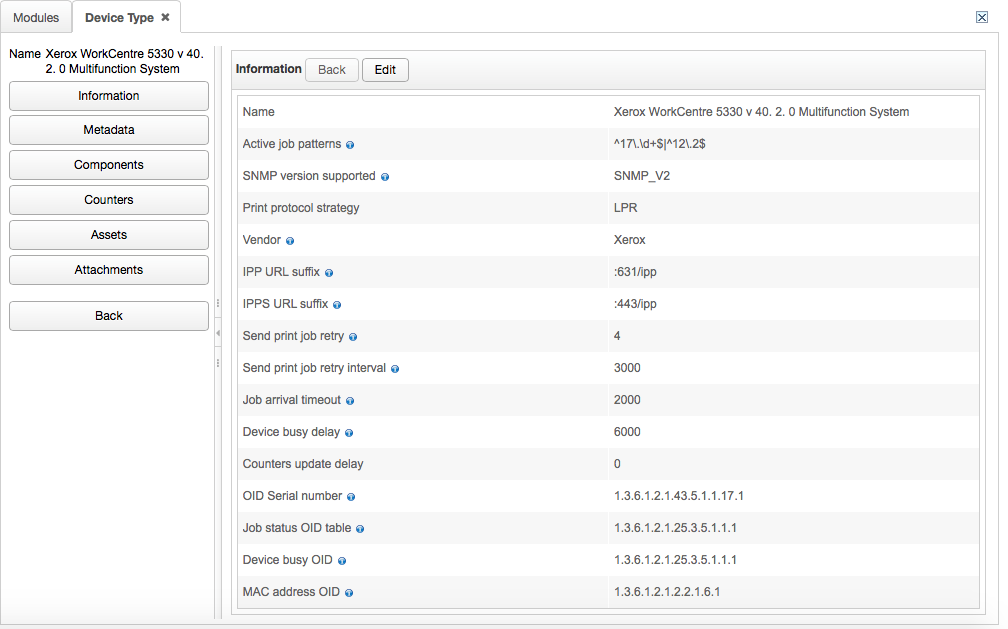
To add a new device type, press the New button and fill in the configuration fields:
Name: the name of the device type (required).
Active job patterns: values used by the system to detect the MFP status. In the default strategy, it represents the busy values read by SNMP busy OID The default value is 4|5. For Xerox devices that are not Xerox Phaser 3250, it represents a regular expression. The suggested value is ^17.d+$|^12.2$ (required).
SNMP version supported: the SNMP supported version (required). It can be:
SNMP_V1.
SNMP_V2.
SNMP_V3.
OFFLINE.
Print protocol strategy: the protocol used (required). It can be:
LPR.
IPP.
IPPS.
OFFLINE.
Vendor: vendor name, associated to a Vendor ID. The combination of Serial number and Vendor ID is universally unique.
IPP URL suffix: it disables the URL suffix for IPP device URL. You can define the value in Genius Conf -> Multitenant -> Tenants -> select the tenant -> Configure -> Switch to Advanced -> My module -> Device -> IPP Spooling -> IPP url suffix.
IPPS URL suffix: it disables the URL suffix for IPPS device URL. You can define the value in Genius Conf -> Multitenant -> Tenants -> select the tenant -> Configure -> Switch to Advanced -> My module -> Device -> IPP Spooling -> IPPS url suffix.
Send print job retry: it disables the number of retry attempts to print jobs. The default value is defined in Genius Conf -> Multitenant -> Tenants -> select the tenant -> Configure -> Switch to Advanced -> My module -> Device -> Spooling -> Send print job interval..
Send print job retry interval: it disables the waiting interval between the various retry attempts.
Job arrival timeout: the timeout after the arrival of a print job. This field disables the default timeout. The default value is defined in Genius Conf -> Multitenant -> Tenants -> select the tenant -> Configure -> Switch to Advanced -> My module -> Device -> Spooling -> Job arrival timeout..
Device busy delay: the time of delay before the device is ready. This field disables the default busy delay. The default value is defined in Genius Conf -> Multitenant -> Tenants -> select the tenant -> Configure -> Switch to Advanced -> My module -> Device -> Spooling -> Device busy delay.
Counters update delay: the time of the delay after the device idle status. After it has elapsed, counters can be read. This field disables the default delay. The default value is defined in Genius Conf -> Multitenant -> Tenants -> select the tenant -> Configure -> Switch to Advanced -> My module -> Device -> Spooling -> Counters update delay.
OID Serial number: the serial number attribute type specifies an identifier, the serial number of a device.
Job status OID table: the identifier number of the print job status table of the selecte device.
Device busy OID: the identifier number which show the current status of the device.
MAC address OID: the identifier number of the MAC address.
Edit Device Type
To edit a device type, select a device and click on the Edit button. Editable sections are: Information, Metadata, Components, Counters, Assets and Attachments.
Metadata
Structured information on devices is:
Model key notes: list of all known limitations.
Model type: the kind of device (e.g. printer, plotter, mfp, scanner, etc.).
Color print speed: the number of color pages printed per minute.
B/W print speed: the number of B/W pages printed per minute.
Scan speed: the number of scans per minute.
Minimum print volume recommended: the minimum value for the recommended print volume. Users must check the usage of the device. Usually, the vendor gives this information as a range (e.g. 5.000 up to 10.000 per month)
Maximum print volume recommended: the maximum value for the recommended print volume. Users must check the usage of the device. Usually, the vendor gives this information as a range (e.g. 5.000 up to 10.000 per month).
Minimum scan volume recommended: the maximum value for the recommended scan volume
Maximum scan volume recommended: the maximum value for the recommended scan volume.
Pit stops level 1,2,3: the preset amount of print jobs after which maintenance checks must be performed.
Width: information about the dimension (width) of a device, additional components are not taken into account.
Height: information about the dimension (height) of a device, additional components are not taken into account.
Length: information about the dimensions (length) of a device, additional components are not taken into account.
Units of measurement (only LFP/Plotter) describes the thickness of the paper (mm).
Weight shows the information about the weight of a device.
Private MIB support shows if Genius Bytes has the private mibs.
Software capability shows if it is possible to run a software on this model thus if an SDK exists.
Device certificates is the list of typical certificates like blue angel, energy star or common criteria.
Customer classification: a text containing a code which describes the customer internal classification of the model, e.g. table printer class (TPC) or multi-functional color device class 1 (MFCD1). It can identify the kind of device in use (even it is not on the market anymore).
Printer type: the printer type. Values are laser, ink, wax, thermic, etc.
Color: shows if it is a color print device.
Green IT
Energy TEC value: TEC information about the power consumption (kWh per week). It is defined by EU Energy Star Organization.
Energy Efficiency Index (EEI): it is based on the TEC-value. Calculation is defined by EU Energy Star Organisation.
Energy power consumption OFF: how much wattage is used if the device is OFF. Power cable is plugged in.
Energy power consumption stand-by mode: how much wattage is used when the device is in stand by.
Energy power consumption in sleep mode: how much wattage is used when the device is in the power save mode.
Stand-by mode timeout: how long the device is active before switching to the stand by mode.
Power safe mode timeout: how long the device is active before switching to the power safe mode.
Current price: the cost of the running device.
Stand-by cost: the cost of the device in the stand by mode.
Power safe mode cost: the cost of the device in the power safe mode.
Components
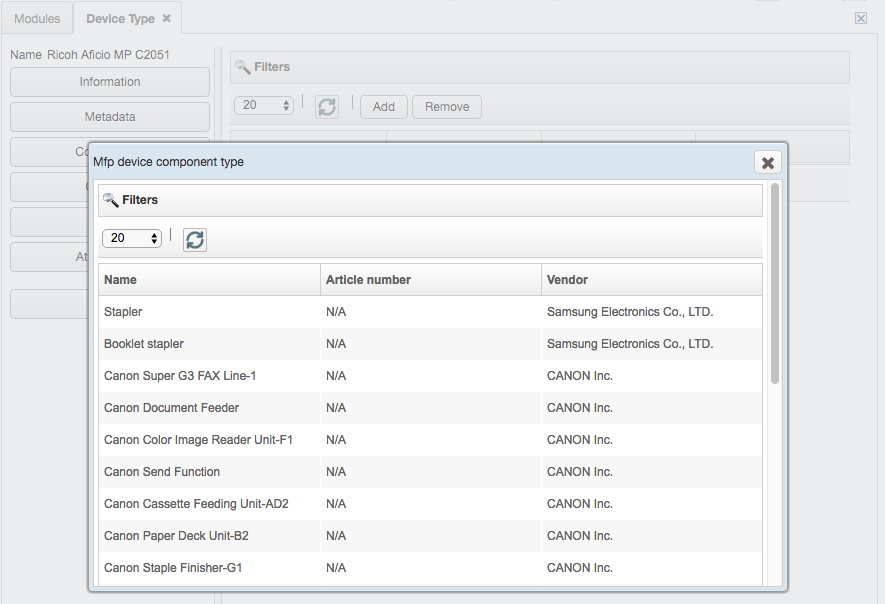
When a device gets a new component, it must be added to the device's component list. To add the component to the list and associate it to a device, select the device, click Edit button -> Components -> Add:
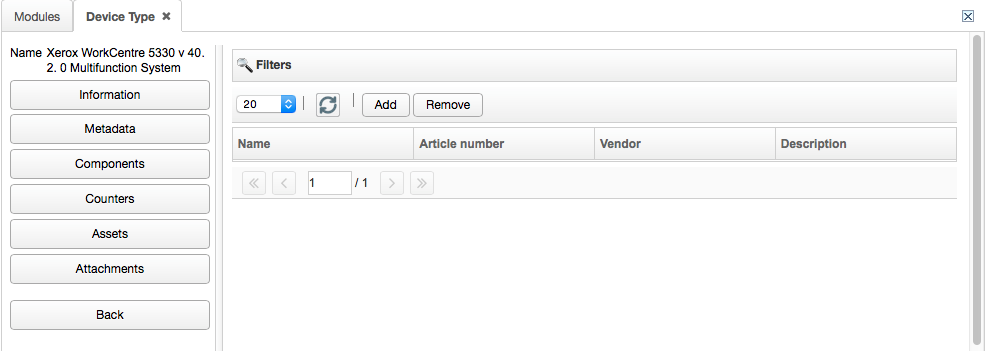
To select the component, click on it twice (for further details about the components, refer to the Components section.).
Counters
Through counters, the amount of copies and print jobs a device makes can be verified. This information is shared among four different types of counters:
Function (PRINT, COPY, SCAN, etc.),
Format (A4, A3, etc.),
Color (BLACK_WHITE, COLOR) and
Side (SIMPLEX, DUPLEX).
Counters can be aggregable or not aggregable. A counter is aggregable when its subsets can be collected in mass. For example, PRINT is a generic counter whose value can be obtained adding aggregable counters as PRINT-A4-BLACK_WHITE, PRINT-A4-COLOR, PRINT-A3-BLACK_WHITE, PRINT-A3-COLOR and other supported document sizes.
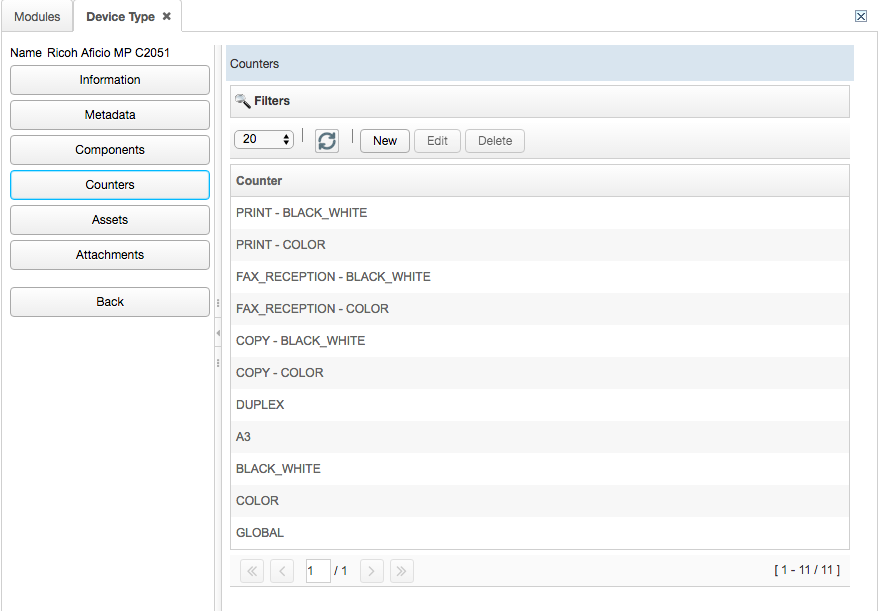
For each device, there is an available counters list. A Ricoh device's counters list is displayed in the following image.
Note
The Genius Server automatically detects counters when a new device is added. However, the Genius Server allows users to add counters manually. This feature is useful if a device is not fully supported. For further details, refer to the Add a New Counter section.
Note
If a new Genius Server version provides an update for the device, delete all counters related to this device and perform a new device detection. For further details, refer to the Discovery section.
Add a New Counter
Unsupported devices may have counters, which could not be detected by the Genius Server. Counters that have not been recognized during the device detection can be added.
To add a new counter, press the New button from the device counter list.
Specify the counter details:
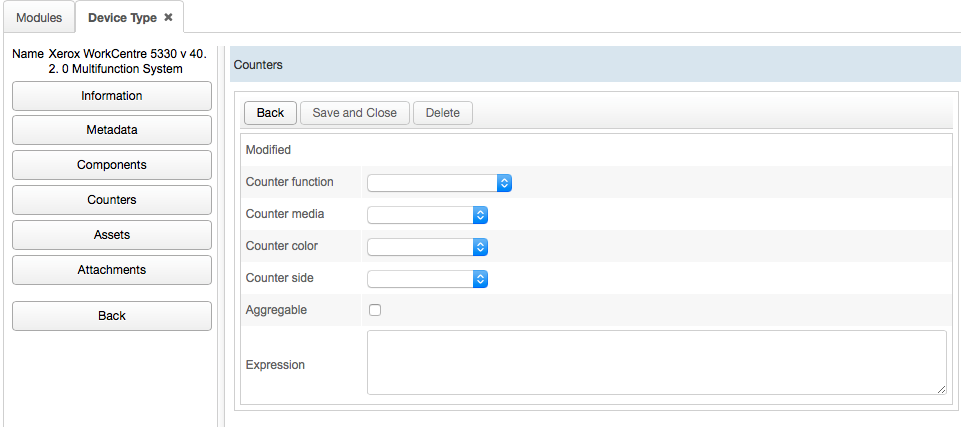
The list of fields with their description is:
Counter Function: NOT_AVAILABLE, PRINT, COPY, SCAN, FAX_RECEPTION, FAX_TRANSMISSION.
Counter Media: NOT_AVAILABLE, A3, A4, A5, B4, B5, FOLIO, LEDGER, LEGAL, LETTER, DLT, SQUARE_INCH, STATEMENT.
Counter Color: NOT_AVAILABLE, COLOR, BLACK_WHITE.
Counter Side: NOT_AVAILABLE, SIMPLEX, DUPLEX.
Aggregable: if checked, the counter is aggregable.
Expression: a valid OID must be specified, it can be added with the hash code value (
trueparameter is required) or can be not encoded (falseparameter is required). The two different expressions are listed below:my:snmpVal(device, 'CBA1DBFAACD4270833A1600EE4057E81D7C0A0D313631D6651F4CAAAA 76B258D1F28FC16355BF1A4F4A1917AA51CD5C7', true) my:snmpVal(device, '1.0.0.00.0.11.2.3', false)
How to Delete Counter Definitions
In some cases it is necessary to manually delete counter defintions. For this navigate to Admin -> Device Management -> Asset -> Device Type.
Select the device whose counters are to be deleted here and either double click it or click Edit.
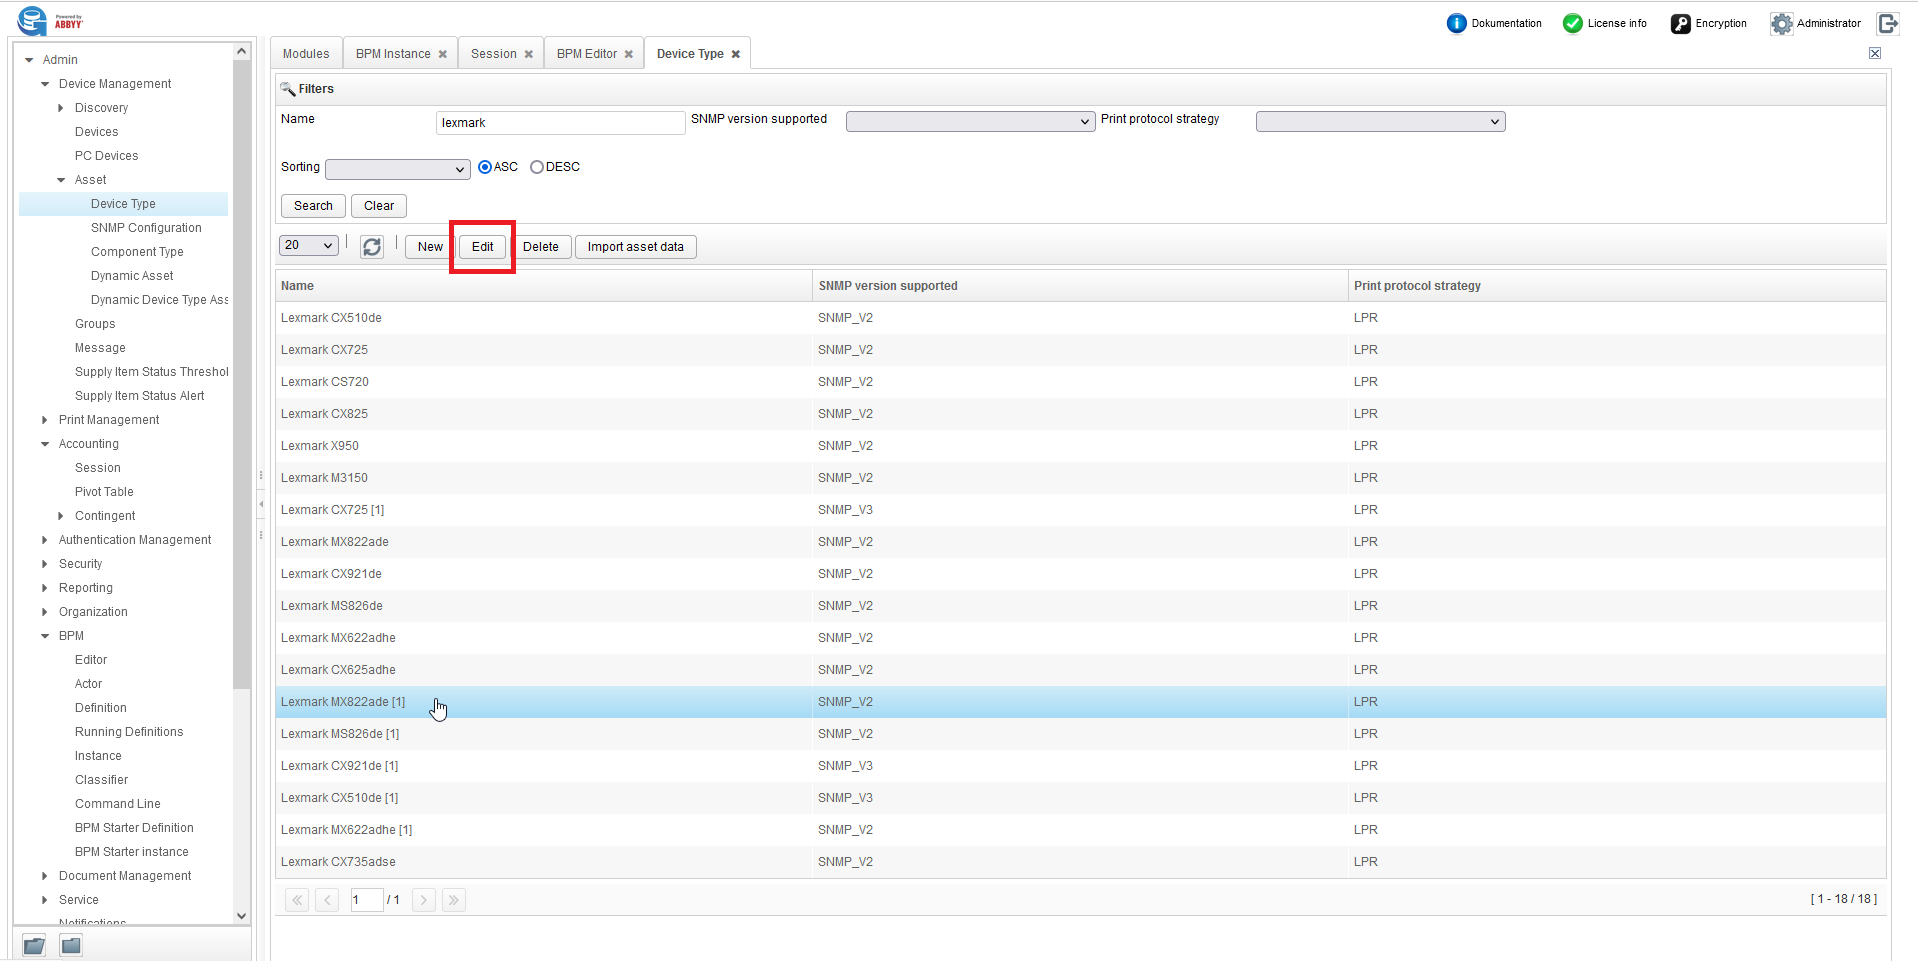
In the next window click on Counters on the left side.
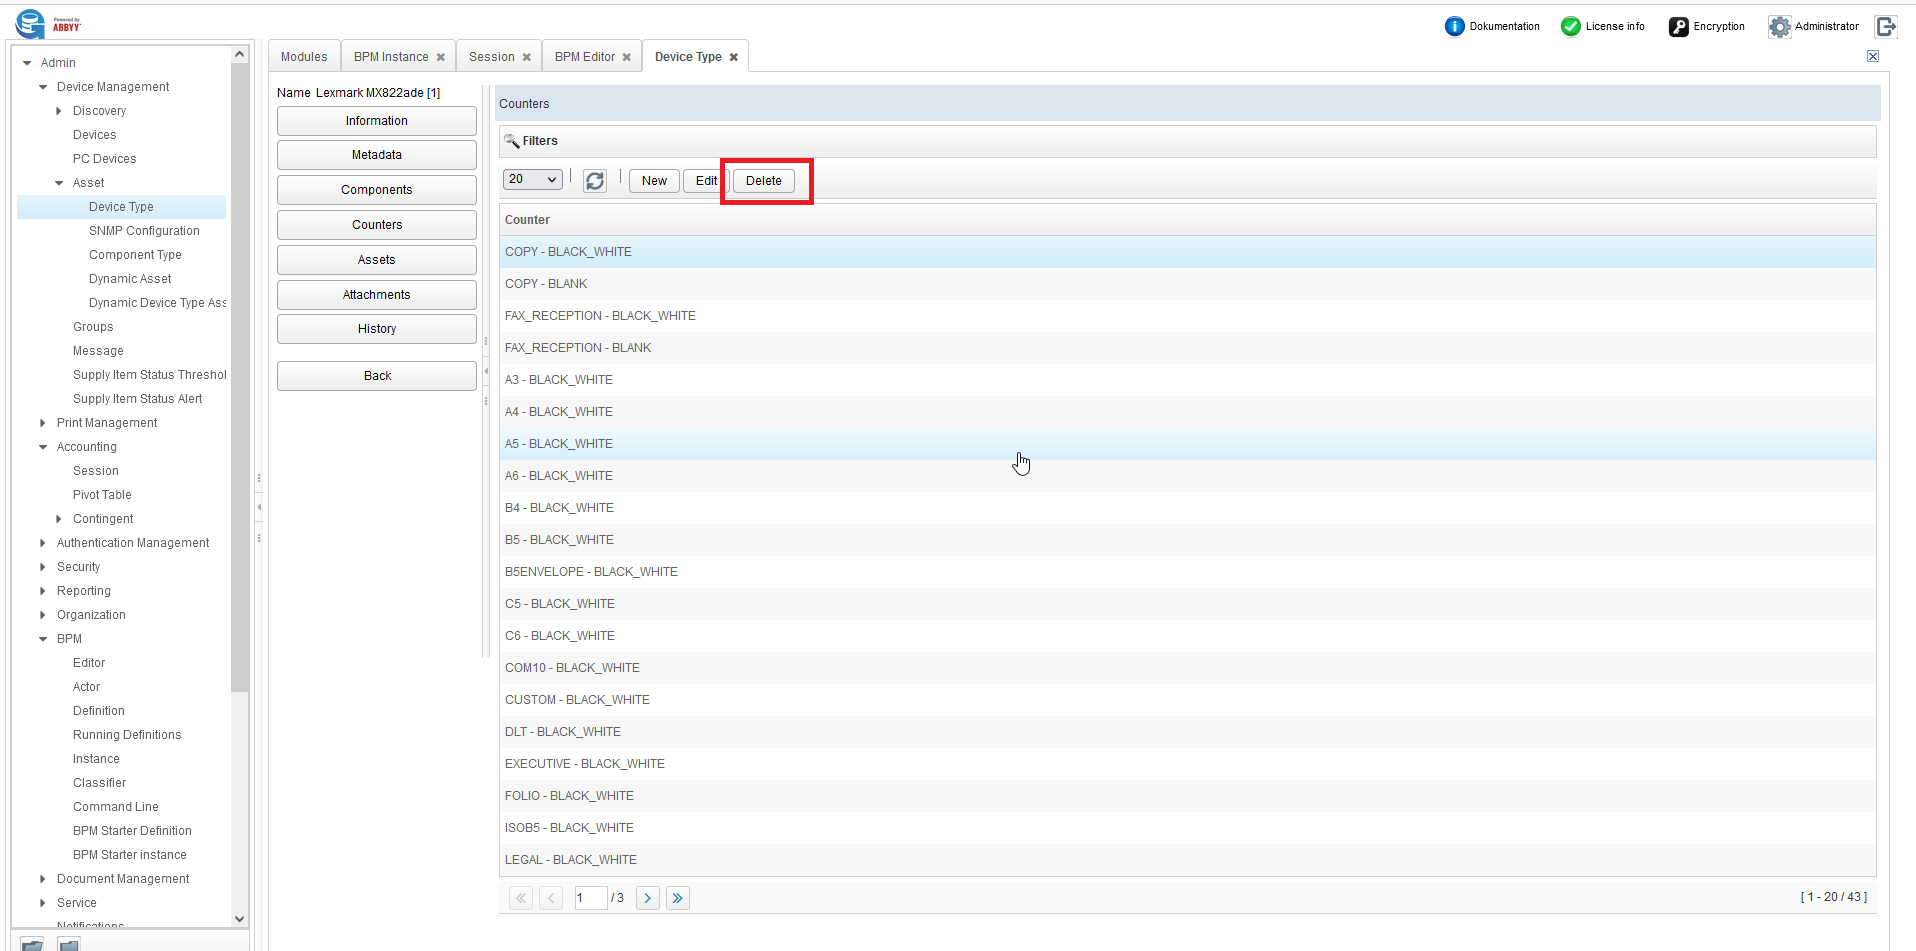
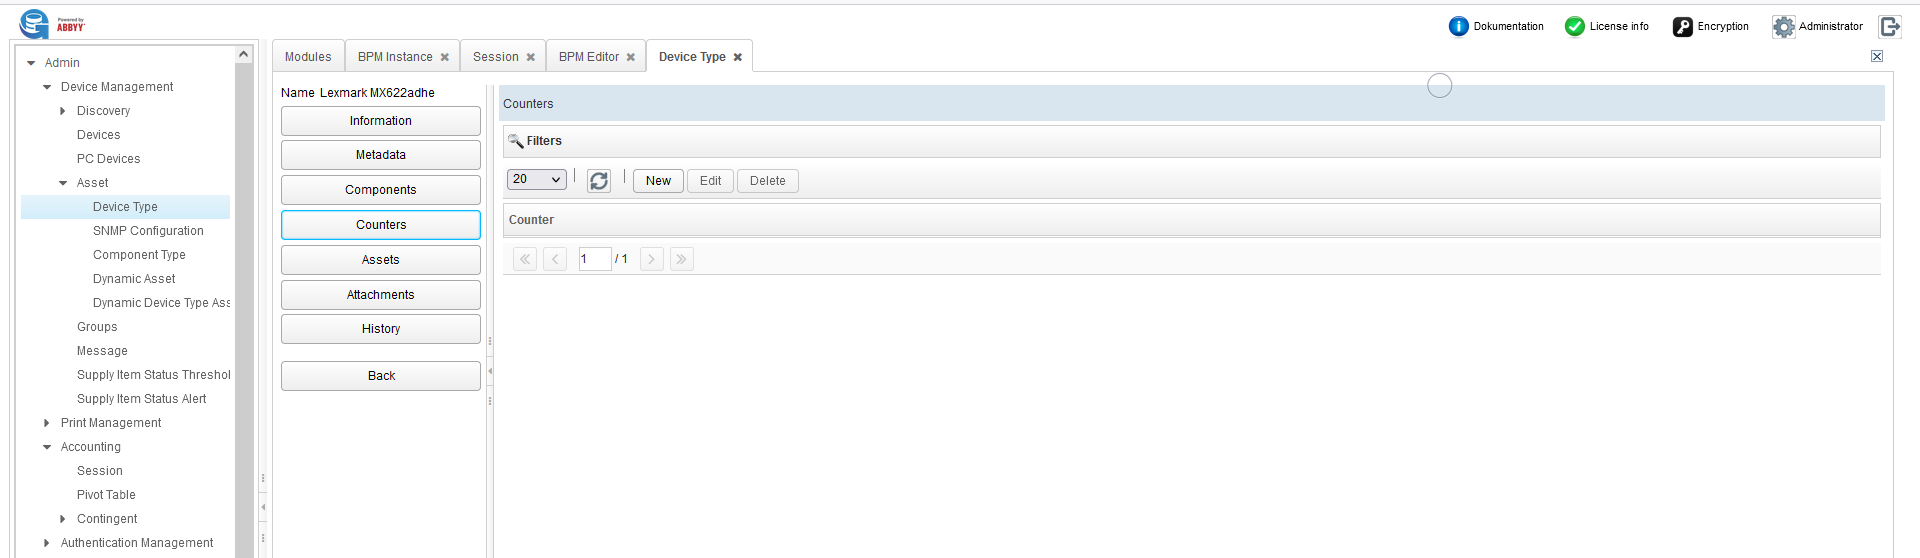
Then select the counter you want to delete by clicking it and then press Delete at the top of the page. Confirm and the counter will be deleted. Below an example on how a counter list looks if all counters have been deleted.
SNMP Configuration
SNMPv1 and SNMPv2 are protocols, which notify events or errors occurred on devices. SNMPv1 and SNMPv2 are protocols, which notify events or errors occurred on devices. Groups of devices are assigned to SNMP communities for security reasons.
This section shows a list of community names, which is used to read data via SNMP. By default it is public.

New Community
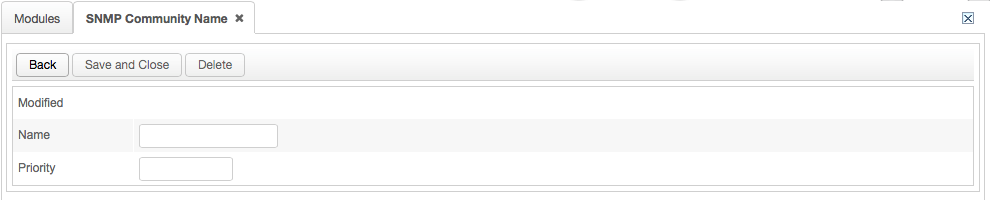
To create a new community, press the New button and fill in the configuration fields:
Priority: allowed values which range from 0 to (2^31)-1, the lower is the number the higher is the priority.
Port: the SNMP port.
Timeout: the connection timeout with the community.
Retries: the number of retries of connection
SNMP version: the versione of the SNMP. It can be:
SNPM_V1
SNPM_V2
SNPM_V3
Community Name: name of the community.
To save, click the Save and Close button.
Edit community
To edit a community, select the community and click the Edit button.
Note
Only the priority value is changeable.
Delete community
To delete a community, select the community and click on the Delete button, then confirm.
Note
To delete communities already assigned to a device, remove the association first. The default community name cannot be deleted.
Component Type
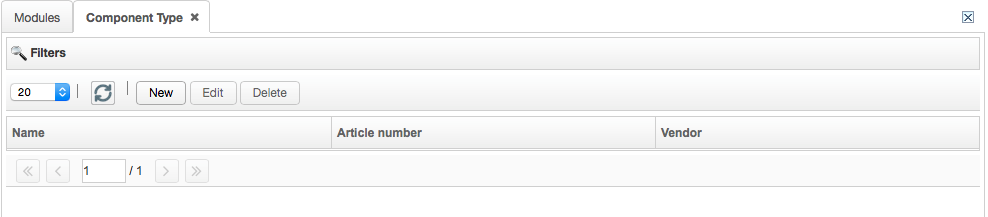
The Genius Server automatically detects the device components such as finishers, input optional trays, scanners etc. If the components are not recognized, users can add them manually (refer to New component section).
New component
To add a new component, click the New button,
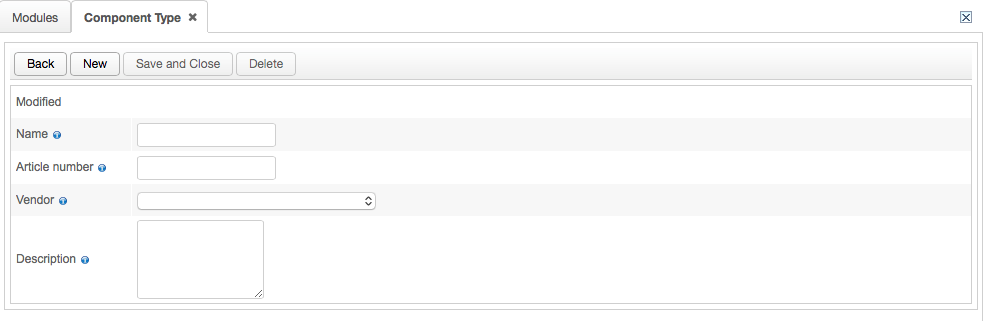
and enter the following information:
Name: the component name (required).
Article number: the component article number.
Vendor: the vendor name (required).
Description: the component description (required).
To save, press the Save and close button.
Edit component
To edit a component, select an item from the list and press the Edit button. Only the Article number and the Description fields are editable.
To confirm, press the "Save and close" button.
Delete component
To delete a component, select an item from the list, press the Delete button, then confirm.
Dynamic Asset
The most common device assets can be summarized in:
System Data (serial number, vendor ID, device type, IP-Address, life cycle status, etc.).
Customer Specific Data (description, location, cost center,etc.).
Security Data (SNMP version and community names).
Runtime information (status of consumables, network status).
Main assets about devices (e.g. device vendor or serial number) are reported in the system by default. For other customizable items, users must define a dynamic asset.

New Dynamic Asset
To define a new dynamic asset, press the New button and fill in the fields.
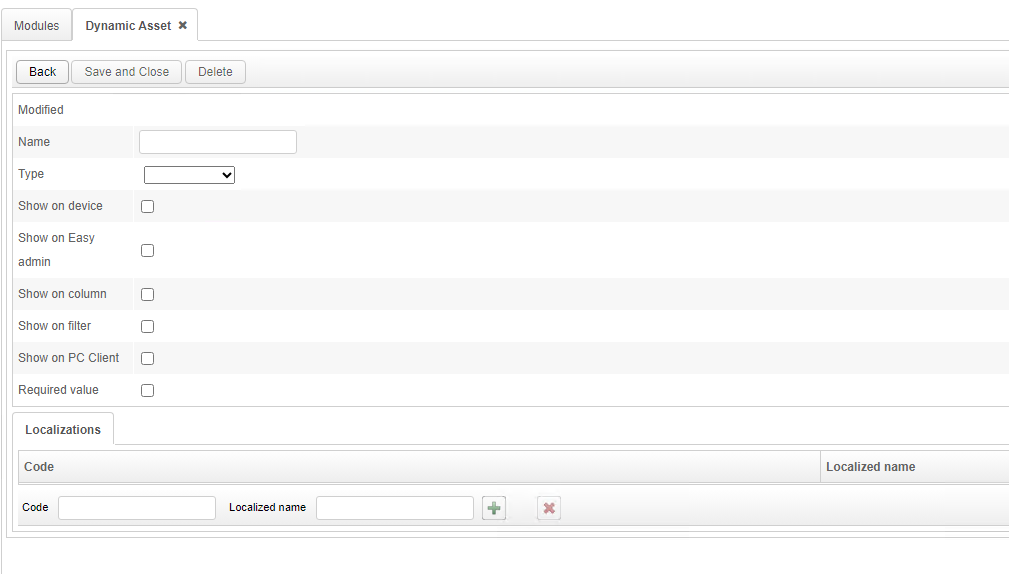
Name: the name of the dynamic asset (required).
Type: how the information is visualized (required).
Show on device: if checked, the dynamic asset is displayed on the device's overview.
Show on Easy admin: if checked, the dynamic asset is displayed on Easy admin (refer to Easy Admin section).
Show on column: if checked, the dynamic asset is displayed on the column.
Show on filter: if checked, the dynamic asset is displayed in filters.
Show on PC Client: if checked, the dynamic asset is displayed on Genius PC Client.
Unique value: if checked, the dynamic asset corresponds to a unique value, e.g., only one service number, one device, etc.
Required value: if checked, the dynamic asset corresponds to a required value.
Fill by OID: if checked, the dynamic asset is evaluated from a specified OID.
Localization
This section allows the administrator to localize the newly generated dynamic assets. For Code enter the language code (e.g., en_EN, en_US, de_DE, it_IT) and for Localized name the name in the chosen language. Press the + button to add the localization. Multiple localizations can be added. To delete a localization, select it and press the red X button.
To save the dynamic asset, press the Save and close button.
Dynamic Device Type Asset
In this section, a list of dynamic device type assets is displayed. Users can create new assets, and edit or delete the existing ones.

Name: the name of the dynamic asset (required).
Type: how the information is visualized (required).
Show on device: if checked, the dynamic asset is displayed on the device.
Show on column: if checked, the dynamic asset is displayed on the column.
Show on filter: if checked, the dynamic asset is displayed on among filters.
Show on PC Client: if checked, the dynamic asset is displayed on Genius PC Client.
Unique value: if checked, the dynamic asset corresponds to a unique value, e.g., only one service number, one device, etc.
Required value: if checked, the dynamic asset corresponds to a required value.
Localization
This section allows the administrator to localize the newly generated dynamic asset types. For Code enter the language code (e.g., en_EN, en_US, de_DE, it_IT) and for Localized name the name in the chosen language. Press the + button to add the localization. Multiple localizations can be added. To delete a localization, select it and press the red X button.
To save the dynamic asset type, press the Save and close button.
New Dynamic Device Asset
To create a new dynamic asset for device type, press the New button and fill in the fields. To allow the visualization of assets on the MFP device, on the column or/and among the filters, mark the relative checkbox. To show the asset as a required field, mark the Required value checkbox. Here an example of how a new asset type could look:
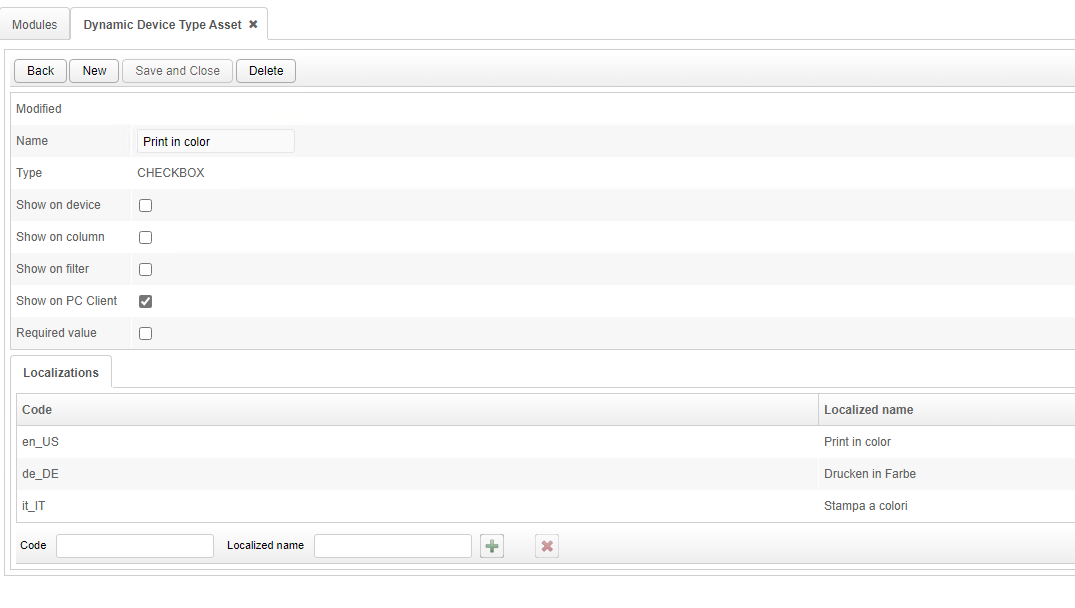
Edit a Dynamic Device Asset
To edit a dynamic asset for a device type, select the asset and press the Edit button.
Note
the Name field is not editable.
Delete a Dynamic Device Asset
To delete a dynamic asset for a device type, select the asset, press the Delete button and confirm. If a value has been assigned to an asset, the asset cannot be deleted. An error message occurs, press OK to continue.
MFP Device Group
By default, all devices displayed in the device list are grouped in myDefaultDeviceGroup and new devices are automatically added to this group.
Besides the preconfigured group, users can gather two or more devices in a group according to a specific property (e.g. A3 paper size, B/W or color printing, vendor number) and award them a grant (for further details, refer to the Grant section).


Create a New Group
To create a new device group, press the New button, enter the Name and the Description and press Save and Close. Name is a required field.

Now the group is displayed on the list.
Add Devices to an Existing Group
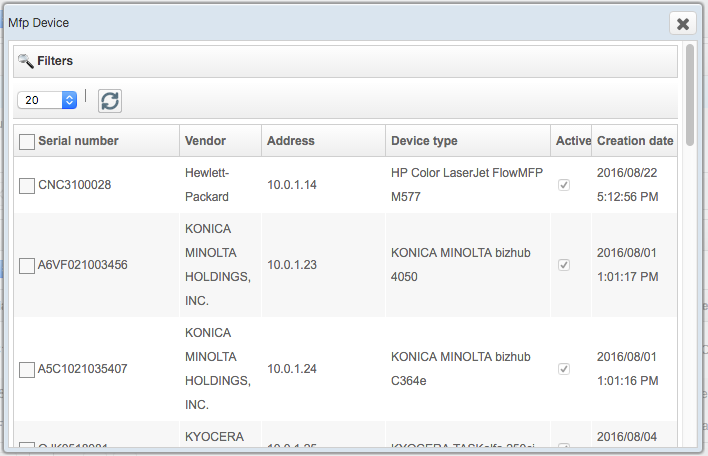
To add a device to a group, select the group, press Add devices button on the bottom of the page and mark the checkbox of the devices selected. To confirm, press Select, then click on OK. Now the devices are displayed on the list.
Delete a Device in an Existing Group
To delete a device from a group, select the group, scroll down to the list of devices, select the device, press the Delete button and confirm clicking on Delete in the prompt.
Auto Creation
Each time a detection of a new device is performed, a new group for device type and/or device vendor is created. Auto creation is not part of the admin web interface, but can be found on the /conf web site, which has been described in a previous chapter.
To enable the group auto creation go to the /conf web interface hostname:8080/conf.
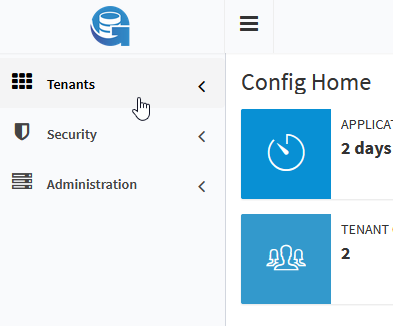
Login as administrator and then click Tenants.
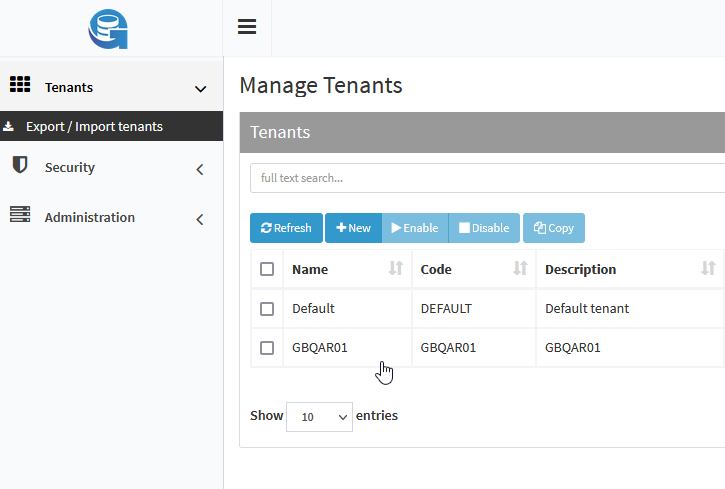
Choose the tenant you wish to modify and click on the tenant.
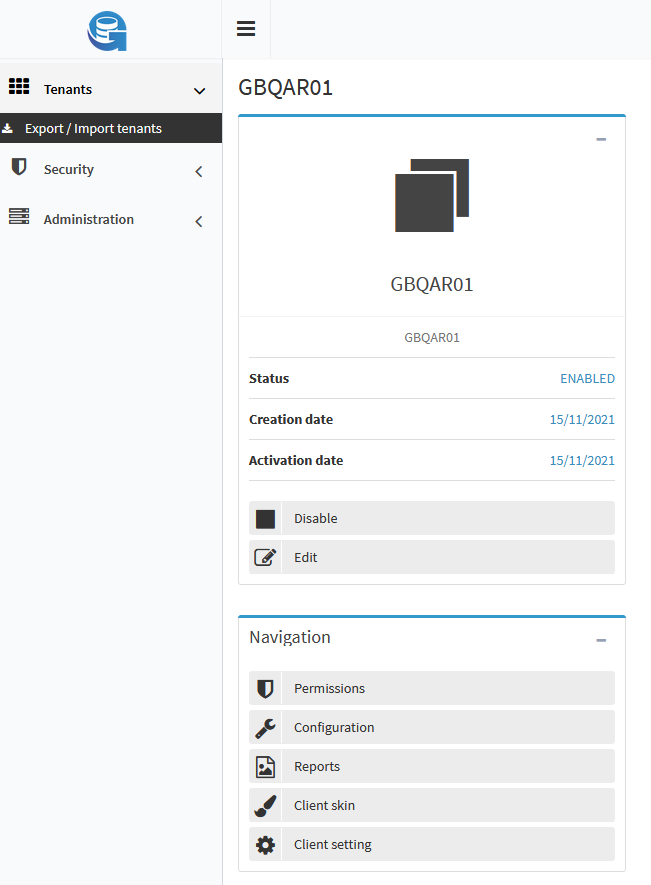
Click on Configuration.
Click on Advanced Configuration.
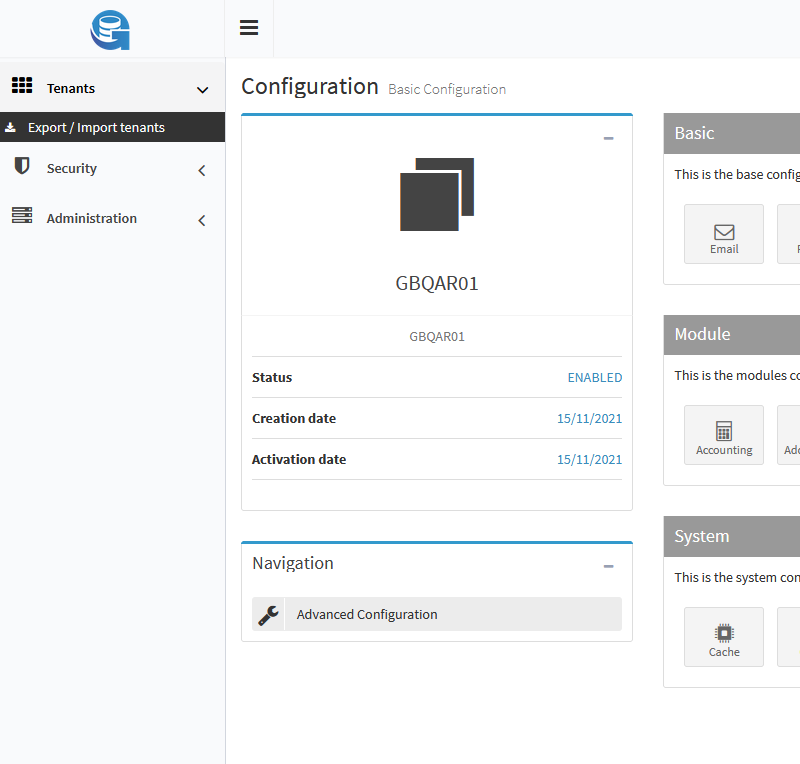
In the Module section click on Device.
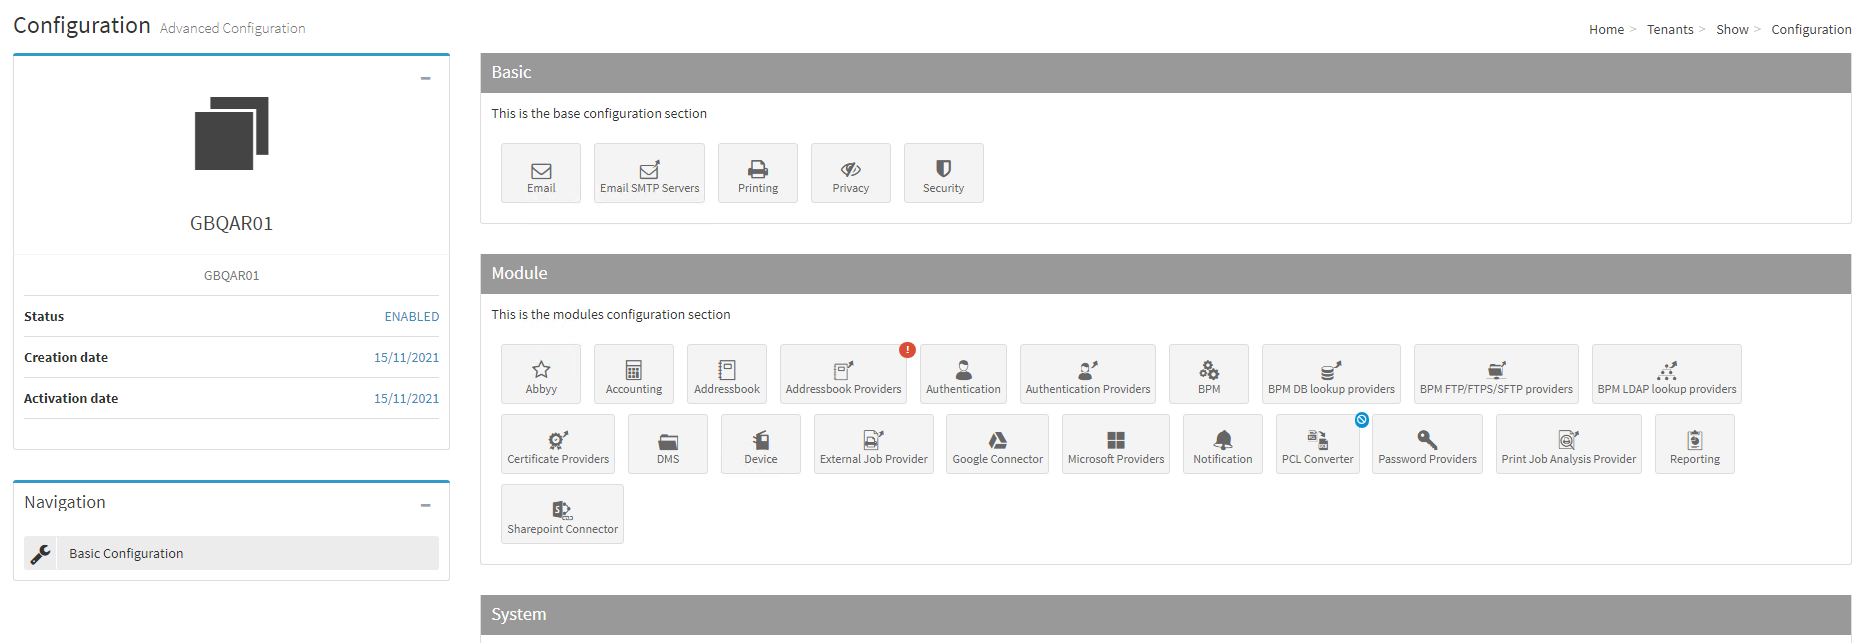
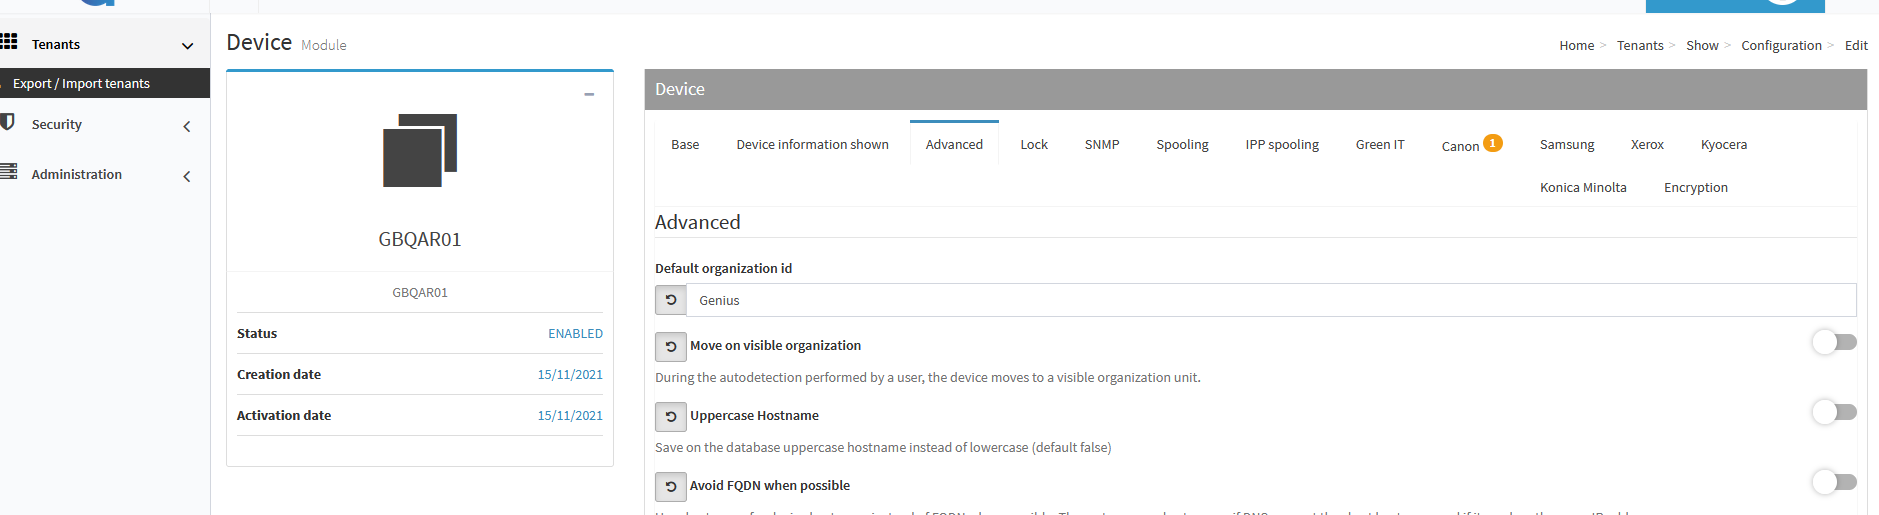
There click on the Tab Advanced.
Make sure to activate Group auto creation by Device Type as well as Group auto creation by Device Vendor.
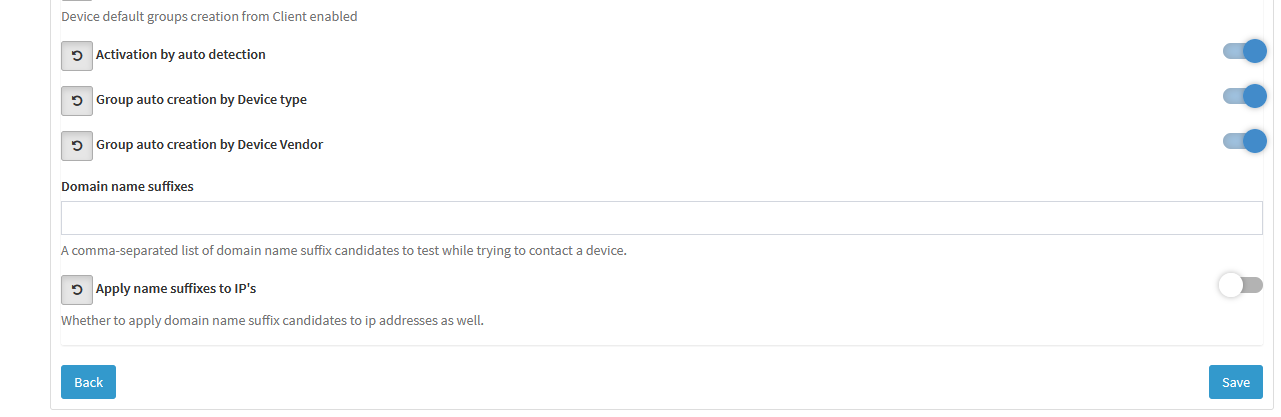
Press Save to save the changes.
Filters
In general, filters allow users starting a targeted search for devices, assets, groups, etc. filling in one or more fields (e.g. serial number, address, device type, vendor, status, etc.).
Device Message

This section shows device messages, e.g., "paper is out (4)". Closed messages are greyed out.
ID: the ID of the message.
Severity: the severity of the message.
Device: which device sent the message.
Device type: the device type.
Description: the description of the message.
Source: the source of the message, e.g., POLL.
Status: the status of the message, e.g., CLOSED or NEW.
First occurrence: the first occurrence of the error.
Last occurrence: the last occurrence of the error.
Process date: the date when the message has been processed.
For details on the message double click the message field. Here details like the Code or Training level are documented.
Supply Item Status Threshold
In this section it is possible to define the threshold of the toner and waste toner.
Defining a threshold, the admin can configure an alert for when the toner is almost empty, or the waste toner is almost full.

To define a threshold, press on the New button.
Enter the values in the following fields:
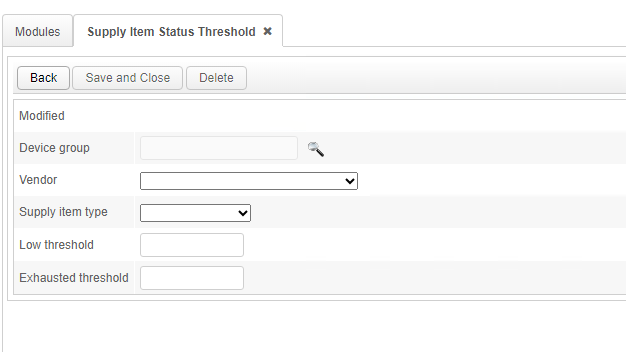
Device group: the group of devices on which apply the threshold. Selecting the magnifying glass, it is possible to choose the group.
Vendor: the vendor of the devices on which apply the threshold.
Supply item type: the supply item of which the admin defines the threshold. The list of possible supply items contains items like TONER, WASTE_TONER, INK and many more and is updated regularly in new Genius Server releases.
Low threshold: a parameter that determines that the toner is almost empty, or the waste toner is almost full.
Exhausted threshold: a parameter that determines that the toner is finished, or the waste toner is full.
Hint
For Example:
Selecting the toner, the low threshold can be set on 10 and the exhausted threshold can be set on 2.
To save, press Save and Close.
To cancel, press Back.
To delete a definition, select the item and press the Delete button.
To edit a definition, select the item and press the Edit button.
Supply Item Status Alert
In this section it is possible to configure the status alert of the toner or waste toner.

To create an alert, press the New button.
Enter the values in the following fields:
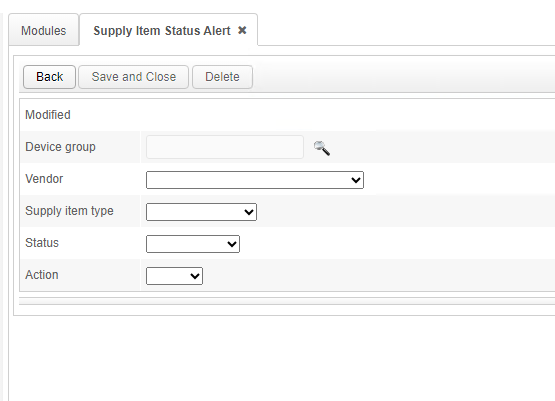
Device group: the group of devices on which apply the status alert. Selecting the magnifying glass, it is possible to choose the group.
Vendor: the vendor of the devices on which apply the status alert.
Supply item type: the admin can choose the supply item to monitor and therefore receive the status alert on the selected one. It can be:
TONER
WASTE_TONER
Status: the status when send the alert (i.e. one of the parameters configured in the Supply Item Status Threshold). It can be:
LOW
EXHAUSTED
Action: the action to take when the status alert is reached. It can be:
EMAIL: the status alert is sent via email.
BPM: when the status alert is reached, a BPM process starts.
Selecting Email, two new parameters appear:
Email recipients: the email of the person who needs to receive the alert.
Email locale: the language of the automatic email to send to the recipient.
Selecting BPM, the following parameters appear:
BPM definition: the process created ad hoc to manage the toner and the waste toner.
Definition variable: the variables to be used in the BPM process.
Type: the variable type. It can be:
DYNAMIC: the output changes depending on the input.
STATIC: the output is a fixed parameter.
Starter variable: the item that starts the process.
To save, press Save and Close.
To cancel, press Back.
To delete a definition, select the item and press the Delete button.
To edit a definition, select the item and press the Edit button.