
DMS
Genius DMS is an Enterprise Content Management (ECM) system that manages all the contents within the solution. Genius DMS is a repository supported by the server that stores contents, attributes, links, versionings, ACL security, histories and searches. Users can configure the document category in the admin web console. The Genius DMS is fully integrated into the platform and triggered by the BPM engine. According to the selection made during the installation process, Genius DMS data are stored in the Genius Server database and in the filesystem.
Category management
In Genius DMS, categories allow you to quickly and easily organize and classify contents and help users retrieve the content they are looking for. Categories are organized in a hierarchy. Folder and Device are the root folders, the main categories. The system includes some default built-in categories and categories, which are the following:
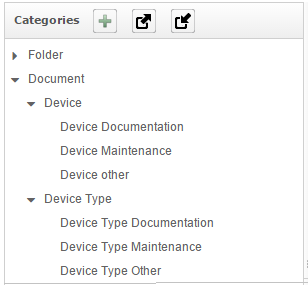
The administrator can create other categories and subcategories among which he can add options, attributes and subcategories.
Content category
The administrator can associate some metadata to a content in order to specify metainformation. These metadata are called Attributes and are useful during the search and the organization of the content.

Content category attributes
A category has a number of attributes, which classify the information.
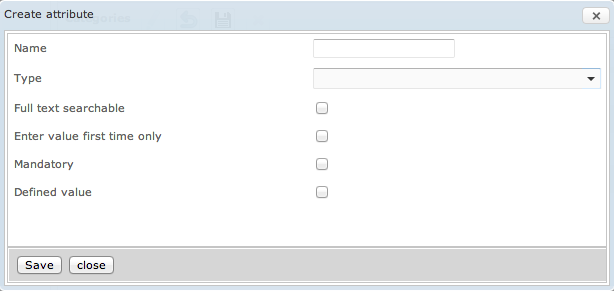
To add attributes, press the pencil (edit) button near the Category details, then go to attributes at the bottom of the page and press the + button in the toolbar. Once the form opens, fill in the following fields:
Name: the name of the attribute (required).
Type: the type of the attribute (required). It can be:
Generic Text: it stores a text value.
Generic Boolean: it stores two values between which choose (e.g. on/off, enabled/disabled, etc.).
Generic Date: it stores a date.
Generic Double: it stores decimal figures.
Generic Long: it stores integer and long integer numbers.
Current Date: it stores the current date of a document saving, modification or creation.
Current User: it stores the user who saves, edits or creates a document.
Uuid: it stores the unique identifier of a document.
Full text searchable: if checked, the full text of the document is searchable.
Enter value first time only: if checked, the value has to be entered only the fist time.
Mandatory: if checked, the field is required.
Defined value: if checked, it is possible to choose among pre-configured options.
Main attributes: if checked, the attribute has the priority so it is shown as first attribute (it is also shown in the category field on Gweb).
Current Date, Current User and Uuid attributes are automatically managed by the system:
To save the attribute(s), press the Save button.
To edit an attribute, select the attribute and press the pencil (edit) button, perform the changes and then press Save. To make an already created attribute become a Main attribute, select the attribute and press the switch button.
To delete an attribute, select the attribute and press the X button.
Hint
Example:
Attributes: the birthday and the city of residence.
For the Curriculum Vitae category the administrator chooses as attributes the birthday and the city of residence. In this way it is possible to search a CV through this parameters.
Content category grant creation
Create a grant is the list of users or groups of users that are allowed to create documents in the selected category. If any creation grant has not been added, every user is enabled to create a document. No ACL are performed.
To create a grant, press the pencil (edit) button then go to create grant at the bottom of the page, press the user or the group of users icon and select one or more of them.
Hint
Example:
Group: Human resources group.
Grant: Create a document.
After having created the Curriculum Vitae category, the administrator creates the grant and sets that only the human resources group can create documents in this category.
Content category grant searching
Search a grant is the list of users or group of users who are allowed to do a research among the documents in a selected category. If any search grant hasn't been added, every user is enabled to create a document. No ACL are performed.
To create a search grant, press the pencil button then go to search grant at the bottom of the page, press the user or the group of user icon and select one or more of them.
Content category subscription
The subscription is a feature which allows the administrator to ask for a notification once a file or a document is modified, edited, deleted or created.
To subscribe, select the category, press the pencil (edit) button, in the palette go to Subscription and press the icon to add one or more users or a group in order to receive notifications.
Default ACL
ACL (Access controlling list) is a list of permission attached to an object. To set a default ACl, select the category, press the pencil (edit) button, in the palette go to Default ACL and press the icon to add an ACL to one or more users or a group. Select the identity and press the Select button.
Add a content category
To add a new content category, login on the web console as DMS administrator. Go to Document management -> Category management. Select the category or the subcategory in which the new category is added and press + in the toolbar.
Once the form opens, fill in the the fields (name is required).
To save the category, press the floppy disk in the upper toolbar.
Update, cancel and delete a content category
From the category management view, the DMS administrator can update, cancel changes and delete a content category.

To update a content category, select the category and click on the pencil (edit) button in the toolbar. Modify the information or add new attributes if needed. To apply changes, press the floppy disk icon. To cancel changes press the arrow (cancel) in the toolbar or move to another page.
To delete the category, click X (delete) in the toolbar and press OK to confirm.
To delete a content category, select the category to delete and click on the X (delete) button in the toolbar. Press OK to confirm.
Folder browsing
In the Folder browsing the administrator can view, add, edit, move, delete, subscribe and unsubscribe folders and documents.
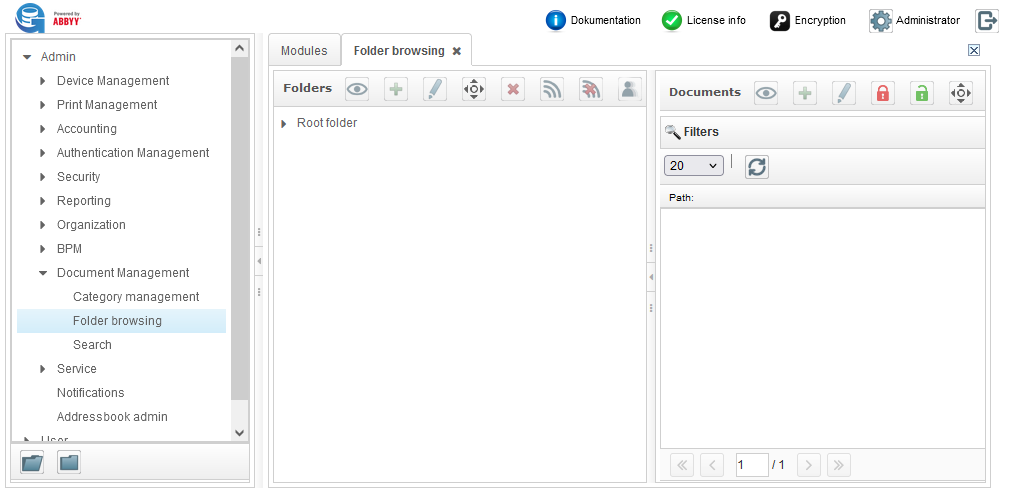
Folders
To visualize all the category or subcategory main features, press the eye (view) button. A view folder screen opens. The user finds the name, the path, the creation, the last modification (if present), the state and the category of the folder. At the bottom of the screen, it is possible to visualize attributes, the ACL (Access Control List) security, the history (the document time line: all the activities carried out on the document) and subscriptions.
If the document is public, every user is allowed to do the following:

To add a new folder or subfolder, select the folder or the subfolder where to add the new one and press the + (add) button. A screen opens, select the folder and press Forward, enter the name (required), attributes and the subscription (the notification is sent once a file or a document is modified, edited, deleted or created), if necessary. Once the attributes are saved, they cannot be edited or deleted anymore (for more details refer to the Hint in the next section).
To edit a folder, select the folder and press the pencil (edit) button. In the screen opened, users can edit the Name of the folder and subscriptions. To move a folder, press the move folder button. A screen opens, press Root folder, select the folder to move, then press Move. Select the destination folder and press Move again.
To delete a folder, select the folder and press X button and press OK. To subscribe a folder, select the folder and press the subscribe button. The subscription is automatic.
To unsubscribe a folder, select the folder and press the unsubscribe button. The unsubscription is automatic.
To massive manage the ACLs, select the user icon and the following windows opens:
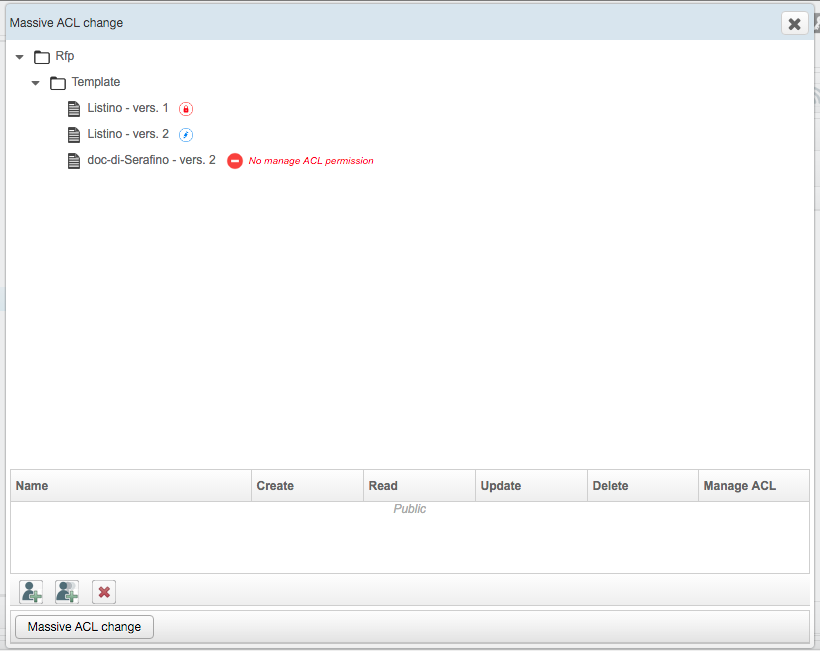
Press the user icon or the group of users icon to add a user or a group of users and the relative ACLs. to delete a user or a group of user, select it and press the red cross. to apply the massive ACL change, press Massive ACL change.
Note
The massive ACL change can be performed only if the following two conditions are available:
the modify enabled setting is checked on the category.
the user has the ACL manage permission or he has the DMS super user role.
When you create a new folder with ACL, the administrator is expected to have enabled the read, update, and delete privileges to be able to work on the folder. Once a document category is created, it automatically inherits its document category ACL but they are still changeable.
To enable an ACL in a public folder, select the folder, press the pencil button, and then click on the add (user or group of users) icon. Select the user or the group and confirm the necessary checkbox. To save, press the Save button.
Hint
Example:
Groups: Human resources group and Administration group.
ACL: create, update, modify, delete and read a document.
The administrator enables the ACL and assigns to the Human resources group the create, update, modify and delete privileges to be able to work on the CV folder, but he assigns to the Administration group only the read privilege.
Documents
To visualize a document, select the document and press the eye (view) button. A view folder screen opens. The user finds the name, the path, the version number, the file, the size, the creation date, the last modification date, the state and the category of the document.
At the bottom of the screen, users can visualize attributes, the ACL (Access Control List) security, the version, the link (intertextual connection), attachments, the history (the document time line: all the activities carried out on the document).
If the document is public, every user can do the following things:

To add a new document, select the folder or the subfolder where to add the new document and press the + (add) button. A screen opens, click on Document, select the category among the creation grant categories and press Forward, enter the name (required). Upload a file, enter the attributes, the ACL, the link and the attachments, if necessary.
Hint
Example:
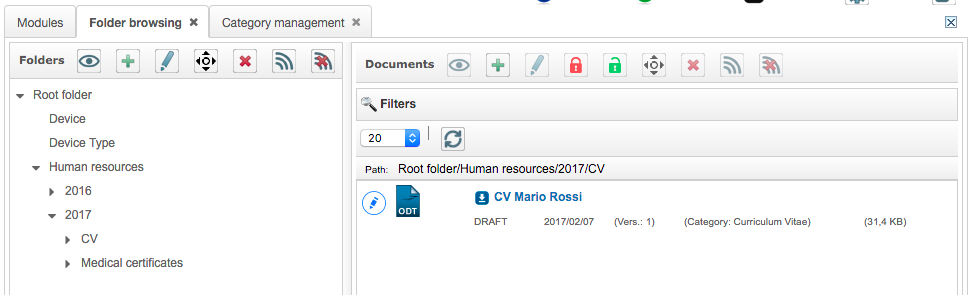
Folders: Human resources, 2017, CV, Medical certificates.
Document: CV Mario Rossi
The administrator creates a folder tree: the Root folder named Human resources, a folder named 2017, two folders named CV and Medical certificates. In the CV folder there is the CV of Mr. Mario Rossi received in the year 2017.
Content browsing
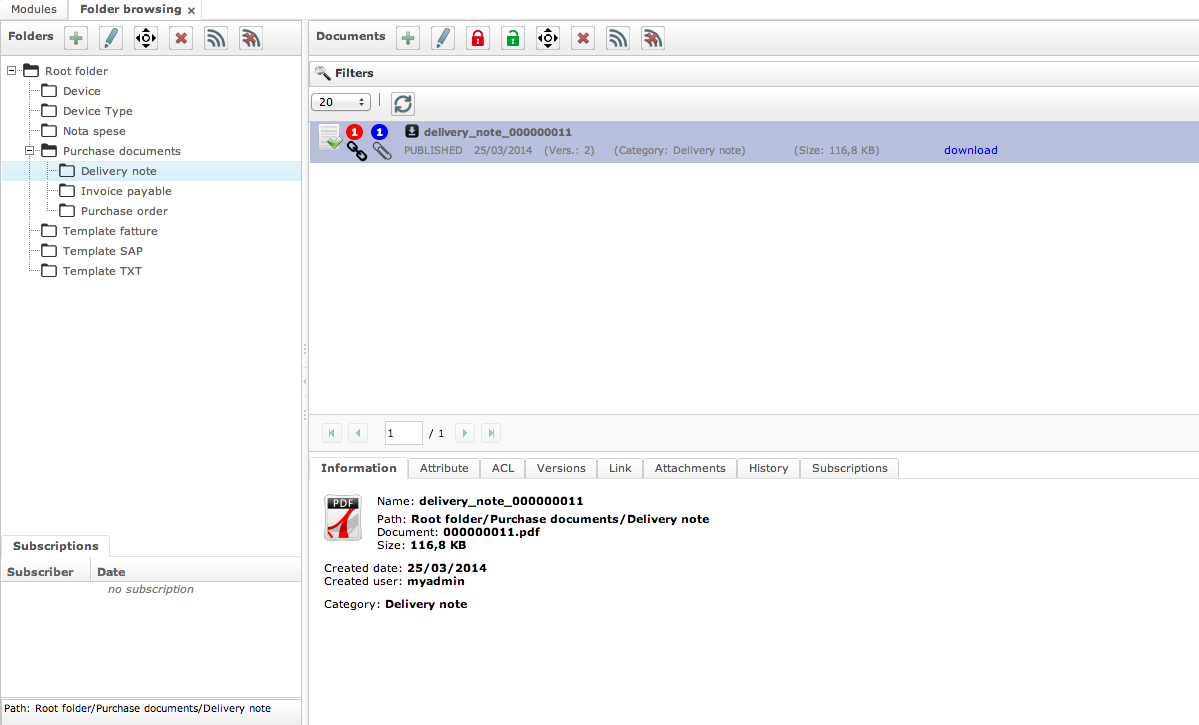
Users can start two different kinds of research: the content browsing and the content searching.
Through the content browsing, the user searches for a document into various folders.
Content searching
There are two types of content searching: search simple or search by category.
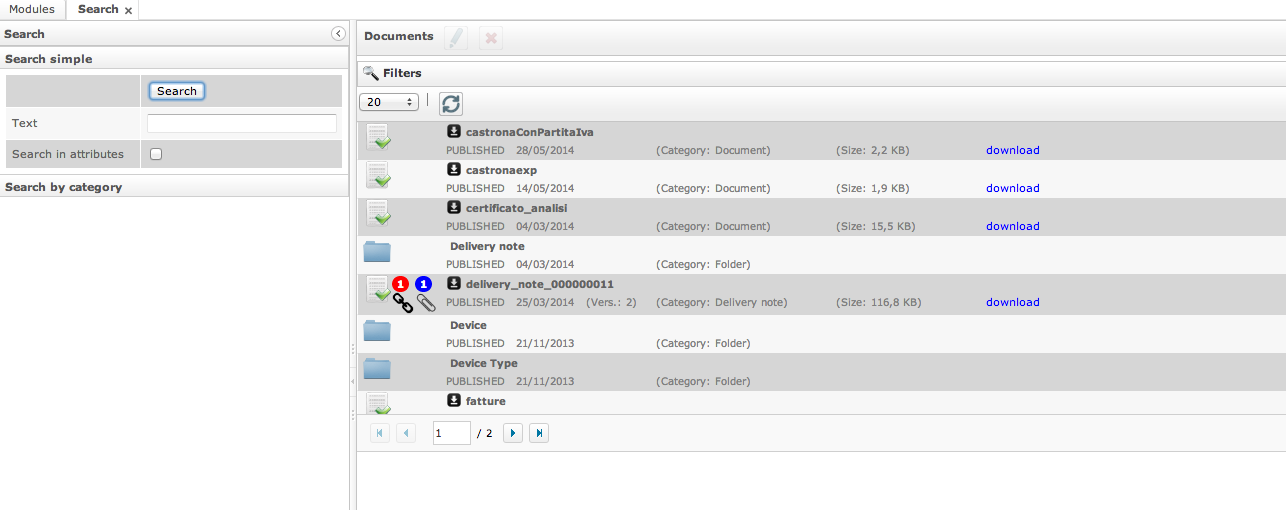
The search simple allows the user to search for a document through its name or the name of its main file.
The search by category allows the user to search in the creation grant category for a document through the content category (using the attributes as filters).