
Elatec TCPConv
Overview
Elatec TCPConv enables card based features (such as authentication and pull printing) on any print device that does not have a panel or support for the connection of a USB device to a local area network (LAN). It works with all printer manufacturers.
There are two types of converters: TCPConv and TCPConv 2.
TCPConv
Connectors, Controls, LEDs
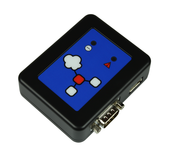
The TCPConv is a 2 ports network router which is meant to be connected between a network printer and a print server.
The 2 Ethernet ports are provided with two LEDs:
Yellow LED: it indicates the link speed:
if the LED is turned on, the current link speed is 100Mbit/s.
if the LED is turned off, the current link speed is 10Mbit/s.
Green LED: it is the combined LED indicating a link and a carrier sense signal.
It is equipped with one standard USB where to connect an USB device (e.g. card reader), and a DC power supply.
The following LEDs are located on its top side:
Green LED: it turns on as soon as the power is supplied to TCPConv via a DC power supply. The green LED flickers (turned off for a short moment) as soon as data are transferred via TCPConv.
Red LED: it is normally off. As soon as an error occurs, this LED flashes (turned on for a short moment). Error conditions are of two kinds:
TCPConv is not able to establish a TCP/IP connection to a configured server (for further information, refer to the detailed description regarding the configuration of TCP/IP server connections).
TCP/IP traffic is not able to be delivered to a destination address due to communication timeout.
Supported Devices
The USB port support the following devices:
Elatec TWN3 or TWN4 transponder readers/writers.
For further details about supported devices, contact Elatec.
TCPConv Configuration
To make the TCPConv work in a specific network environment, an appropriate configuration is necessary. For this purpose, TCConfig is provided in the TCPConvAdminPack.
TCConfig Requirements
PC with Microsoft Windows XP, Windows Vista or Windows 7 operating system,
.NET Framework 3.5 and
a proper configured TCP/IP network connection.
TCPConv Network Configuration
To configure the TCPConv, complete the following steps:
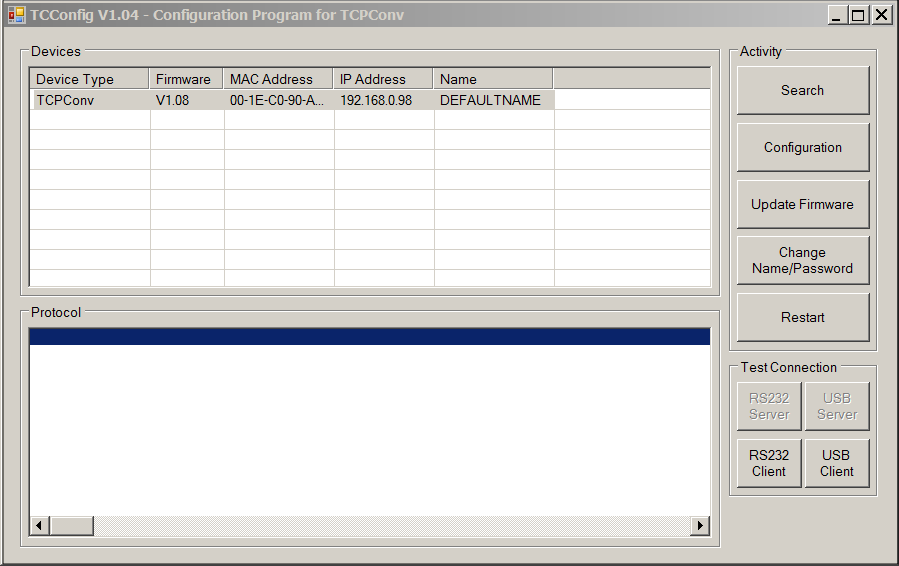
Start TCConfig by double-clicking on the TCConfig.exe file. The following main dialog opens:
Note
Only TCPConv connected to the local network segment can be detected by and configured with TCConfig.
Note
TCConfig searches for TCPConv via UDP broadcast. Even not properly configured TCPConv can be found and displayed.
Press Search and then select TCPConv connected to the target device.
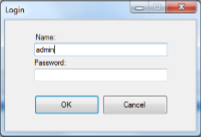
Press Configuration and perform the login. By default the administrations credentials are:
name: admin
the password field is empty
Note
Credentials can be configured on the Genius Server.
Note
TCPConv deletes log-in information after 5 minutes of inactivity and the administrator has to specify log-in information again.
Enter a unique device name and check Use DHCP.
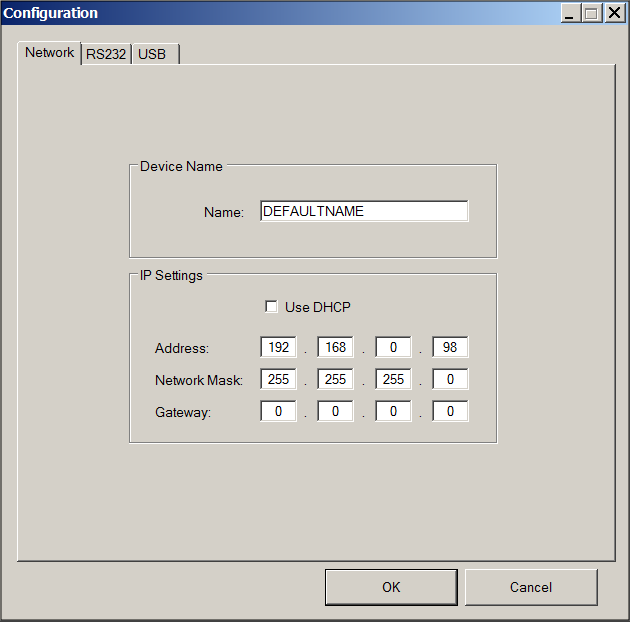
To finally make the new configuration work, users must:
Close the configuration dialog by pressing the OK button. To discard all the changes, press Cancel.
Restart the device to have the new configuration enabled, otherwise TCPConv keeps on using the old configuration. There are three ways to restart the device:
through a power cycle (turning off and on the power of TCPConv). To display the updated information in the TCConfig, press the Search button.
pressing the Reset button of TCPConv. To display the updated information in TCConfig, press the Search button.
clicking on the Restart button. This is the simplest and therefore preferred way of restarting TCPConv.
Once the device has been restarted, complete the following steps:
Come back to the Configuration page.
Switch to USB tab and enable the TCP Client section.
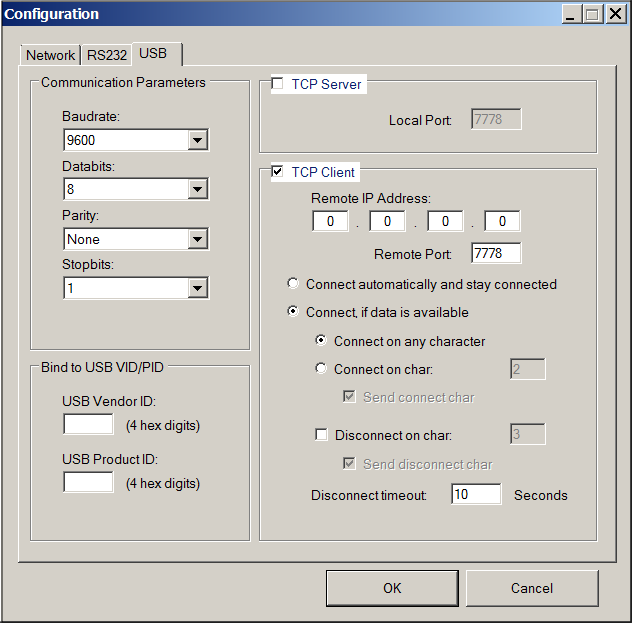
Enter the Genius Server IP in the Remote IP Address.
Warning
The remote port number is configurable on the Genius Server, don’t change it unless the exact port number is known.
Note
Configure the printer enabling the DHCP.
Select Connect, if data is available and then press OK.
Copy TCPConv IP Address (it has to be entered in a mapping table in Genius Server to define which printer should receive the job started swiping the card on the TCP Conv).
To apply the changes made, restart the TCPConv. There are two ways of restarting TCPConv:
press the Restart button in the main dialog of the TCConfig and
press the Reset button of the TCPConv.
TCPConv and the Configuration Tool
To make the TCPConv work, it is necessary to configure its settings also in the Configuration Tool. For further details refer to [Advanced] TCP Conv.
TCPConv and the Genius Server
To finish the configuration, complete the following steps:
Open the Genius Server Web Admin console
Select Device Management and perform the device detection in the Device section (for further details refer to Device Information Shown).
Go to TCPConv Mapping in the Print Management section and create a new TCPConv (for further details refer to TCPConv mapping).
Select Authentication Management and go in the User section in Genius Server Provider.
Create a user and enable it (for further details refer to User).
Now the configuration is completed and it is possible to start to use the TCPConv.
Restarting TCPConv
To make changes in the TCPConv configuration being effective, restart it. There are two ways of restarting TCPConv:
press the Restart button in the main dialog of TCConfig or
press the Reset button of TCPConv.
Changing Log-in Information
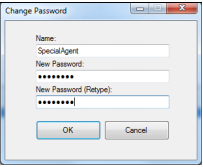
To change the log-in information, press the Change Name/Password button in the main dialog. Another dialog opens, where to enter the appropriate information. To be accepted and valid, enter the same password twice.
Updating the Firmware of TCPConv
TCConfig offers the possibility of updating the firmware. This can be achieved with the following steps:
in the main dialog of TCConfig select one of the listed TCPConv.
as soon as a device is selected, the Update Firmware button is enabled, so press it.
a dialog is opened, there you can select the appropriate firmware image. Firmware images for TCPConv have the .bix extension.
press OK to accept the firmware image in the file dialog. The firmware is immediately programmed. The programming progress is shown in the protocol section of the main dialog box.
Note
In case of an interruption of the process (e.g. loss of power, system crash), users can repeat the sequence. In this situation, TCPConv is detected and displayed by TCConfig as TCPConv (Bootloader).
TCPConv 2
Connectors, Controls and LED
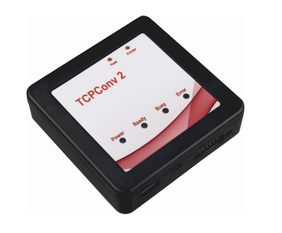
The TCPConv 2 is a 2 ports network router which is meant to be connected between a network printer and a print server.
The 2 Ethernet ports are provided with two LEDs:
Yellow LED: it indicates the link speed: * If the LED is turned on, the current link speed is 100Mbit/s. * If the LED is turned off, the current link speed is 10Mbit/s.
Green LED: it is the combined LED indicating a link and a carrier sense signal.
It is equipped with one standard USB, one mini USB connector and a DC power supply.
The following LEDs are located on its top side:
Power (green LED): it is on when power supply is connected.
Ready (green LED): it depicts that the device is in normal operation.
Busy (red LED): it depicts that the device is initializing.
Error (red LED): it depicts an error (e.g. TCPConv 2 cannot get an IP address or no printer is connected).
Supported Devices
The USB port support the following devices:
Elatec TWN3 or TWN4 transponder readers/writers.
all HID keyboard/CDC devices.
For further details about supported devices, contact Elatec.
TCPConv 2 Configuration
To make the TCPConv 2 work in a specific network environment, an appropriate configuration is necessary. For this purpose, TC2Config is provided in the TCPConv2AdminPack.
TC2Config requirements
Microsoft .Net Framework version 3.5 or higher.
UDP Port 7001 is available.
Devices must be on the same subnet as the discovery tool. Cross subnet discovery is addressed in the Elatec documentation.
TCPConv 2 network configuration
To configure the TCPConv 2, complete the following steps:
Start the TC2Config by double-clicking on the TC2Config.exe file. The following main dialog opens:
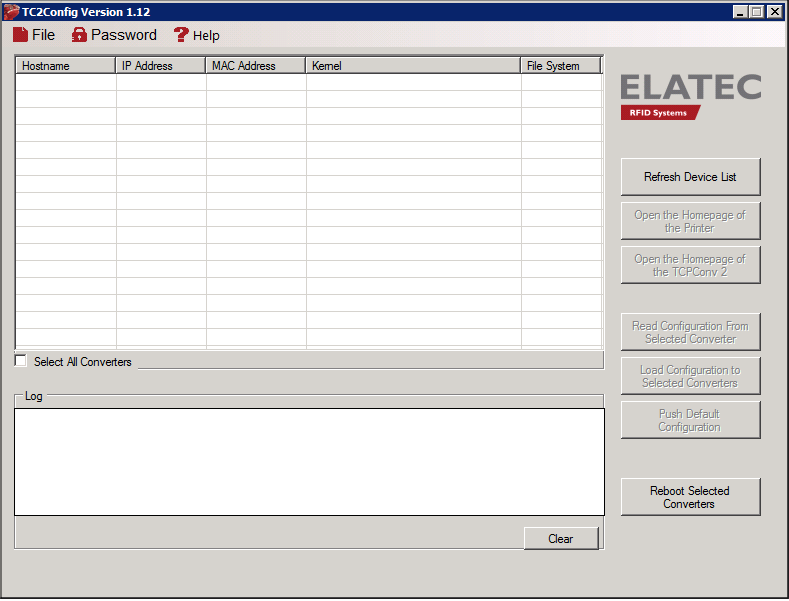
Select File on the left top of the window, click on "Select Subnet Search File".
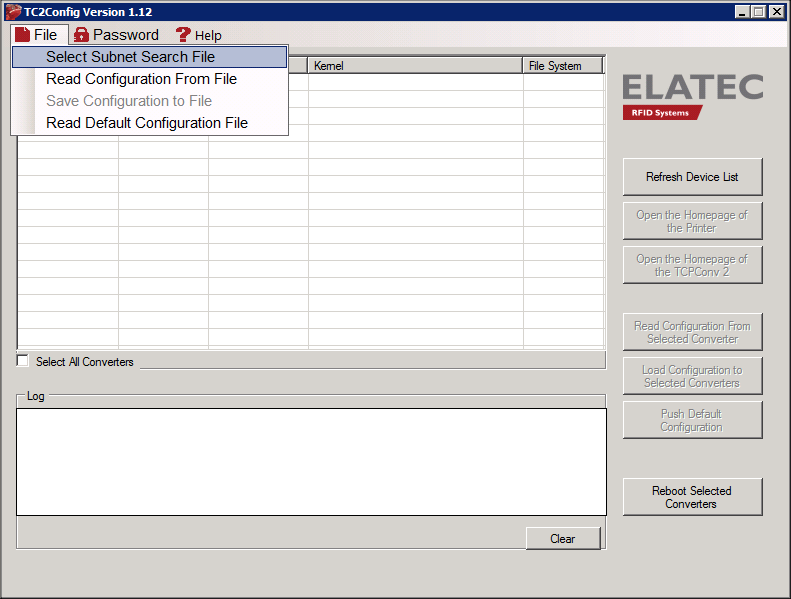
Choose the file which contains the search criteria (e.g. The Sample Configuration.txt file in the TC2Config package) and press Open.
Select Refresh Device List and only the TCPConv connected to the local network segment are detected by and configured with TCConfig.
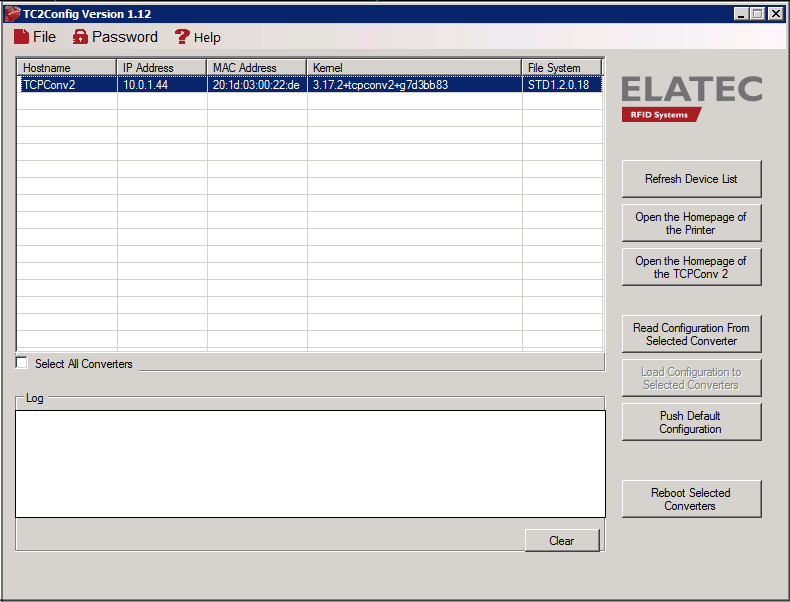
Select a TCPConv 2 and press Open the Homepage of the Printer to know the printer IP address.
Come back to the TC2Config window, select again the TCPConv 2 and press Open the Homepage of the TCPConv 2. the following page opens:
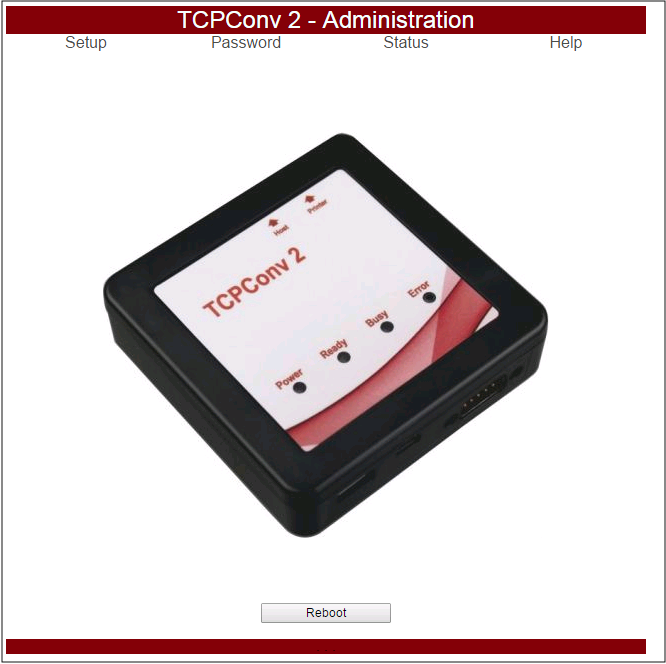
Select Setup and in the Network Settings page configure the Address, the Netmask and the Gateway.
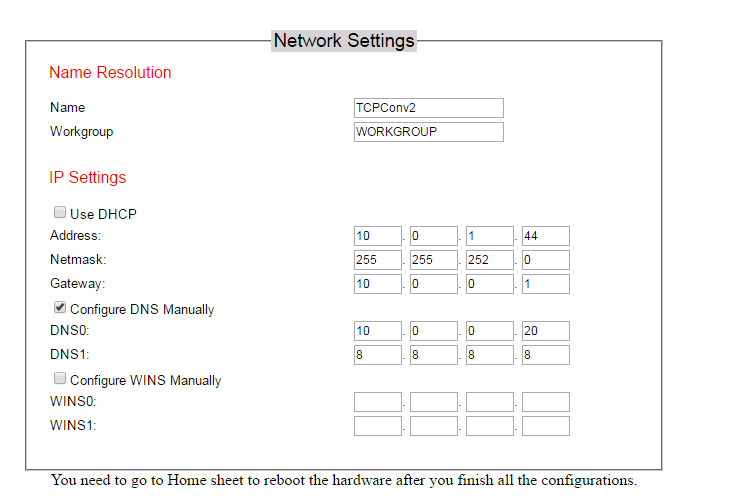
Press Apply to save the changes.
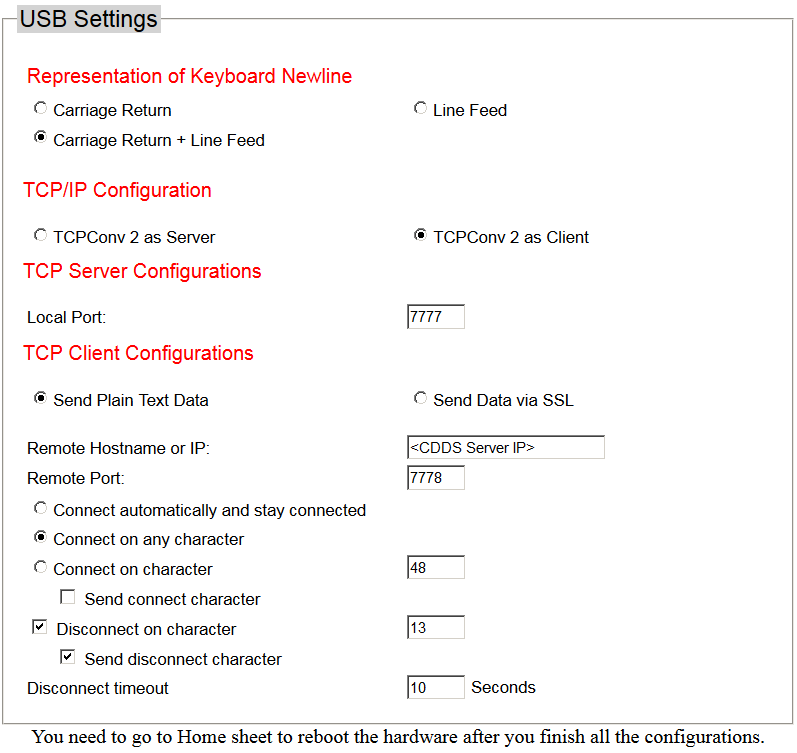
Switch to the USB Settings page and configure the following parameters:
Representation of Keyboard Newline: set Carriage Return + Line Feed.
TCP/IP Configuration: set TCPConv 2 as Client.
TCP Client Configurations:
Remote Hostname or IP: enter the Genius Server IP.
Remote Port: enter the TCP Server port (7778).
Connect on any character.
Disconnect on character.
Send disconnect character
Note
Configure the printer enabling DHCP.
Press Apply to save the changes.
Go to the Home page and reboot the TCPConv 2.
Warning
It is recommended to unplug and plug the TCPConv 2 in for an effective restart.
TCPConv 2 and the Configuration Tool
To make the TCPConv 2 work, it is necessary to configure its settings also in the Configuration Tool. For further details refer to [Advanced] TCP Conv.
TCPConv 2 and the Genius Server
To finish the configuration, complete the following steps:
Open the Genius Server Web Admin console
Select Device Management and perform the device detection in the Device section (for further details refer to Device Information Shown).
Go to TCPConv Mapping in the Print Management section and create a new TCPConv (for further details refer to TCPConv mapping).
Select Authentication Management and go in the User section in Genius Server Provider.
Create a user and enable it (for further details refer to User).
Now the configuration is completed and it is possible to start to use the TCPConv 2.
Changing Log-on information
To change credentials, complete the following steps:
Open the Homepage of the TCPConv 2.
Select Password.
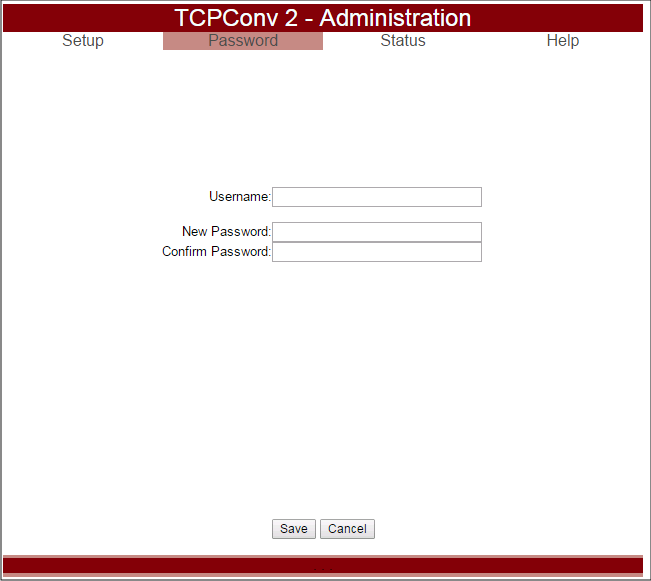
Enter the new credentials and press Save.
Testing TCPConv and TCPConv 2
To test if the TCPConv and the TCPConv 2 work, complete the following steps:
Send a pull printing job.
Go to the printer and swipe the card on the card reader connected to the TCPConv/TCPConv 2.
If no print is performed, check the Genius Server Web Interface (TCPConv mapping, Authentication Management and Event Protocol).
Regulatory Information
CE Declaration of Conformity
This products comply whit the following standards:
DIN EN 55022: 2007-04 Class B
- DIN EN 55024: 2003-10
DIN EN 61000-4-2: 1996-03
DIN EN 61000-4-3: 1996-03
DIN EN 61000-4-4: 1996-03
DIN EN 61000-4-5: 1996-09
DIN EN 61000-4-6: 1997-04
DIN EN 61000-4-8: 1994-05
DIN EN 61000-4-11: 1995-04
DIN EN 61000-3-2: 2006-10
DIN EN 61000-3-3: 2006-06
Trademarks
All referenced brands, product names, service names and trademarks mentioned in this document are the property of their respective owners.