
Tenants
Using Genius Conf the administrator can add, enable, disable and modify tenants. Note that the navigation on this page also supports using the "Back" button on your browser. You can also reach previously accessed pages by clicking the corresponding link on the top right or reach the overview page by clicking the Genius Server symbol on the top left.
Most settings can be reached by simply clicking or double clicking.
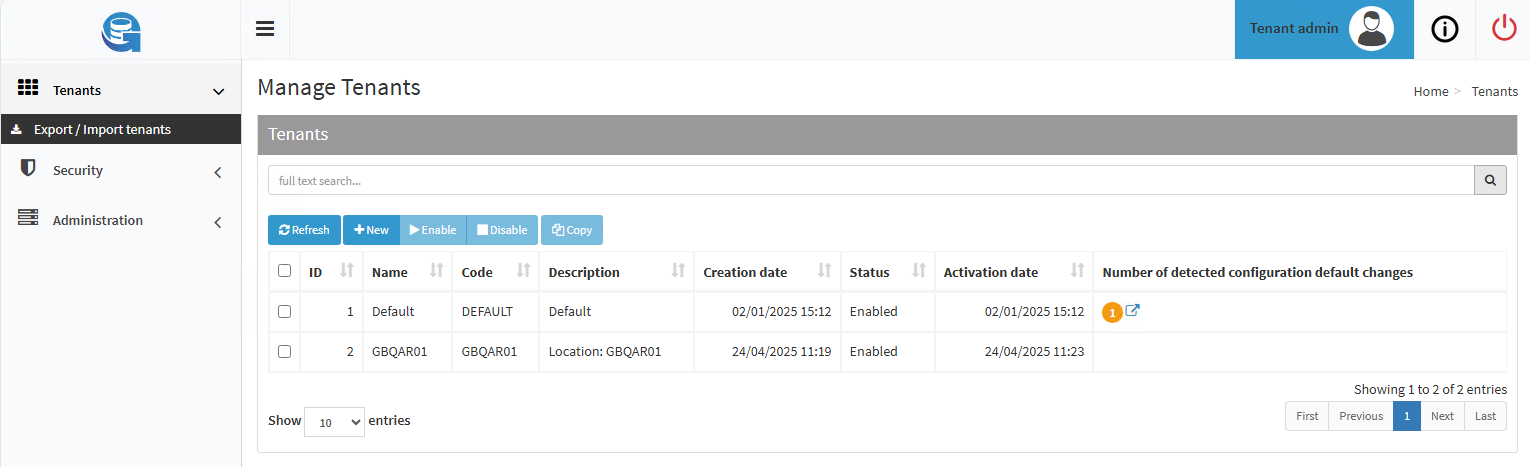
By default, tenants are not enabled. To enable a tenant, select it and press the Enable button, then Confirm.
To disable a tenant, select it and press the Disable button, then Confirm.
To add a new tenant, press the New button and fill in the configuration form:
Name: the name of the tenant - it must be unique (required).
Code: the name of the tenant code - it must be 7 character long including at least one upper case letter and a number (required).
Description: the description of the tenant.
Creation date: the creation date of this tenant.
Status: the status of the tenant. It can be:
ENABLED or
DISABLED.
Note
By default it is set to disabled. To enable the tenant, press the Save Changes button, then Back and, from the tenant list, select it and press on the Enable button, then Confirm.
Activation date: the activation date of this tenant.
Subnet: subnet addresses or the IP addresses seperated by a comma or one per line.
To save changes press the Save Changes button, then Back.
In the overview the following columns are shown:
ID: the numerical tenant ID is shown. This information is important when checking log folders, since those are not sorted by tenant code but by ID. So for example: if the DEFAULT tenant has the ID 1, the folder /logs/1 would cointain the logfiles for the DEFAULT tenant. When sending log folders to your support contact, please always include the affected tenant code and corresponding ID, to make it easier to find the relevant data.
Name: the name of the tenant.
Code: the name of the tenant code.
Description: the description of the tenant.
Creation date: the creation date of this tenant.
Status: the status of the tenant. It can be:
ENABLED or
DISABLED.
Activation date: the activation date of this tenant.
Number of detected configuration default changes: this column shows the number of changes of the default configuration. When clicking on the icon next to the number, the configuration overview of this tenant shows. Modules that have been changed from default are marked with an orange marker.
It is also possible to Export or Import tenants by clicking the corresponding buttons.
Exporting or Importing Tenants
Click on "Export/Import tenants" in the side bar to get to the Export/Import tenants page.
With the Import button, tenants can be imported. When clicking import a prompt will appear which enables the administrator to upload a .zip configuration of the tenant as well as the password of that .zip file.
To export tenant settings, select a tenant by checking the box next to its name and then click on Export. You will receive a .zip file which will at least contain the tenants-bundle.json file.
You can add a password to the .zip file or leave it empty (we recommend using a password for additional security). Also there are four switches:
Include sensitive data: if checked, sensitive data, e.g., passwords for providers, secrets or similar are included in the export.
Include reports: if checked, the .zip file will additionally contain reports for the tenant.
Include client settings: if checked, the .zip file will additionally contain a folder for client settings.
Include client skins: if checked, the .zip file will additionally contain a folder for client skins.
The overview shows the list of exportable or imported tenants. The columns are:
Name: the name of the tenant.
Code: the name of the tenant code.
Description: the description of the tenant.
Creation date: the creation date of this tenant.
Status: the status of the tenant.
Number of configurations: shows the number of configurations. By clicking on the symbol next to the number, you get redirected to the configuration overview of this tenant.
Number of templates: shows the number of templates. By clicking on the symbol next to the number, you get redirected to the template list of this tenant.
Number of report definitions: shows the number of report definitions. By clicking on the symbol next to the number, you get redirected to the report definitions list.
Number of client skins: shows the number of client skins. By clicking on the symbol next to the number, you get redirected to the list of client skins.
Number of client settings: shows the number of client settings. By clicking on the symbol next to the number, you get redirected to the list of client settings.
Editing a Tenant
To edit a tenant, click on the tenant. A new page opens, that includes some information like the status, tenant code, creation and activation date. If the tenant is disabled you can also enable it here. With the Edit button, the tenant can be modified. Click Edit to open a new window.
Description: the description of the tenant.
Creation Date: the creation date of the tenant.
Subnets: subnet addresses or the IP addresses separated by a comma or one per line.
To save changes press the Save Changes button, then Back.
Permission
To see permissions on a tenant, click on the tenant. A new page opens, then click on the Permission button.
To add a new permission, press the New button. Select a group. You can start typing and the search will assist you in finding the correct group.
Note
Note that, in order to proceed here, you will first need to configure a group. This can be done in Security -> Groups. Refer to Security for details.
Then decide which actions should be allowed and click on the slider on the right. It turns blue if activated.
To save changes press the Save Changes button you should be automatically be sent back to the overview.
To edit permissions, select the group and click on the Edit button.
To delete the group, select the group and click on the Trash button. A confirmation window will pop up. If you are sure you want to delete the entry, select Confirm.
Configuration
When you click on Configuration, a new page opens. Since this chapter is only a brief overview, we will not go into detail on the settings her. For now, note that you will find more tenant specific settings here. If you have previously used Genius Server version 2.x.x you will find most of the settings missing from the configuration tool here.
For further details about the features and how to configure them, refer to the chapter Configuration Overview
Reports
To see reports of a tenant, click on the Reports button. A list of reports open.
Creating a New Report Definition
To add a new report, press the New button and fill in the configuration fields:
Name: the name of the report. It must be unique.
Description: the description of the report.
Active: if checked, the report is selectable from the list.
Upload: the report template to upload. To import a template, press the Select File button and select the template to add (ZIP format only).
Warning
Only the superadmin can create reports for every tenant.
To save changes press the Save Changes button, then Back.
To edit reports, select the report from the list and click on the Edit button.
To delete reports, select the report and click on the Trash button.
Client Skins
To see or edit the client skin for a tenant, click on the Client Skin button.
To add a new client skin, press the New button and fill in the configuration fields:
Embedded type: the client type to add. Choose from the drop down menu the correct client type. Possible values are EMBEDDED_MFP or EMBEDDED_ANDROID.
Vendor: device vendor. Select the correct vendor from the drop down menu.
Subtype: device subtype corresponding to panel shape. Add the correct subtype for the client skins to work correctly. See Subtype Table for more info.
Active: if checked, the client skin is selectable from the list.
Upload: the client skin to upload. To import the file, press the Select File button and select the file to add (ZIP format only).
To save changes press the Save Changes button, then Back.
To edit client skins, select the client skin from the list and click on the Edit button.
To delete client skins, select the client skin and click on the Trash button.
Client-Skins for WEB-Clients are configured inside the WEB-Client instsallation folder. See Client manual for further details.
Client Settings
To see or edit the client settings for a tenant click on the Client Settings button.
To add a new client setting, press the New button and fill in the configuration fields:
Embedded type: the client type to add. Choose from the drop down menu the correct client type. Possible values are EMBEDDED_MFP or EMBEDDED_ANDROID.
Vendor: device vendor. Select the correct vendor from the drop down menu.
Subtype: device subtype corresponding to panel shape. Add the correct subtype for the client settings to work correctly. See the Subtype Table for more info.
Active: if checked, the client skin is selectable from the list.
Upload: the client settings file to upload. To import the file, press the Select File button and select the file to add (ZIP format only).
To save changes press the Save Changes button, then Back.
To edit client settings, select the client setting from the list and click on the Edit button.
To delete client settings, select the client setting and click on the Trash button.
Client-Settings for WEB-Clients are configured inside the WEB-Client instsallation folder. See Client manual for further details.
Subtype Table
Embedded Type |
Vendor |
Vendor ID |
Subtype |
|---|---|---|---|
Embedded MFP |
Canon |
1602 |
800x498
640x400
|
Embedded MFP |
Kyocera/TA/UTAX |
1347 |
788x450
480x272
|
Embedded MFP |
Lexmark |
641 |
android
android-smallscreen
|
Embedded MFP |
Ricoh |
367 |
android
uwvga
svga
wvga
|
Embedded MFP |
Samsung |
236 |
1024x530
898x491
800x438
800x413
800x411
|
PC |
19599 Genius Bytes Software Solutions |
geniuspcclient
|
|
WEB-Clients are handled locally in the WEB-Client folder structure, see client manuals for details |
|||
ZIP-Structure
It is possible to configure settings for a device group or a single device aswell:
Add files using the following naming structure:
settings-<DEVICE-GROUP>.properties (can be more than one)
settings-<SERIAL-NUMBER>.properties
The priority is device > device group > general settings file
Adding a subfolder for a zone based configuration is possible aswell. This could be helpful to have a seperate settings file for a single tenant environment with a relay.