7. How to ... and Troubleshooting
This section describes what to do in case of an application problem that cannot be explained by problems in the application environment. Please make sure that the device is correctly configured as described in the "device configuration" chapter and that the Genius MFP Ricoh SmartSDK Client is configured correctly.
7.1. How to Login as Device Administrator
When Genius MFP Ricoh SmartSDK Client is already installed, double tap the Genius MFP Ricoh SmartSDK Client logo and enter the device administrator credentials (not the client credentials).
7.2. How to Disable Authentication for Native Apps
In case specific native apps should always be accessible and not be locked behind authentication. To configure this, follow the steps described below.
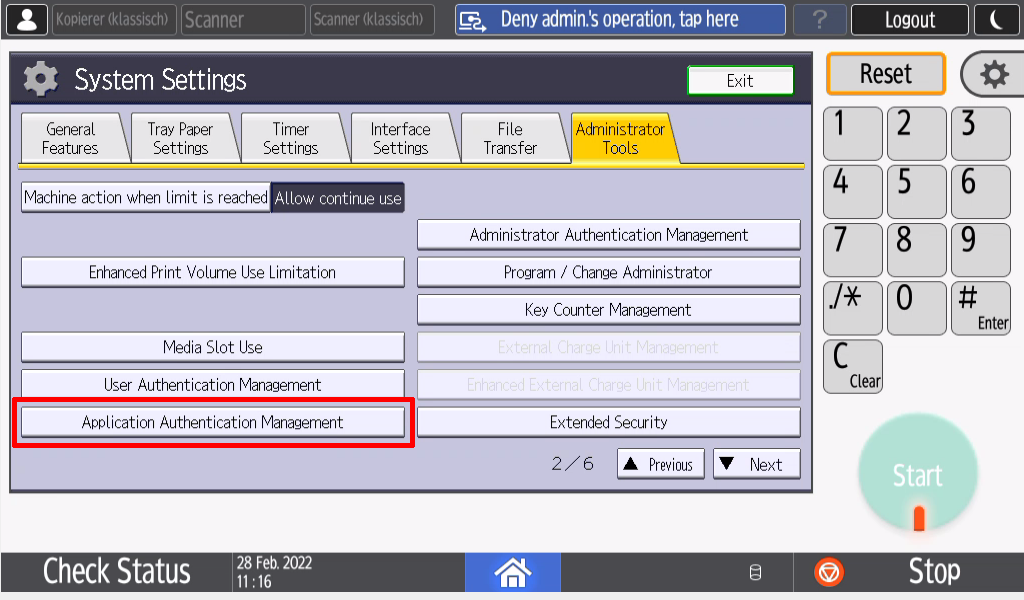
Login as device administrator on the device.
Switch to the Ricoh native home screen.
Depending on the age of your device, find and open either the "User Tools" (older UI) or the "Settings" (newer UI) application. For IM C3500 and newer models check below this section.
Open "Machine Settings"
Navigate to "Administrator Tools" --> Page 2 --> "Application Authentication Mananagement".
Unlock the application that should not be locked anymore. In our example, it's the copy application:
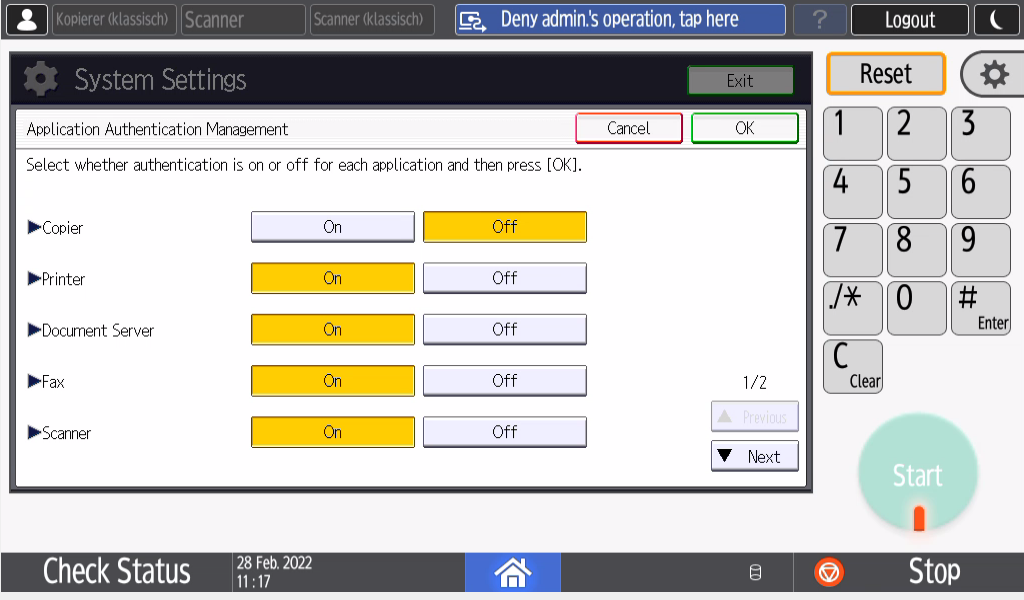
After logout the application should no longer be locked, as shown in the screenshot below. Copy is available in the top left corner.
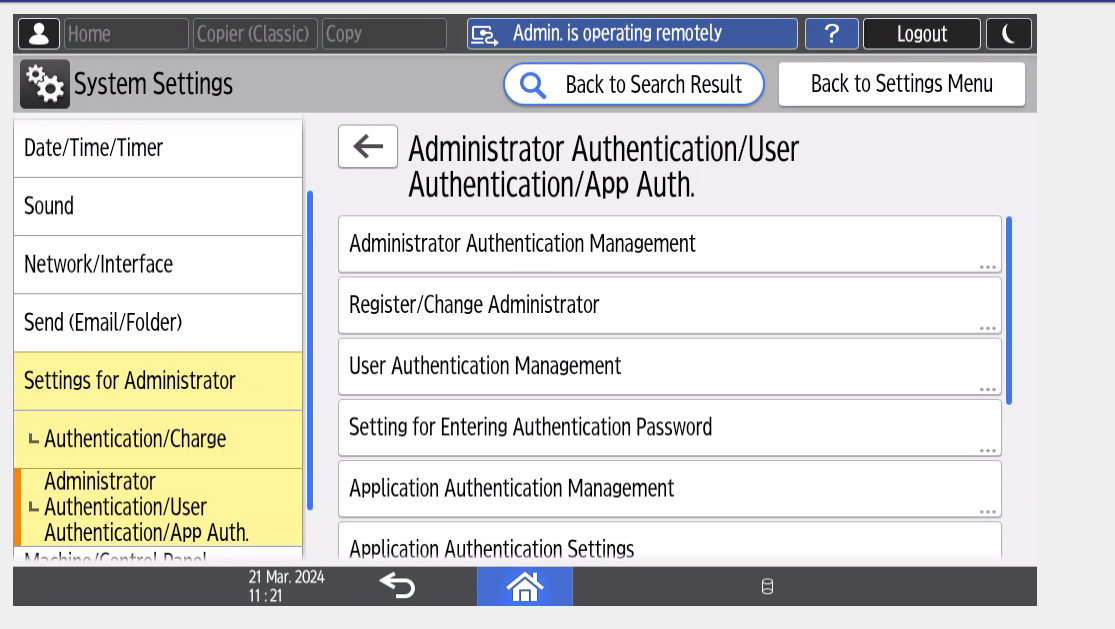
For IM C3500 and newer devices login as device admin and navigate to System Settings -> Settings for Administrator -> Authentication/Charge -> Administrator Authentication/UserAuthentication/App Auth. as shown below.
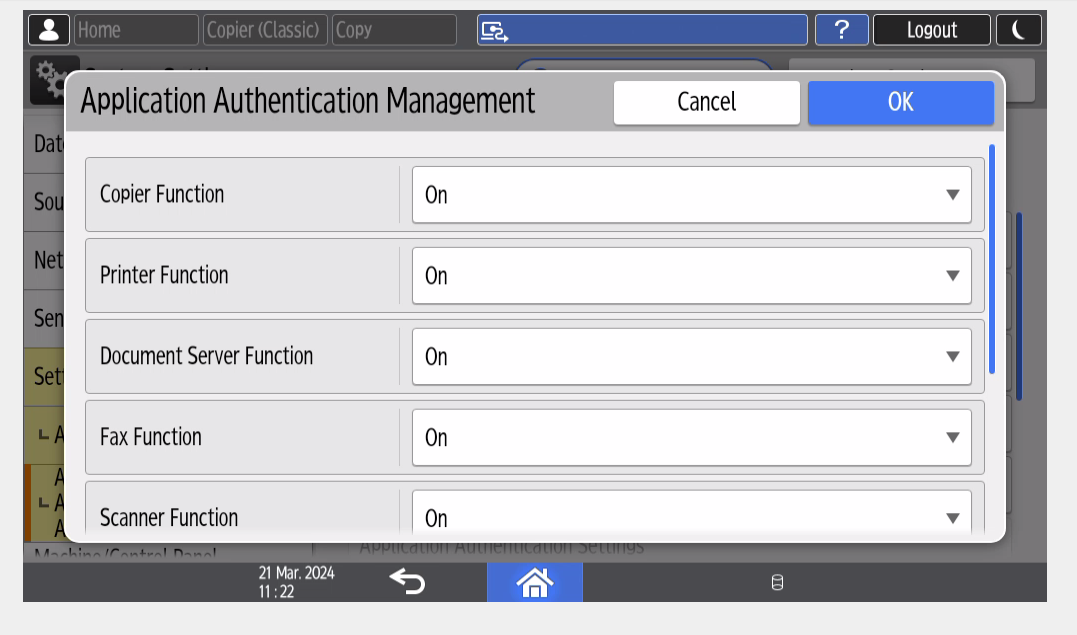
There click on Application Authentication Management and unlock the applications that should be not locked. Press OK to save.
7.3. How to Collect Logs
For most problems it will be required to collect logs that can be used for debugging. This section explains how to collect the logs correctly.
Navigate to the web configuration page of the Genius MFP Ricoh SmartSDK Client
https://<device-ip>/rws/sop/geniusmfp/conf.Go to Advanced and to Logging. Set the Loglevel to debug.
Save the changes.
Wait until the problem is reported again (or reproduce it, if possible).
Note the exact date and time of the incident.
Navigate to the status page by selecting Status in the header and then select Get Device Logs.
Alternatively you can also access the following URL:
https://<IPaddress/hostname>/web/entry/df/websys/direct/getSysInfo.cgi.Choose the date of the incident and set the number of days to 1.
Download the logfile.
This logfile can then be sent to your corresponding support partner, in the best case with a description what happened and when.
7.4. How to Handle a Slow First Login
In some customer environments it can happen that the first login at a device is much slower than following logins.
Problem: When using a HTTPS connection to connect the client to the server, the first login takes ~ 15 seconds, following logins are faster. If the device is not used for a while the next first login takes again ~ 15 seconds.
Reason: A reason for this behavior could be, that the reverse DNS is not working correctly, resulting in the device not being able to reveres lookup the server IP.
Solution:
If possible configure the customer environment to allow reverse DNS lookup.
If this does not work or is not possible activate Reverse DNS Workaround in the client settings on the Genius MFP Ricoh SmartSDK Client configuration page.
7.5. How to Enable Access to Native Device Functions
The Genius MFP Ricoh SmartSDK Client provides a list of separate settings that are used to enable or disable specific native MFP functions. In order to activate a native function, first enable the setting in the client settings. Then verify the group and user permissions in the Genius Server and make sure, that each user that is supposed to use the native function is granted the appropriate role for it (refer to the table below).
Function |
Setting |
Role |
|---|---|---|
Native Copy |
Enable Native Copy |
Device B/W copy role and/or Device color copy role |
Native Fax |
Enable Native Fax |
Device fax role |
Native Home |
Enable Native Home |
Device native home role |
Native Scan |
Enable Native Scan |
Device scan role |
Native usb print/scan |
Enable Native Usb Print/Scan |
Device usb role and device bw print role and/or device color print role |
Native browser |
Enable Native Browser |
Device native browser role |
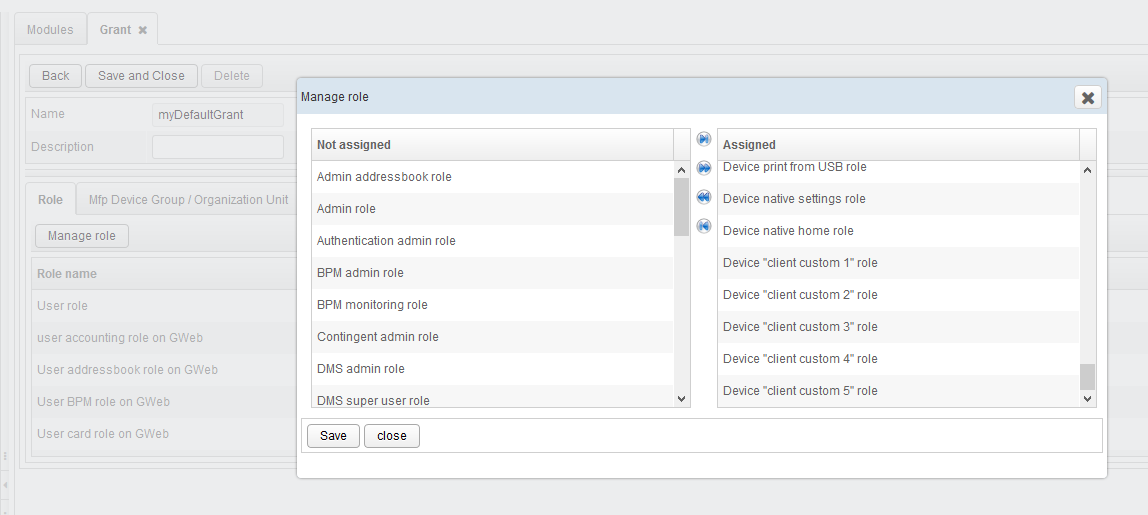
Assign the corresponding role inside the Genius Server, in the manage role section.
7.6. How to Solve Network Connection Problems
If the Genius MFP Ricoh SmartSDK Client experiences connection problems, the causes can be many since many components are involved in the connection (e.g., Genius MFP Ricoh SmartSDK Client, the device controller, the local network, Genius Server). Fortunately Ricoh SmartSDK devices come with some built-in tools that help to identify network issues. Please check with those tools as described below, if you experience network connection problems with your device running Genius MFP Ricoh SmartSDK Client.
Note that both options are best used together, since each option has its limitations as well as its advantages.
7.6.1. Option 1: Using Ping Command
This method is used to check the connection from the device controller to Genius Server or other network nodes, like gateways. What it cannot check is the connection between device operation panel and device controller. Also, it is not possible to check for specific ports. Still the Ping Command is a useful tool to rule out that the device controller can at least reach the Genius Server. Note, that this does not necessarily mean that the Genius MFP Ricoh SmartSDK Client can connect to Genius Server - as mentioned above, the connection between device controller and device operation panel is not tested this way. For this, please use option 2, described further below.
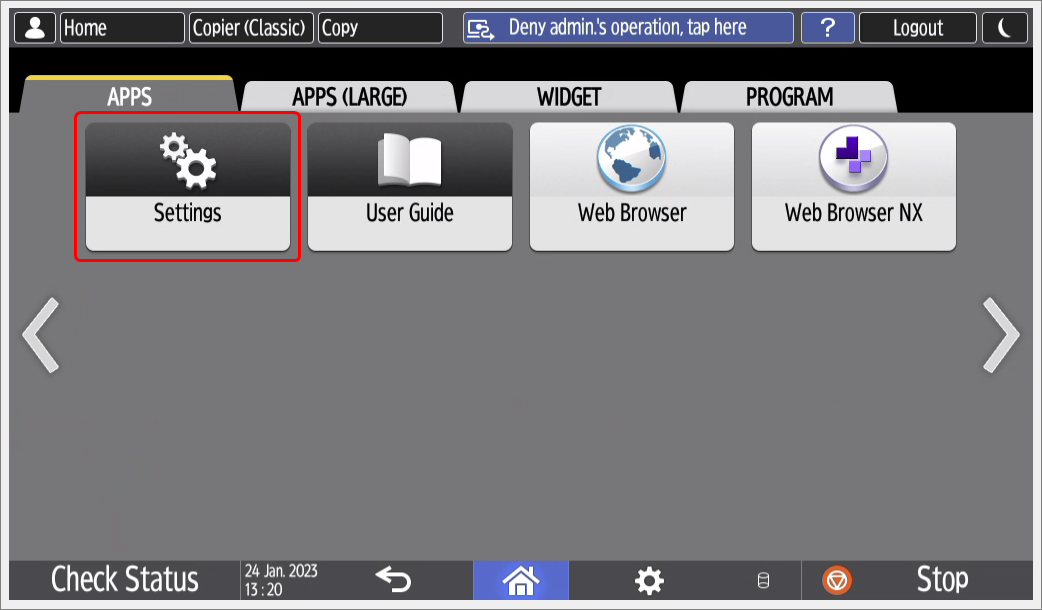
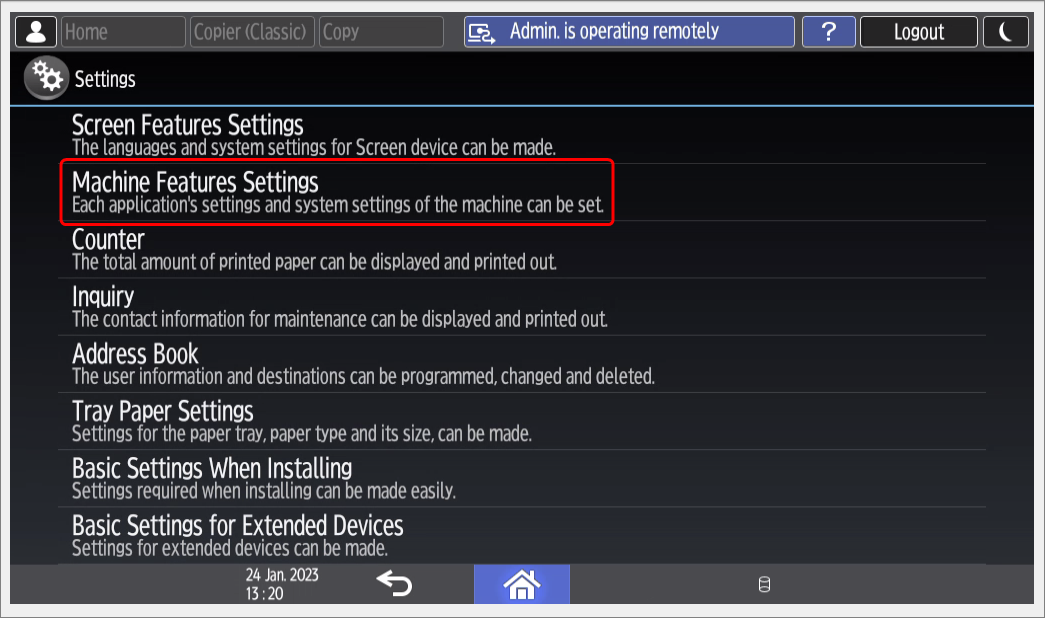
On the device, log in as administrator and open the device homescreen. There press the Apps button in the bottom right.

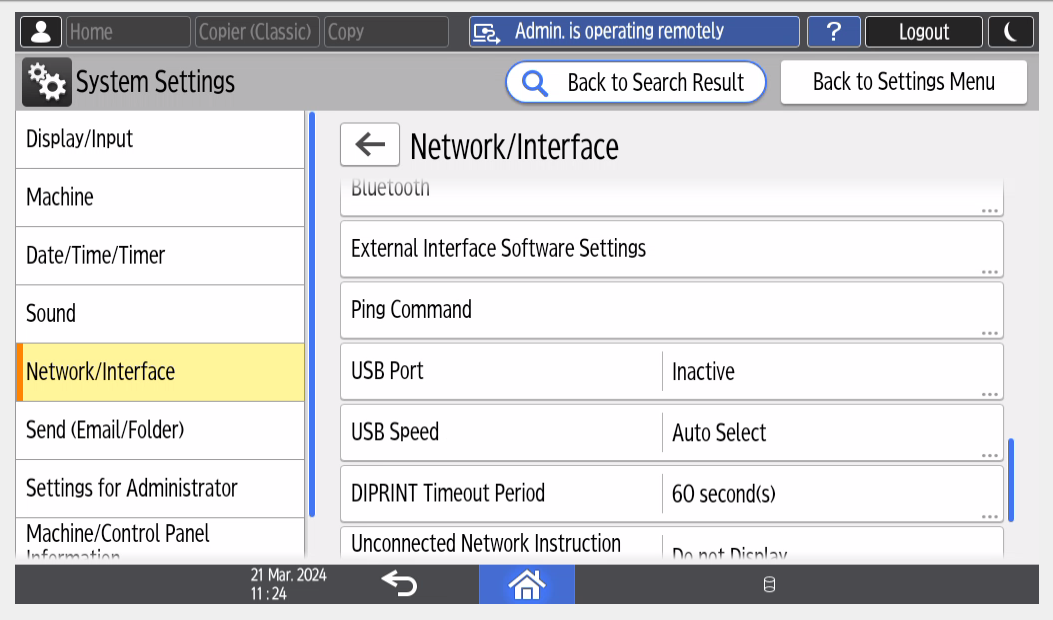
Click on Settings and then Machine Feature Settings. Note that this setting can be found on IM C3500 and other newer models in another place: System Settings -> Network/Interface -> scroll down until you see Ping Command.
Screenshot for newer device models:
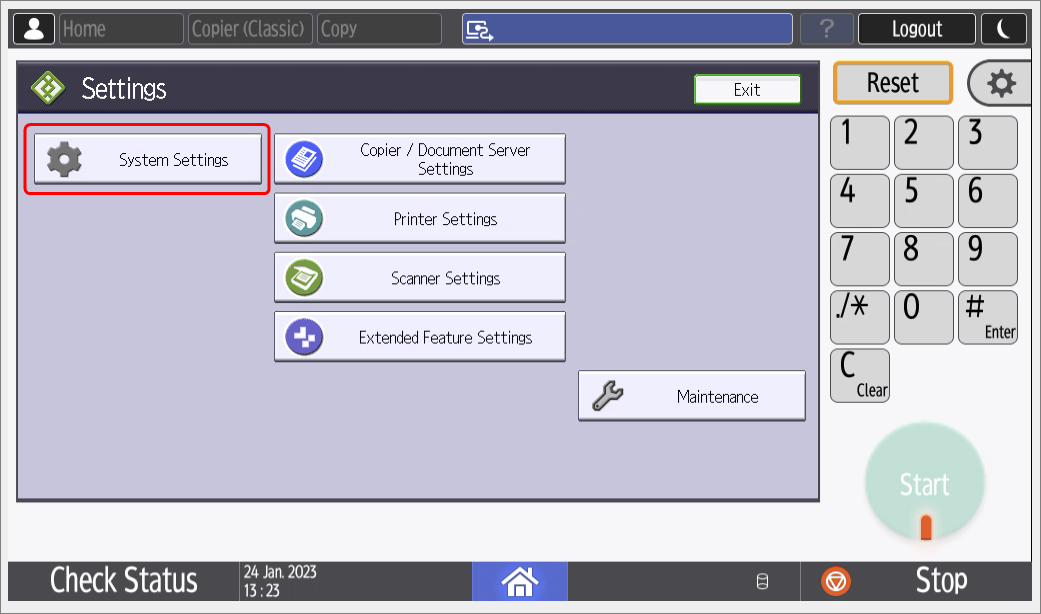
Click System Settings.
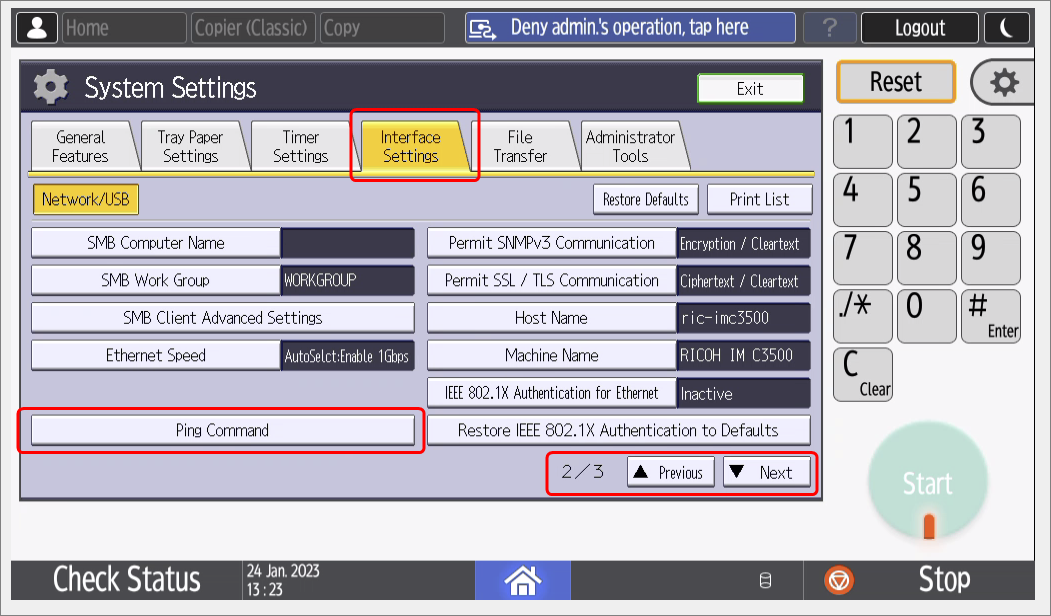
Change the tab to Interface Settings and scroll down, until you find Ping Command. Click on it.
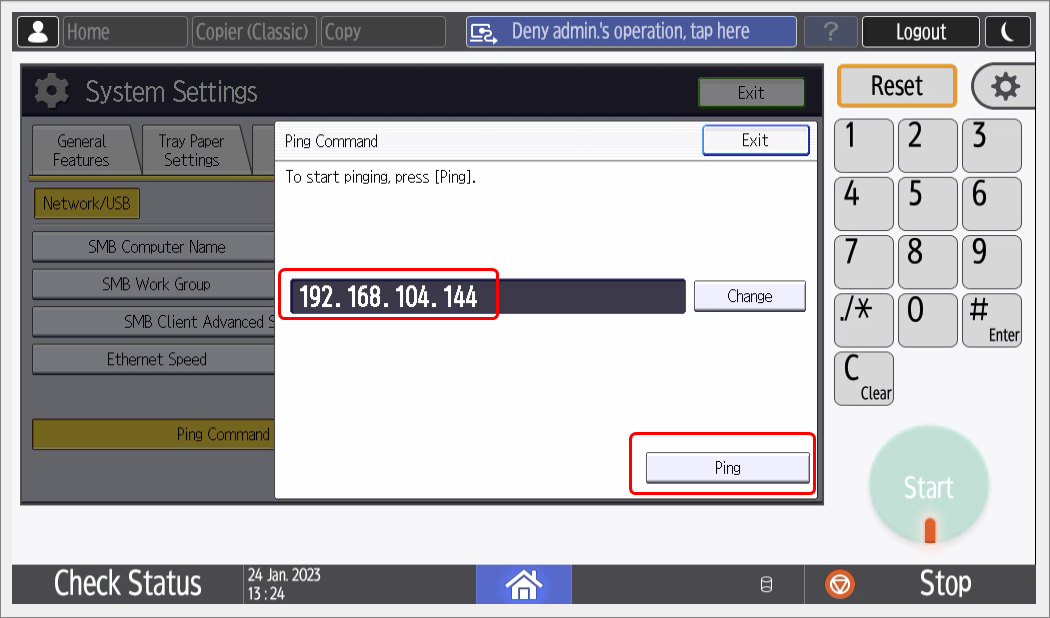
Now enter the IP address of Genius Server to check if the device controller can reach Genius Server.
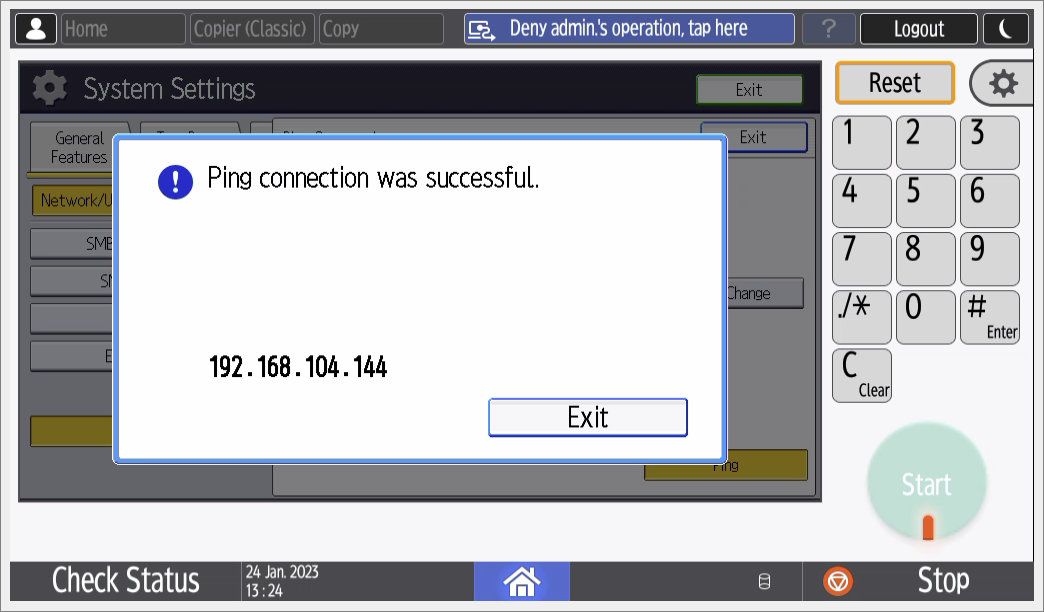
If the ping was successful a message is shown:
7.6.2. Option 2: Using the Web Browser on the Device Operation Panel
With this method you can test, if the connection between device operation panel and device controller is working correctly.
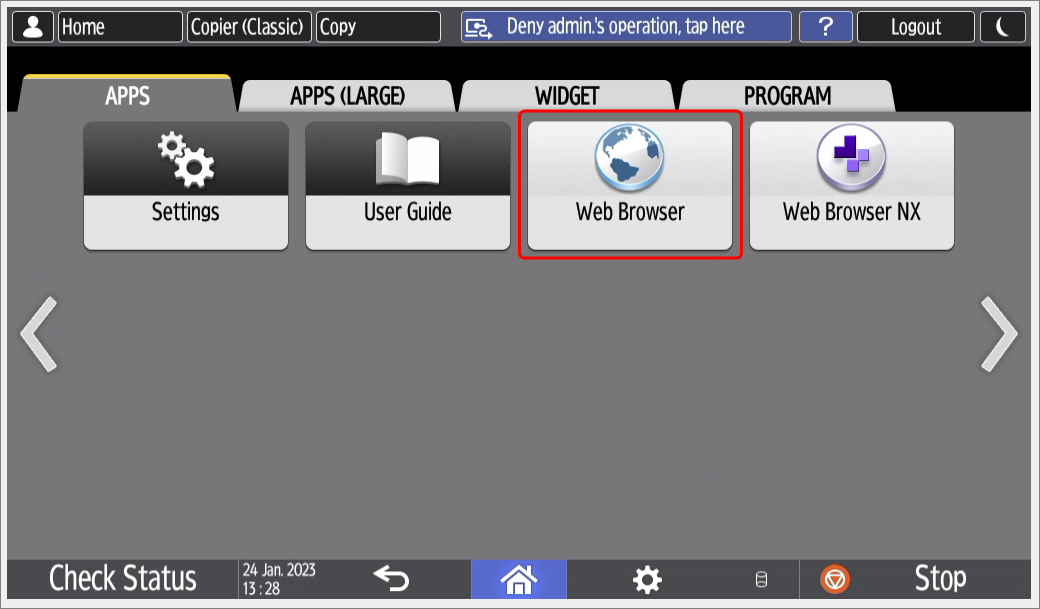
On the device, log in as administrator and open the device homescreen. There press the Apps button in the bottom right.
Click on Web Browser.
Use the device's web browser to connect to the device website
https://<device-ip>/.
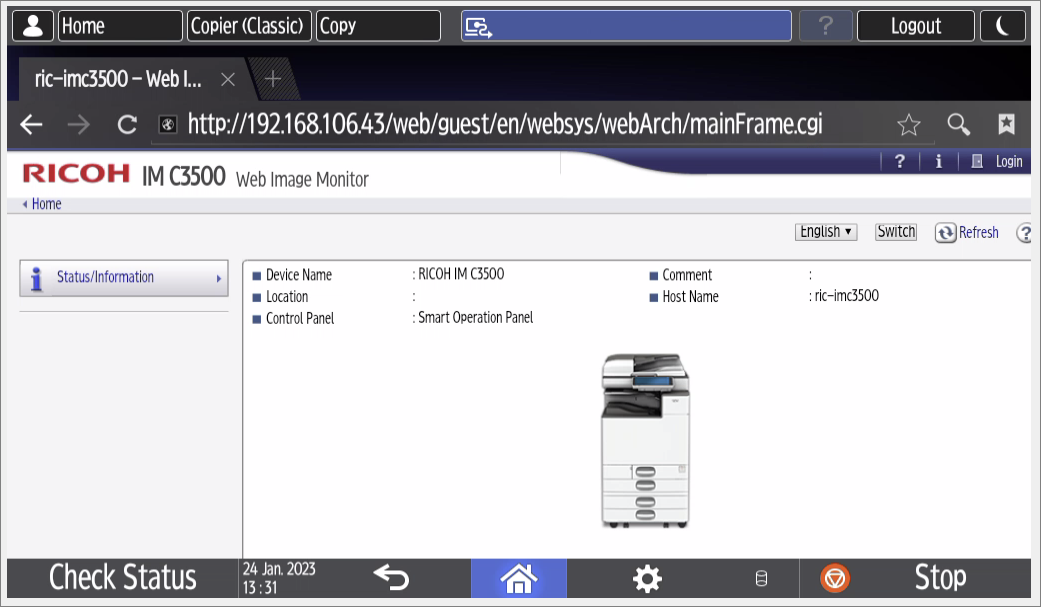
If the device website opens, the connection between device controller and device operation panel works as intended. However if a connection is not possible, controler and panel cannot communicate. This can happen, if the operation panel is not set to machine network (which should be set by default). See Setting Device to Machine Network below for details.
Also, check the Genius Server webite
https://<genius-server-ip>:8443/
If the Genius Server website opens, it shows that the communication of device operation panel -> device controller -> Genius Server works. If the Genius MFP Ricoh SmartSDK Client cannot communicate with the Genius Server despite this test working, please check if the IP address and port of Genius Server has been configured correctly in the Genius MFP Ricoh SmartSDK Client configuration.
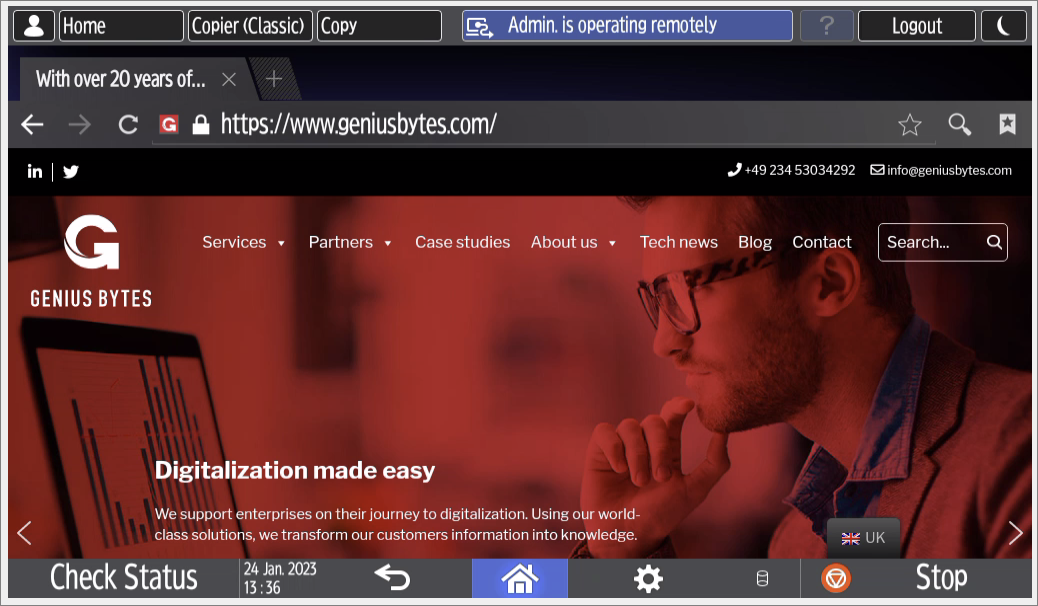
If the connection fails, there might be other issues relating to network and/or configuration. To make sure, check other websites if those are reachable, e.g., https://www.geniusbytes.com/.
7.6.3. Setting Device to Machine Network
Setting this should not be necessary, since it is set by default. But if your web browser test (chapter 6.6.2) failed in step 3, please follow these steps to check if the setting is set correctly:
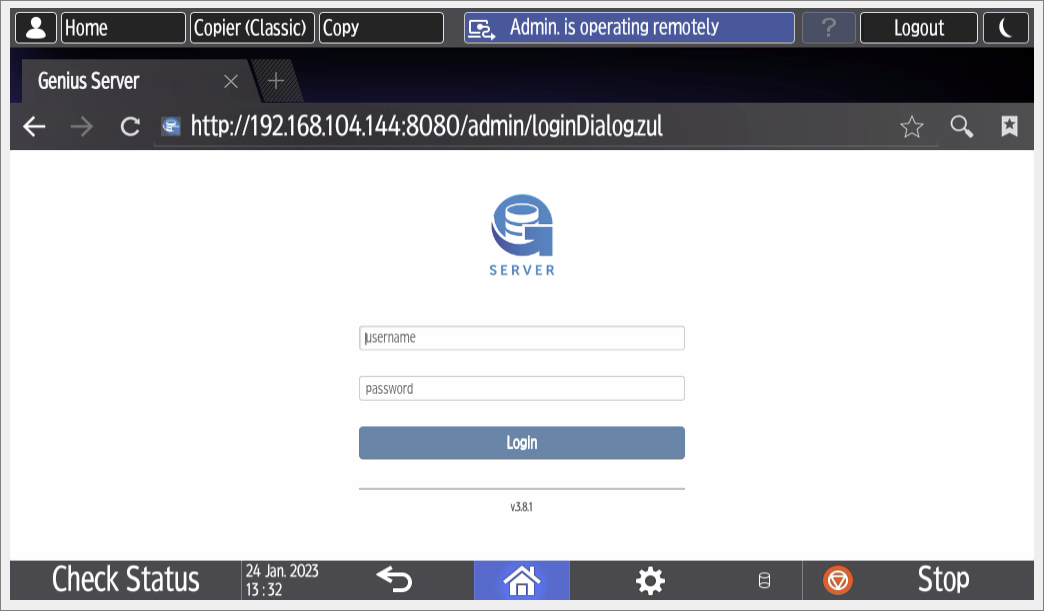
Login as administrator on the device configuration page (Web Image Monitor)
https://<device-ip-or-hostname>.Click on Device Management -> Configuration.
Click on Screen. It might take a while to display the settings.
Check if Interface Settings is set to Machine Network.
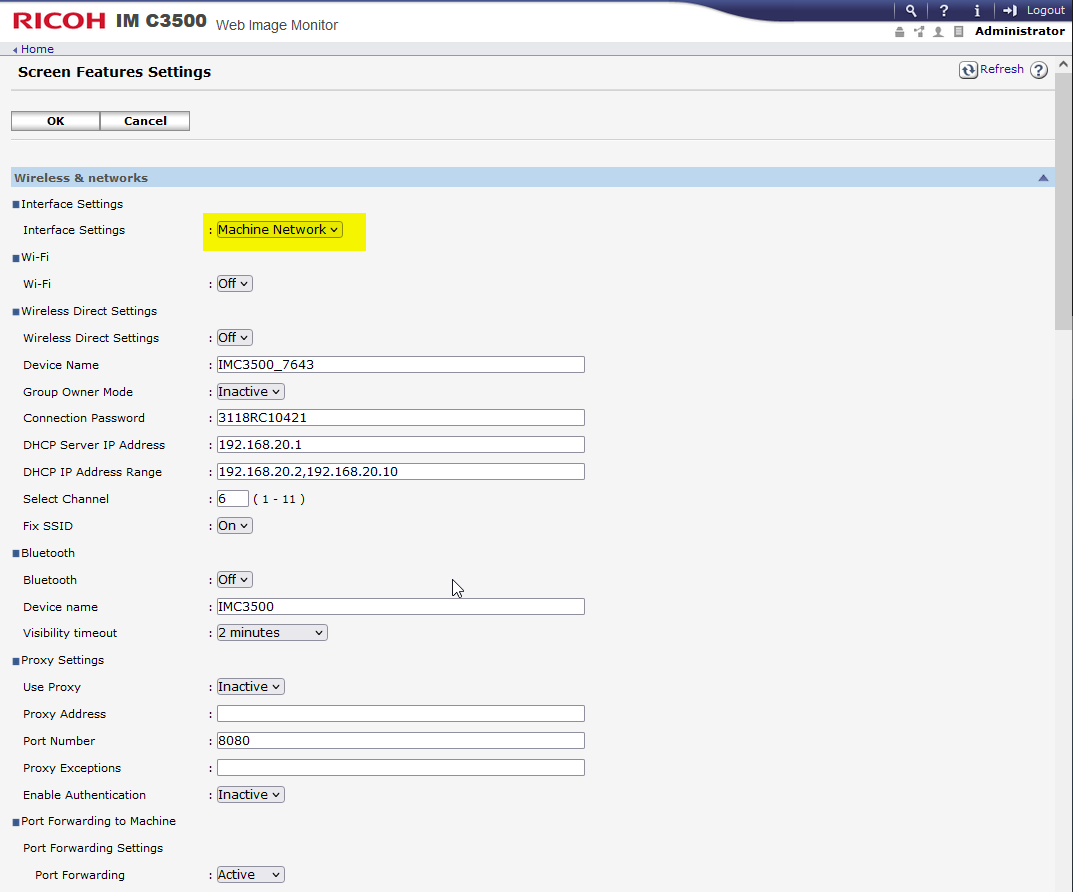
If you had to change to Machine Network do not forget to press OK in the end to save.
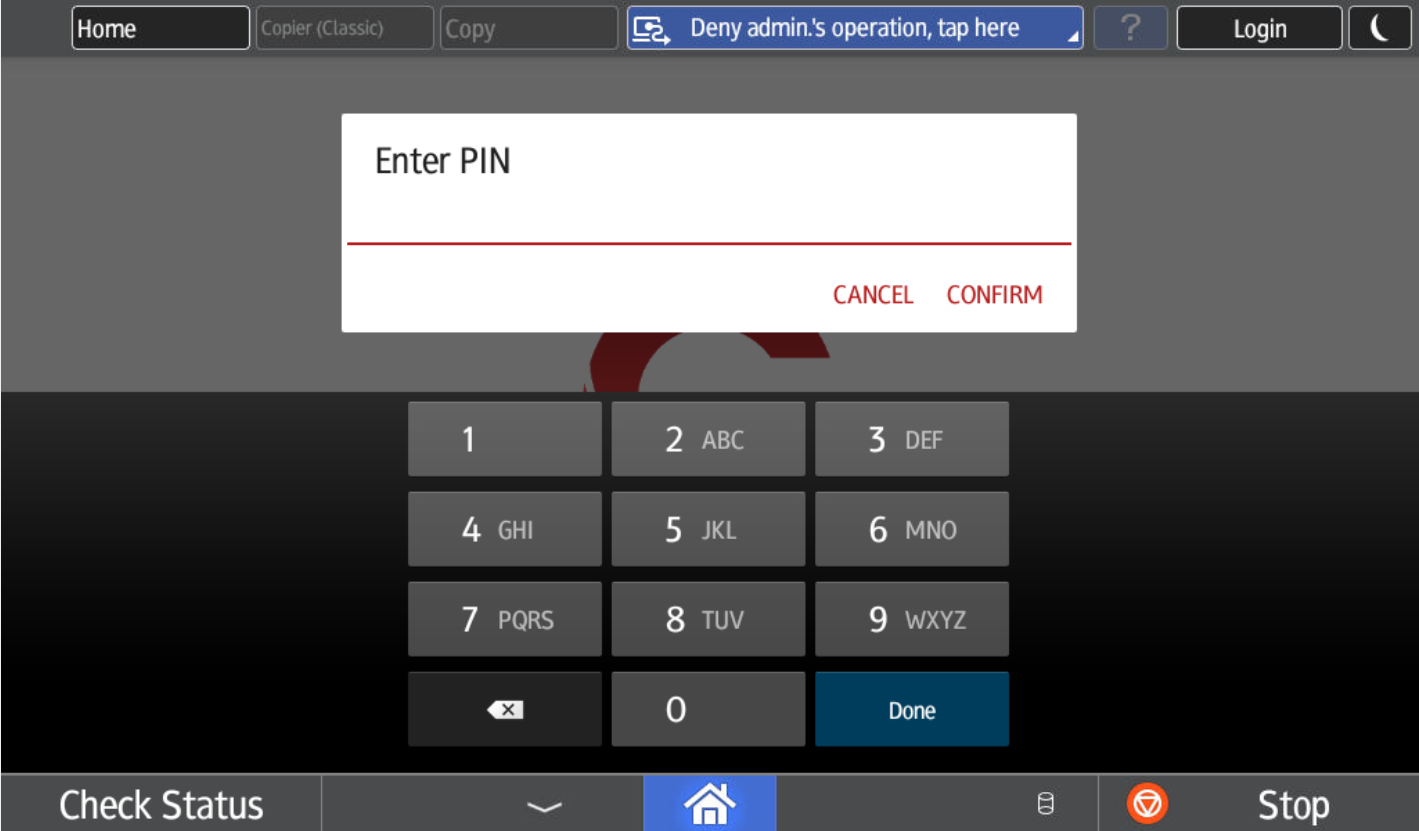
7.7. How to Set NumPad as Default for PIN Related User Entries
In order to set the numpad keyboard as default for PIN related user entries, instead of the alphanumerical keyboard, changes in the layout.properties file have to be applied.
Open the layout.properties file using a text editor (e.g. Notepad++). The layout.properties file is part of the skin package.
Change the settings as shown below:
loginView.authenticationIdRequestView.authenticationId.type=1 (default: 0)
loginView.pinCardRequestView.pinCard.type=1 (default: 0)
Save the layout.properties.
Update the skin package on Genius server.
Perform update skin on the client
A PIN related entry field will now look like this: