2. Preface
This manual contains all essential information to install the Genius MFP Ricoh SmartSDK Client on Ricoh SmartSDK devices.
2.1. Prerequisites
Ricoh MFP with a SmartSDK 2.40 or later versions,
Touch Panel SOP devices. Supported are:
Devices with smart operation panel generation 2 like Ricoh MP C307 or MP C4504.
Devices with smart operation panel generation 2,5 (IMC) like Ricoh IM 2702 or IM C3500.
Devices with smart operation panel generation 3 like Ricoh IM 460 or IM C3510.
Tested FW:
MP C307 with FW Package 17.05
MP C3004 with FW Package 32.05
IM 2702 with FW Package 1.16.1
IM C3500 with FW Package 8.04
Warning
Devices with smart operation panel generation 1, e.g. Ricoh MP C3003Z/C3503Z/C4503Z/C5503Z/C6003Z, are not supported. For further information on the device types, please refer to the Ricoh documentation.
Make sure that no other authentication applications are installed. Genius MFP Ricoh SmartSDK Client must be the only installed authentication application.
The newest version of the Genius MFP Ricoh SmartSDK Client which can be downloaded from the download area. The installation file is named:
Genius-MFP-Ricoh-SmartSDK-Client_<version>_Setup.zip
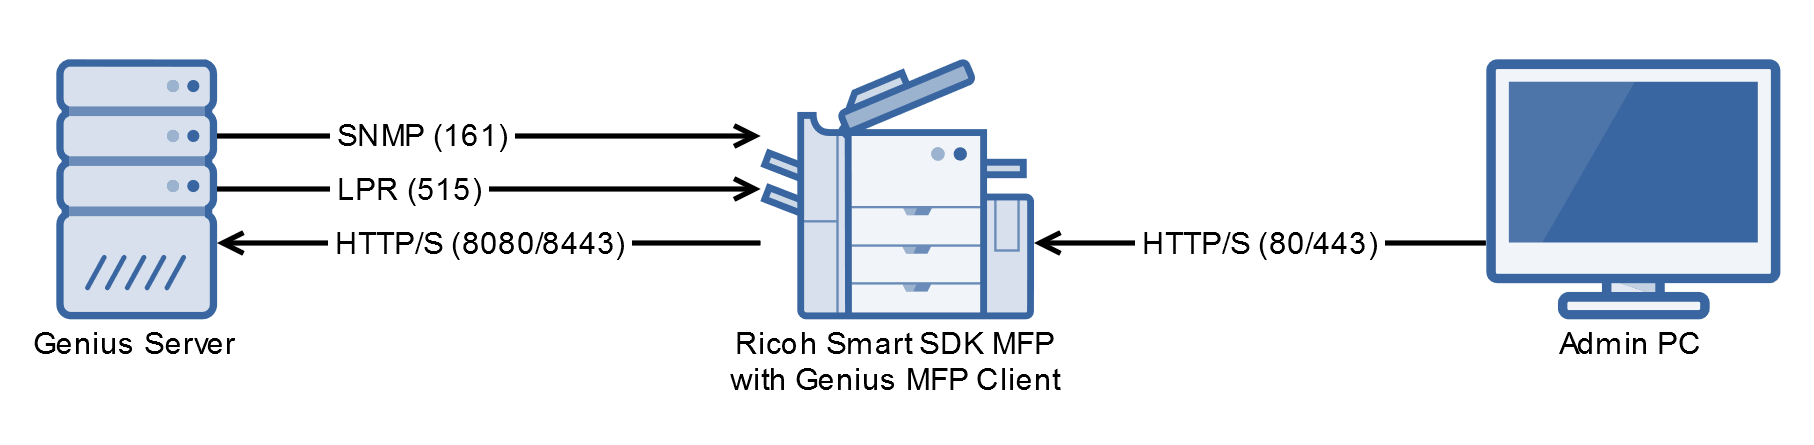
2.2. Port Configuration
The below diagram shows the required ports for the Genius MFP Ricoh SmartSDK Client.
3. Device Configuration
This section describes some possibilities and some necessities for device configuration. Some of these steps are necessary for card readers to work, so read carefully if it is planned to use card readers.
The client configuration follows in the section Client Configuration. Please note, that the configuration steps might differ slightly, depending on the device generation.
Note
Please note, that in order to login as administrator on the device, when the Genius MFP Ricoh SmartSDK Client is already installed, the credentials needed to login are still the device administrator credentials. In previous versions we used the GMFP credentials.
3.1. Manual Configuration
The following configurations can only be configured manually.
For newer device generations like IM C3500, etc. the steps are at times a bit different and will be explained at the end of the corresponding section.
3.1.1. Set Normal Startup Mode
Access the device's native home screen. If the Genius MFP Ricoh SmartSDK Client is already installed do so by double tapping the logo and enter the device administrator credentials.
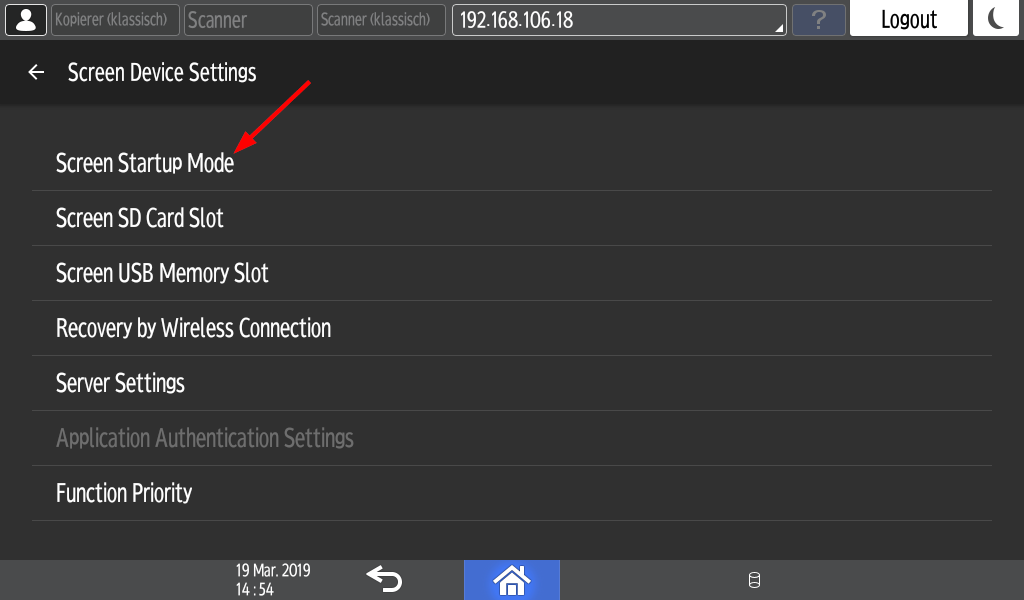
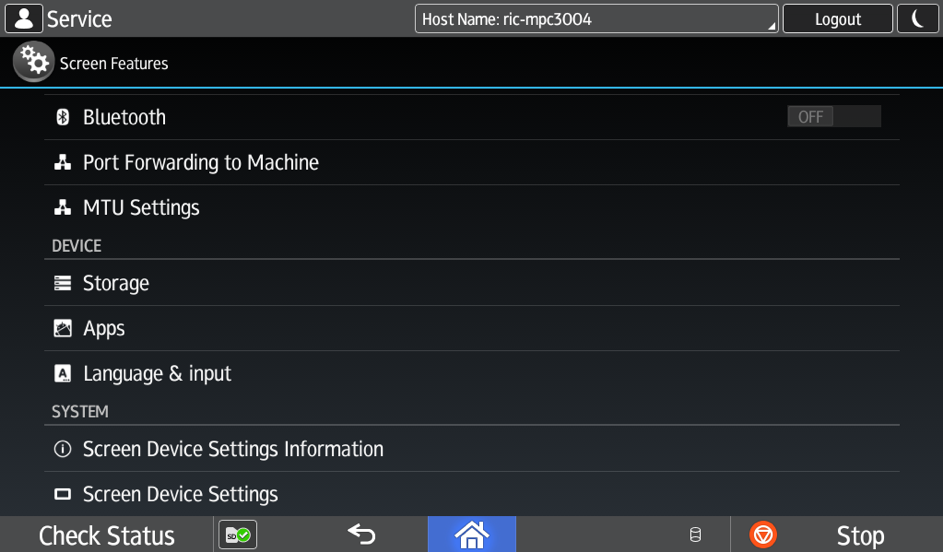
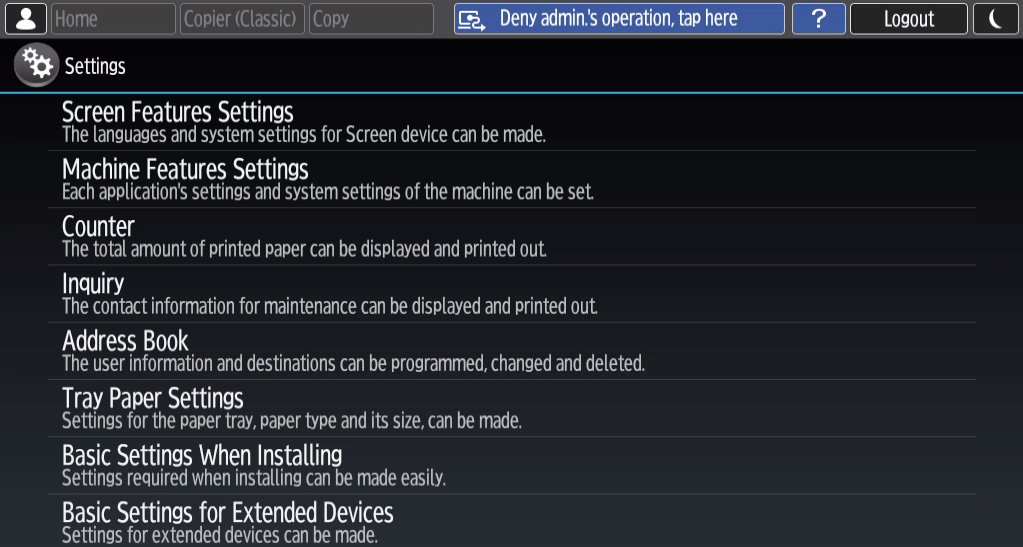
Press the "home" button to access the device main menu and access the "settings" menu. Then access the Screen Feature Settings.
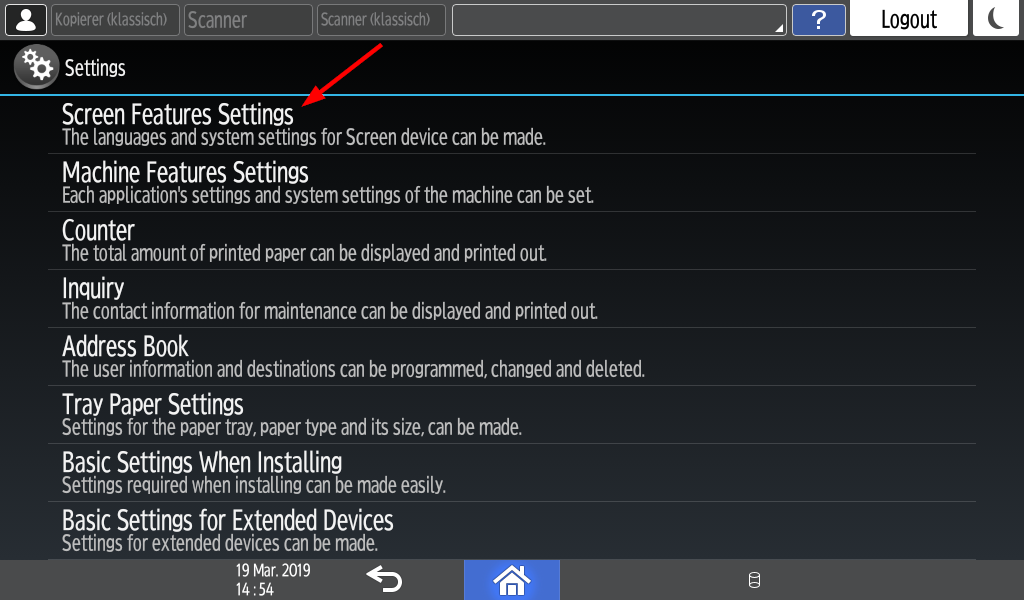
Press "Screen Device Settings"
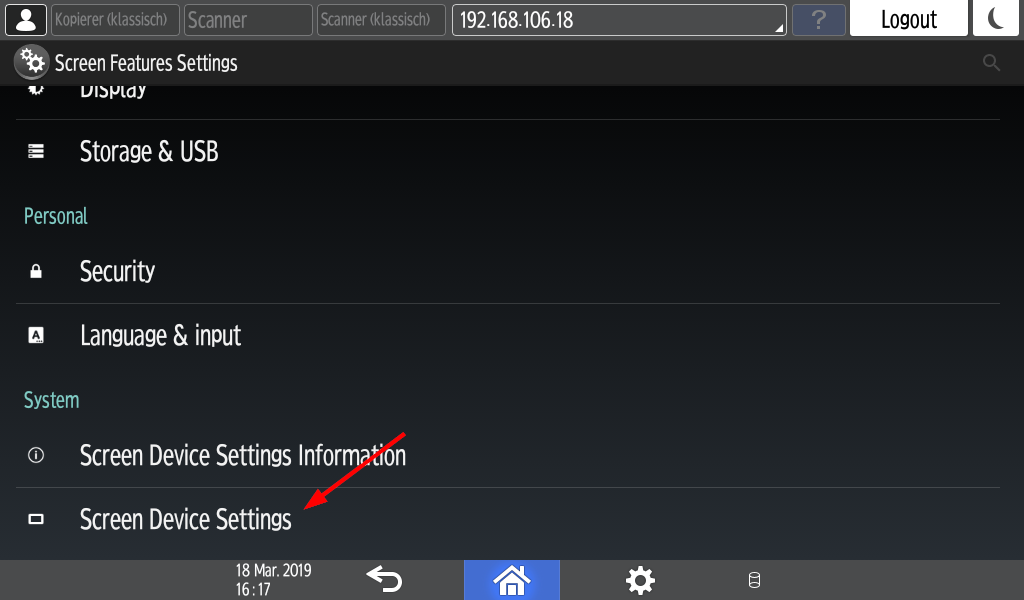
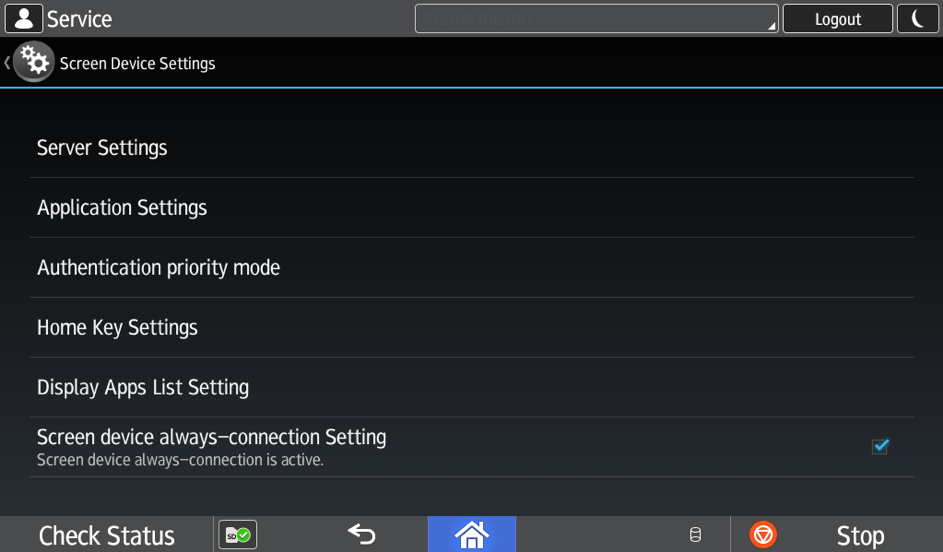
Select "Screen Startup Mode".
Set the Startup Mode to "Normal". If it is set to "quick" the card reader will not function on IMC device types.
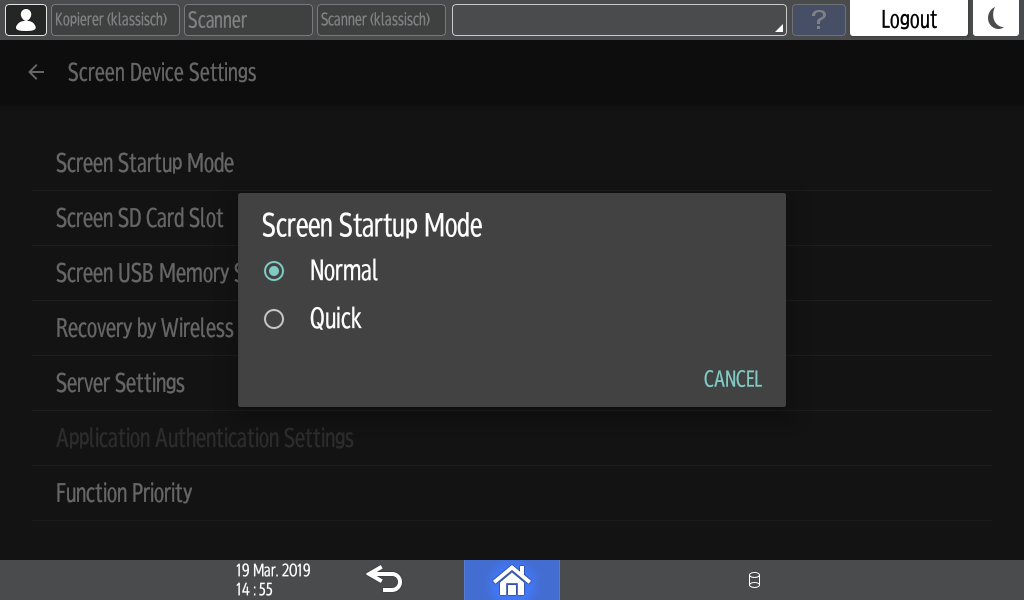
Logout and reboot the device. After the reboot is finished the card reader is working correctly.
3.1.2. Set Normal Startup Mode on Newer Devices
Access the device's native home screen. If the Genius MFP Ricoh SmartSDK Client is already installed do so by double tapping the logo and enter the device administrator credentials.
Press the "home" button to access the device main menu and access the "settings" menu. There navigate to Machine -> Power/Energy
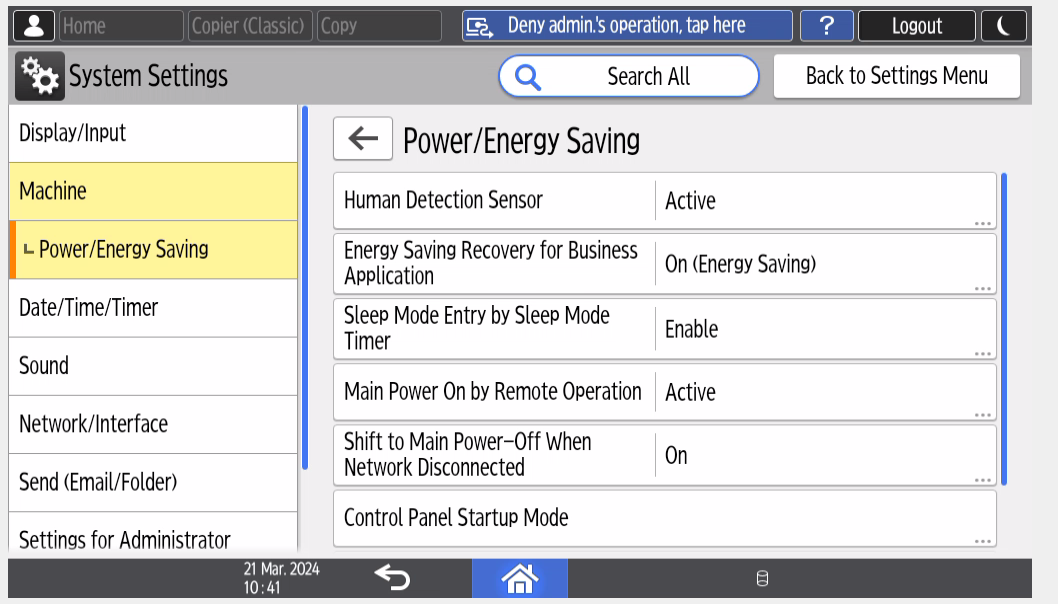
Press Control Panel Startup Mode and select "Normal" from the dropdown menu. If set to quick, card readers will not work on these devices.
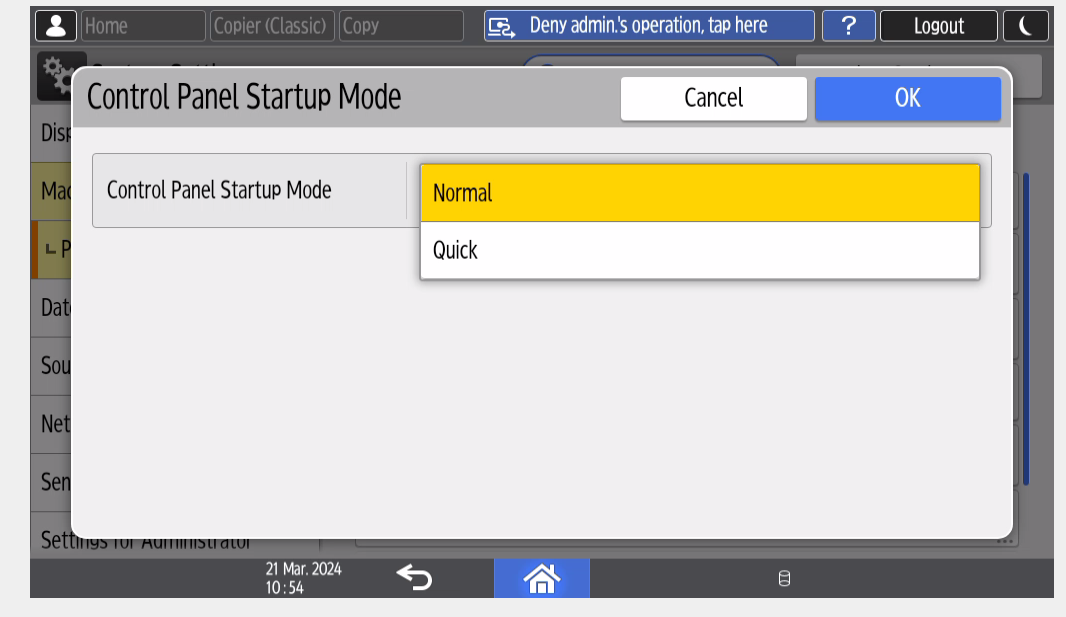
Press OK to save changes.
3.1.3. Configure a Card Reader on SmartSDK Devices
Before using a card reader on a Ricoh smartSDK device it needs to be configured. Complete the following steps:
If a card reader is already connected, disconnect it from the device and access the device's native home screen. If the Genius MFP Ricoh SmartSDK Client is already installed do so by double tapping the Logo and enter the device administrator credentials.
In the following block screen, press the device login button in the upper right corner and perform login with the device's admin credentials.
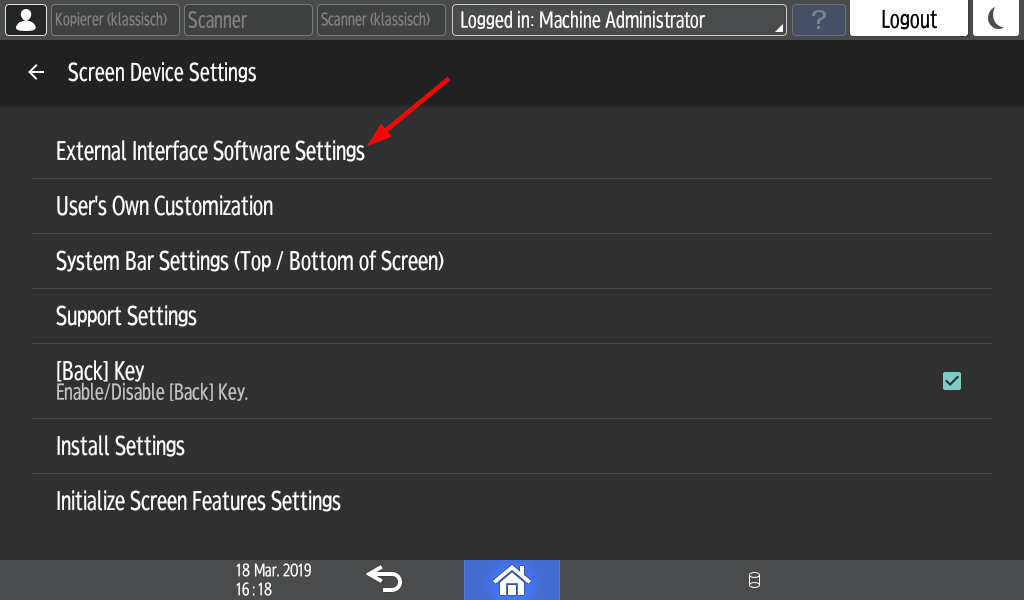
Press the "home" button to access the device main menu and access the "settings" menu. Then access the Screen Feature Settings.
Press "Screen Device Settings"
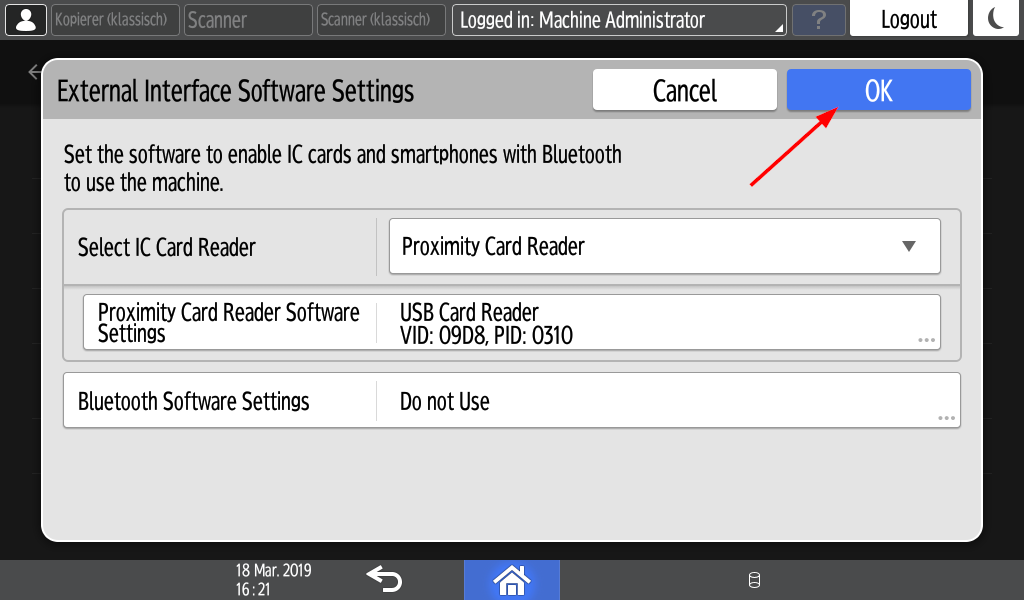
Press "External Interface Software Settings". Note that on some older devices this setting might be called IC Card/Bluetooth Software Settings.
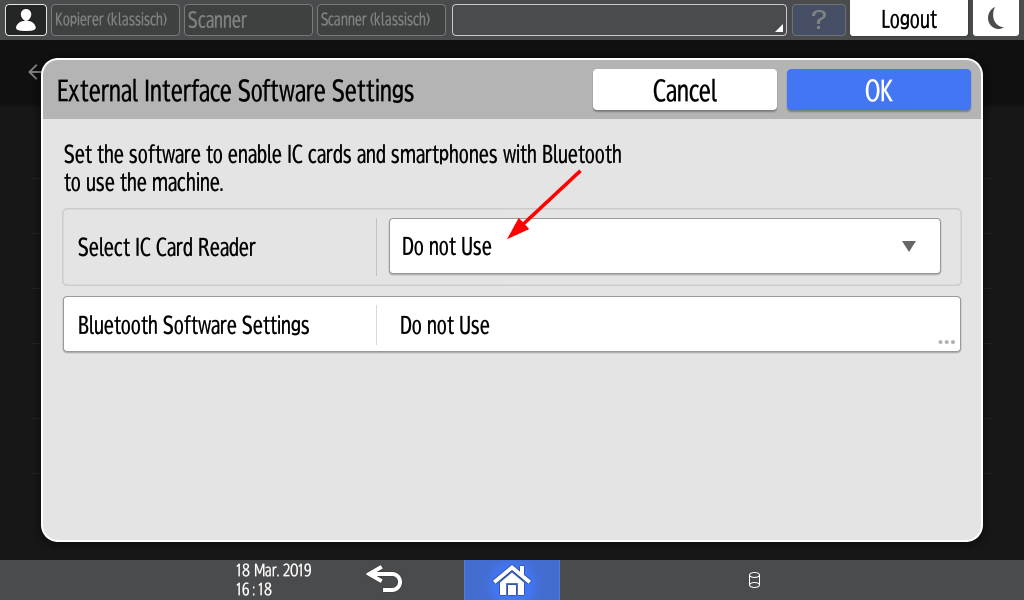
Change "select ic card reader" to "proximity card reader" and click on "Not Set".
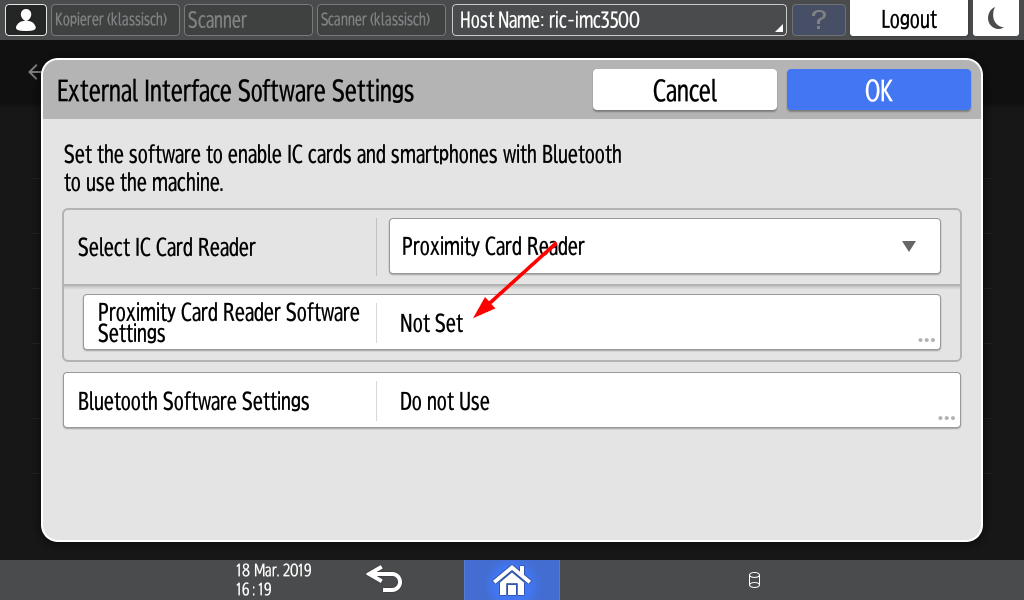
Connect the card reader to the operation panel USB slot (not to a device USB slot) as advised on the screen.
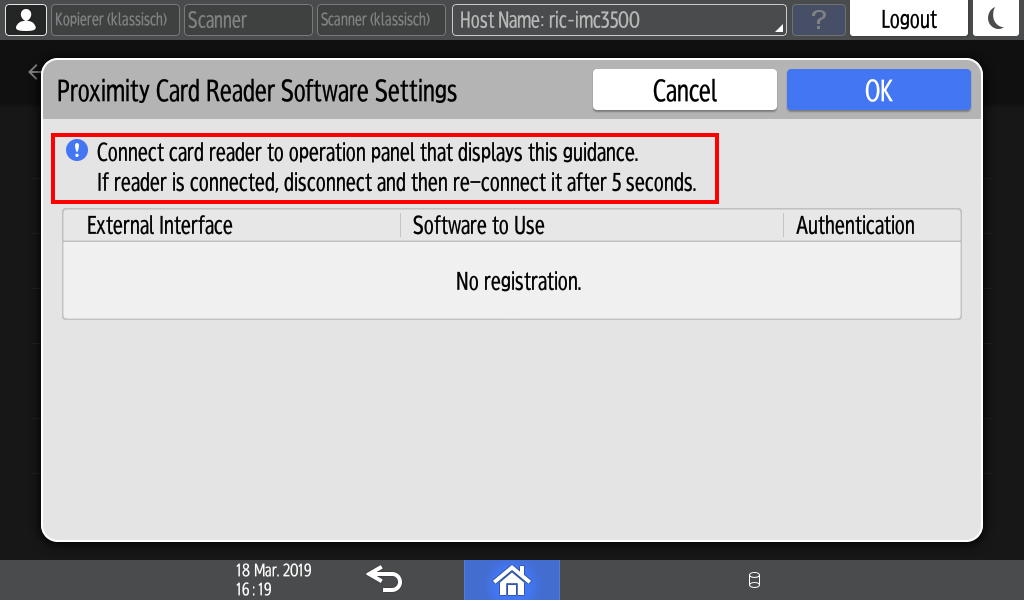
The device should now give a success feedback:
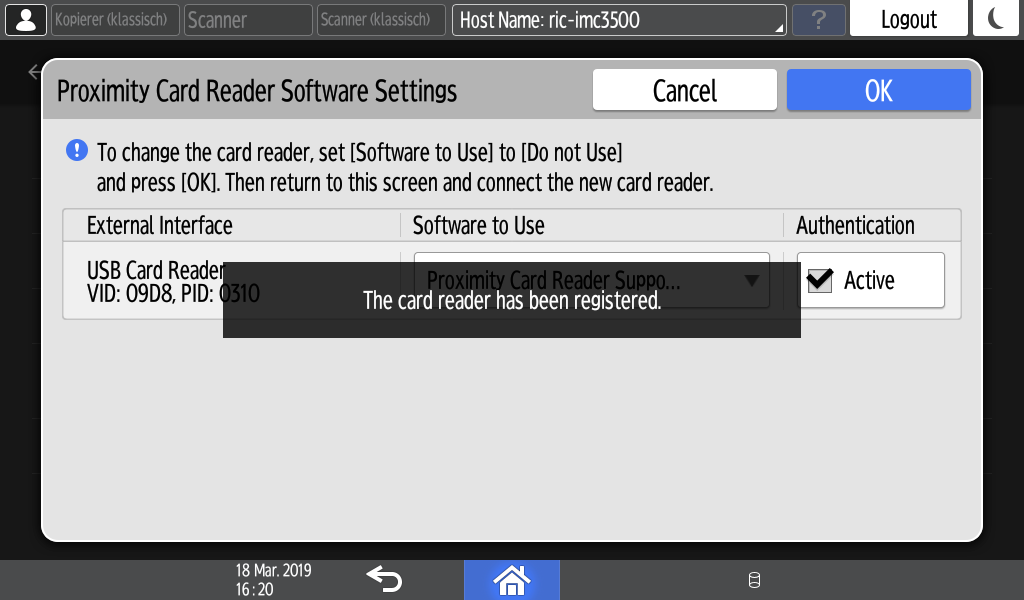
Now press "OK":
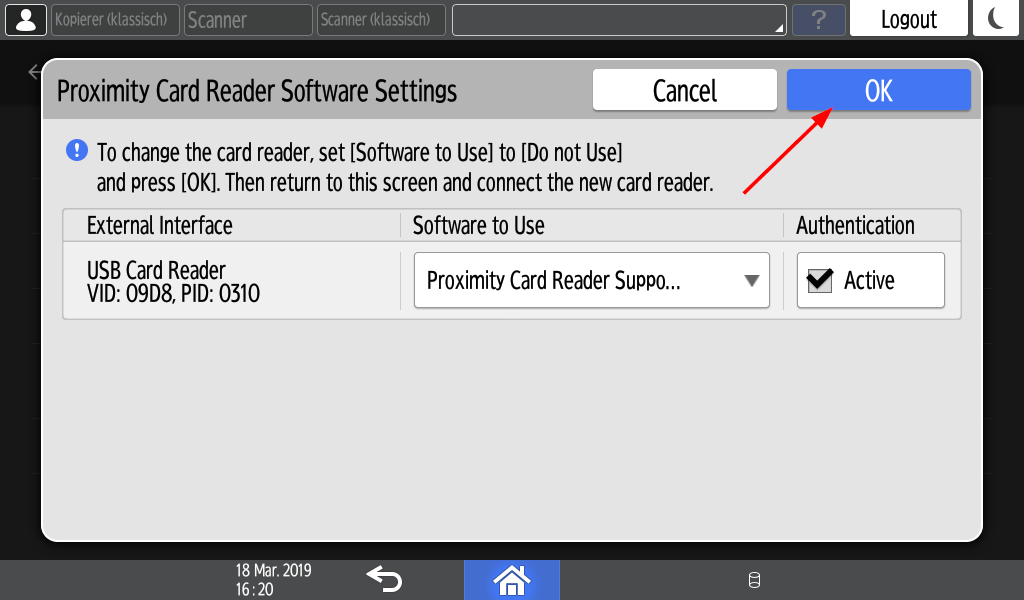
and get this message:
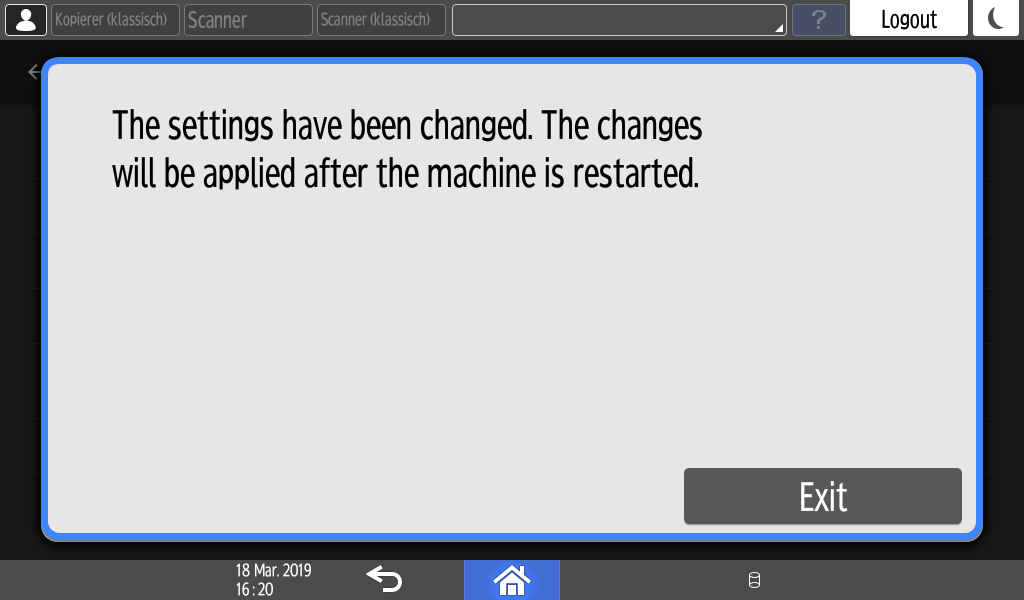
Press "OK" again and afterwards reboot the device.
The card reader has been successfully configured and can be used now.
3.1.4. Configure a Card Reader on Newer SmartSDK Devices
For IM C3500 and other newer models follow these steps.
If a card reader is already connected, disconnect it from the device and access the device's native home screen. If the Genius MFP Ricoh SmartSDK Client is already installed do so by double tapping the Logo and enter the device administrator credentials.
In the following block screen, press the device login button in the upper right corner and perform login with the device's admin credentials.
Press the "Home" button to access the device main menu and access the "Settings" menu.
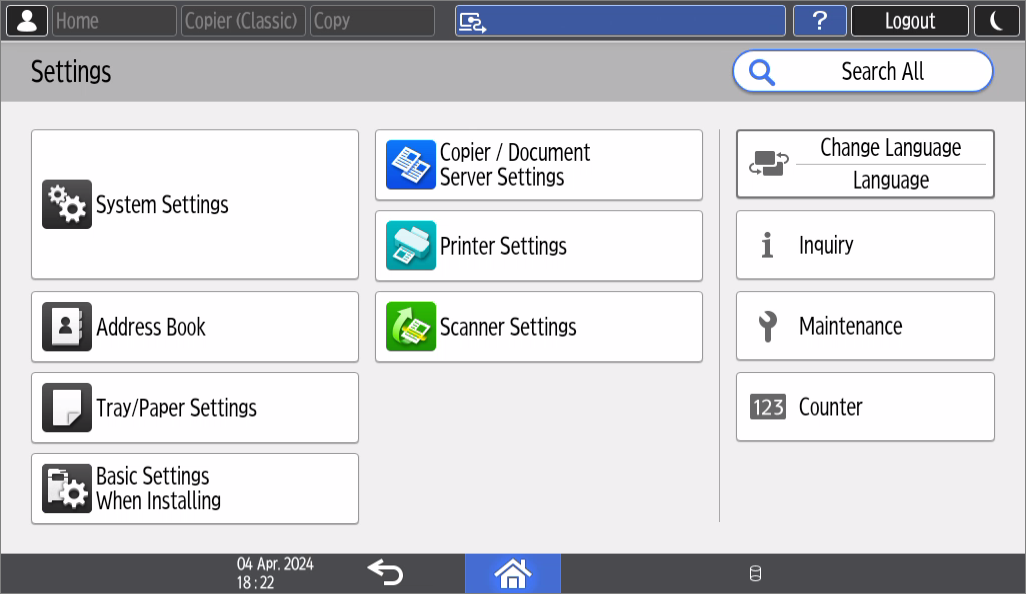
Then navigate to Network/Interface and scroll down to External Interface Software Settings.
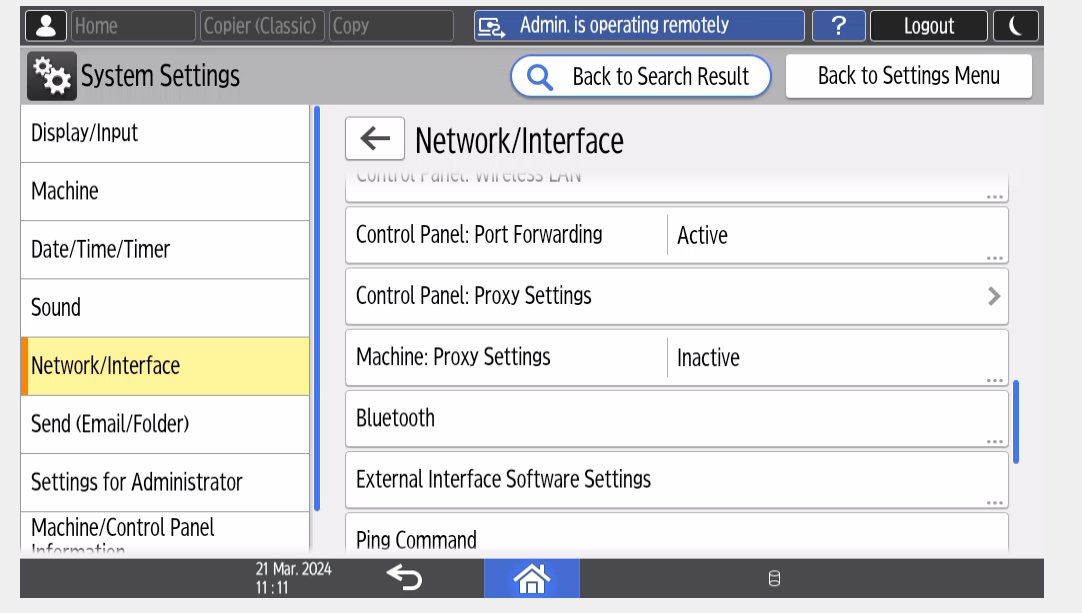
Change "select ic card reader" to "proximity card reader" and click on "Not Set".
Connect the card reader to the operation panel USB slot (not to a device USB slot) as advised on the screen.
The device should now give a success feedback:
Now press "OK":
and get this message:
Press "OK" again and afterwards reboot the device.
The card reader has been successfully configured and can be used now.
3.1.5. Enable Screen Device Always-Connection Setting
This setting must be set to enabled to guarantee smooth client behavior and to prevent unpredictable effects. Per default this setting is disabled, so make sure to not skip this step.
A side effect of this setting is, that it makes it possible to wake devices up from sleep mode by using a card.
Access the Smart Operation Panels service mode (for further information about how to perform the access, contact Ricoh assistance).
Hint
Be careful to select the correct menu here, since the admin menu looks a lot like the service mode menu. If the settings mentioned below are not shown, check again if the correct menu has been chosen.

Press Screen Device Settings.
Press Screen device always-connection Setting to enable it.
3.2. Automated Configuration
The following settings can be set manually, but can also be configured via Genius MFP Ricoh DST. Refer to Genius MFP Ricoh DST documentation for details. Follow the instructions below if you want to set those settings manually.
3.2.1. Set Access Control to Custom Authentication
This section explains some necessary changes for the custom authentication flow to work correctly, allowing for locking/unlocking device functions, count scans and use the global logout button which is always visible on the screen.
First, enable custom authentication. This can be done in two ways.
Use the Genius MFP Ricoh DST, this is the recommended method. Please refer to the Genius MFP Ricoh DST technical manual for details.
For authorized Ricoh personell only: set the service program setting "SP-5-401-230" to "00000001" in SP Mode.
3.2.2. Enable MF Keycard - Job Permit
The second step is to set the setting MF Keycard - Job permit to 1. To configure this, use the Genius MFP Ricoh DST as recommended method.
For authorized Ricoh personell only: set the service program setting "5-490-001".
3.2.3. Enable Administrator Authentication
It is required to enable at least the user admin authentication. For security reasons, we recommend to enable all admin authentication options.
Login as device admin on the device. Navigate to Configuration and there to Administrator Authentication Management. This is the minimum that needs to be configured:

3.2.4. Set User Authentication Management to Custom
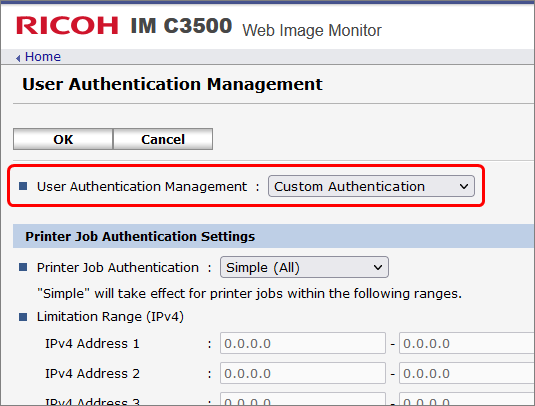
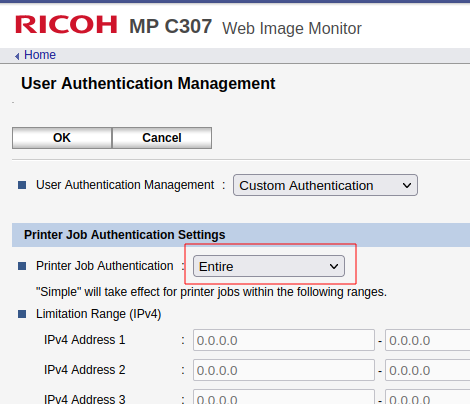
The third step is to set user authentication management to Custom Auth. For this, first login as administrator on the device web page or on the device.
Navigate to Configuration, there find the category Device Settings and inside this category click on User Authentication Management.

From the drop down menu next to User Authentication Management select: Custom Authentication
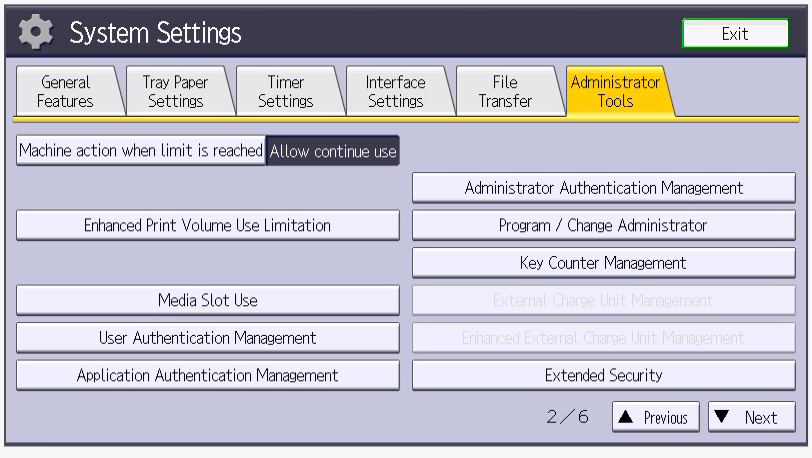
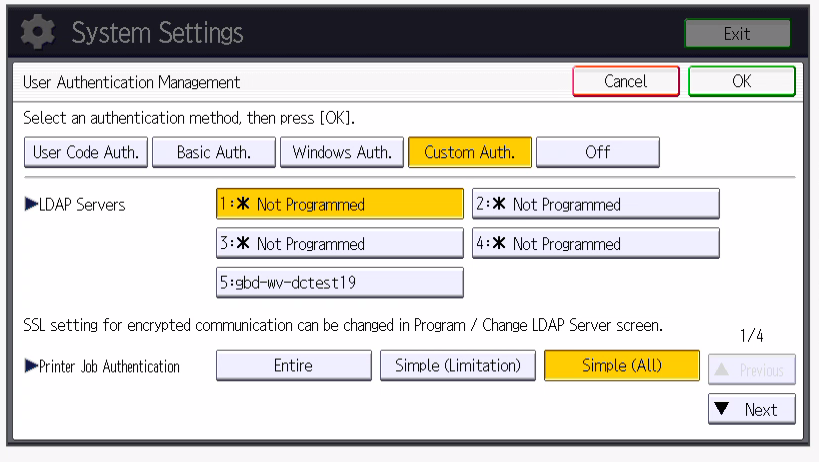
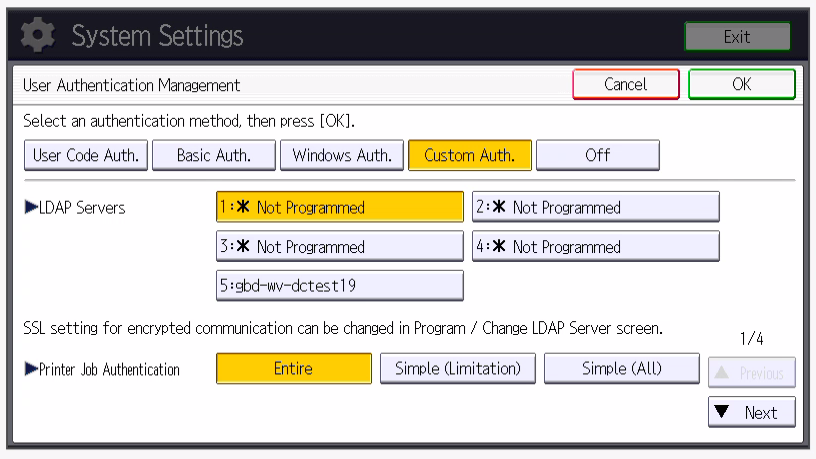
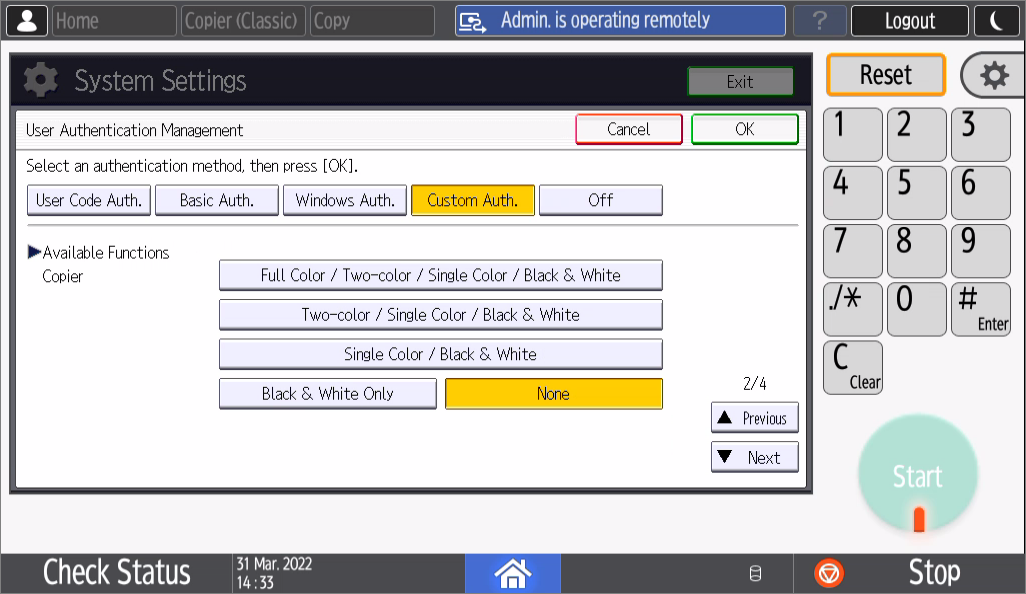
Alternatively, if you are operating on the device, go to System Settings -> Administrator Tools -> User Authentication Management.

Select Custom Auth.. Make sure that LDAP Servers are set to 1: Not Programmed:
Make sure that Printer job Authentication is set to entire.
If you are operating on the device, it will look like this:
Scroll down to LDAP Authentication Settings. Make sure that all features of the available functions section are disabled.
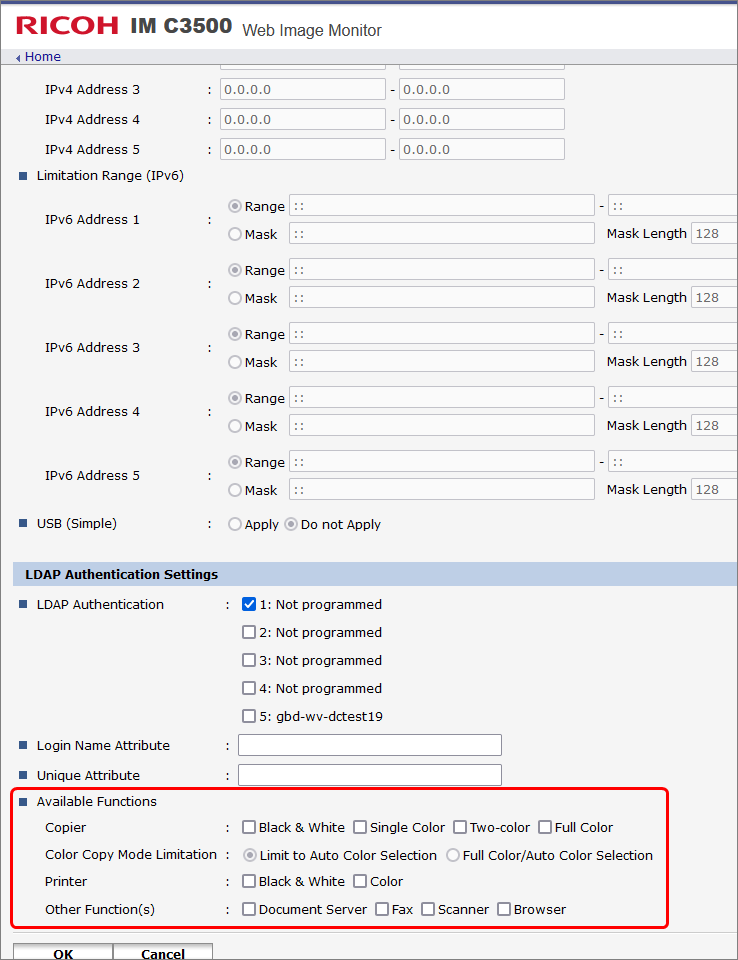
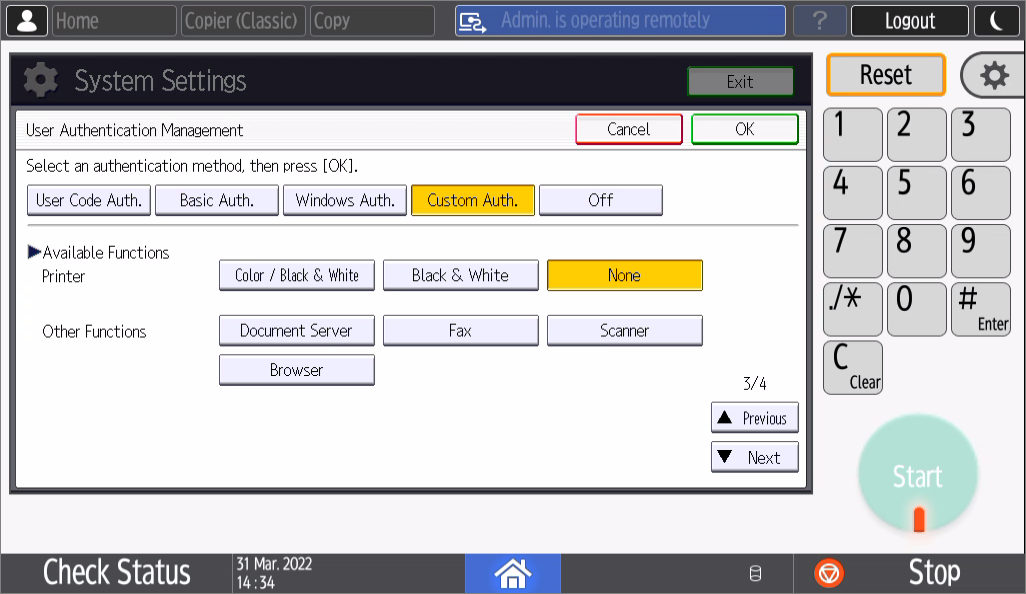
On the device it will look like this:
and
3.2.5. Enable Print Volume Tracking Permissions
Lastly, set the tracking permissions to on. This can either be done via Genius MFP Ricoh DST (see the corresponding manual for details), or by using the User tools on the device screen.
Hint
After these settings have been set, all native Ricoh applications are blocked. Locking and unlocking these applications is now tied to Genius MFP Ricoh SmartSDK Client authentication flow. To unlock specific applications (e.g, in the customer environment "Copy" needs to be always accessible, refer to How to Disable Authentication for Native Apps in the troubleshooting section.
3.2.6. Configure Auto Logout Systems
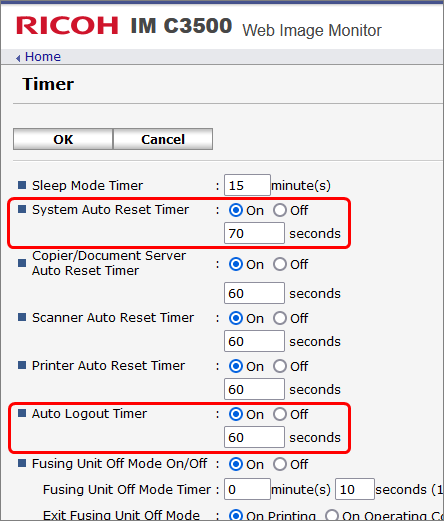
There are three different auto logout timers:
Decive auto logout timer: Regulates the auto logout when a user is using a native application (recommended to be set to 60 seconds).
Device auto reset timer: Controlls when a user is moved back from a native application to the Genius MFP Ricoh SmartSDK Client application (recommended to be set to 70 seconds).
Genius MFP session timeout: Regulates auto logout from the client application (recommended to be set to 60 seconds).
Both device timers can be set previous to the client installation. Genius MFP session timeout can only be set after Genius MFP Ricoh SmartSDK Client has been installed.
3.2.6.1. Device Auto Logout and Auto Reset Timer Configuration
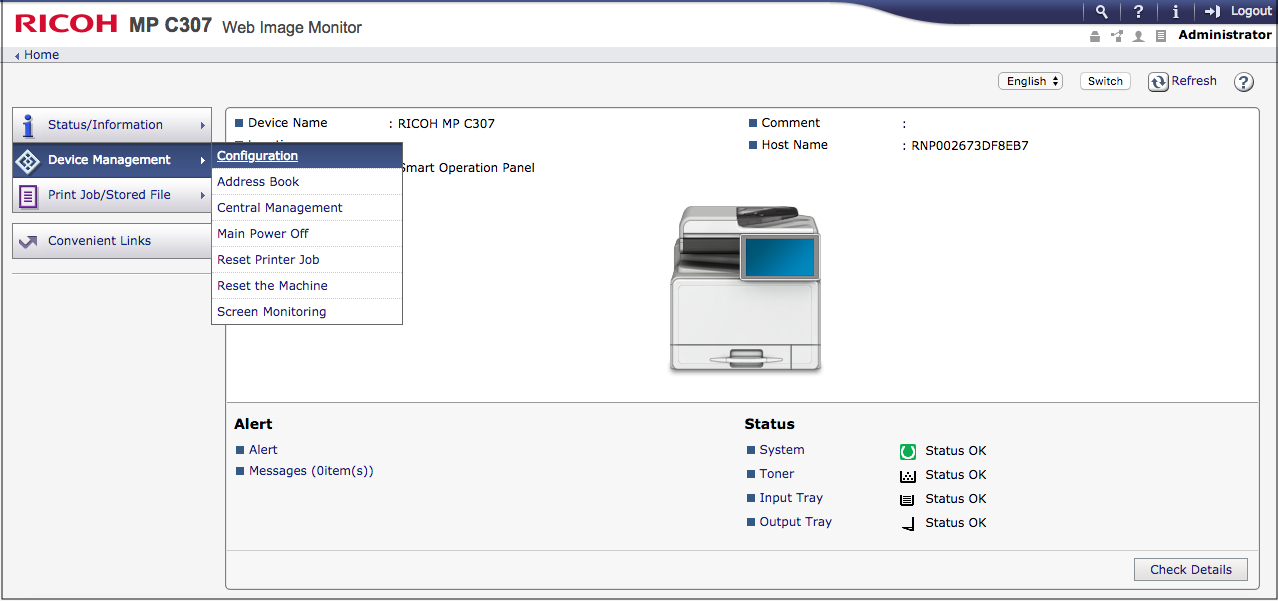
Open the MFP administration page (
https://<device-ip>) and login as administrator:

Click on Device Management and then Configuration:
Select Timer in the Device Settings section:
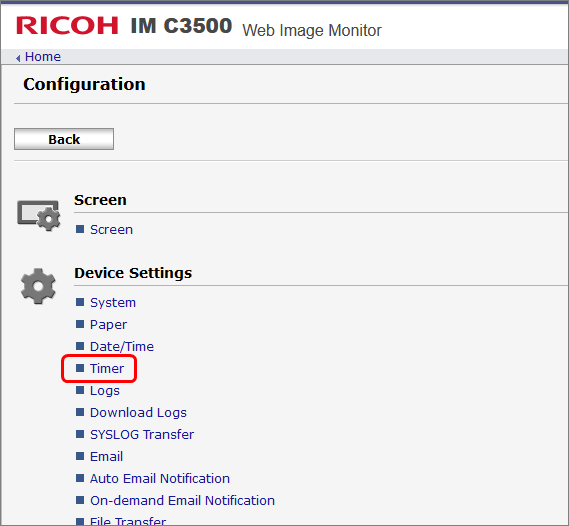
Select System auto reset timer and set it to On to configure, when the user is moved back from a native application to the Genius MFP Ricoh SmartSDK Client application. Choose a sensible value. Select Auto Logout Timer and set it to On to configure, when the user is logged out when using native applications. Choose a sensible value. Do not forget to save the changes.
3.2.6.2. Genius MFP Session Timeout Configuration
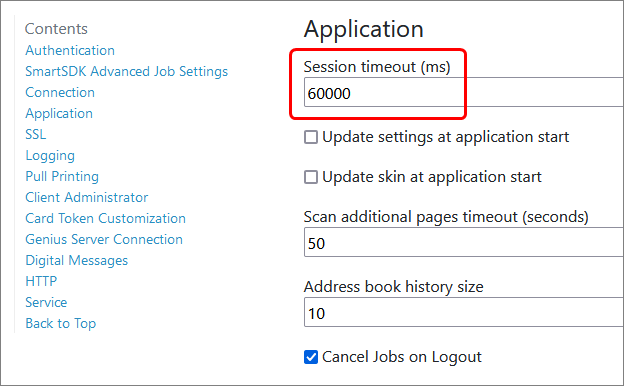
The Genius MFP session timeout can be configured on the web configuration page after the Genius MFP Ricoh SmartSDK Client has been installed. Navigate to Settings->**Advanced**->**Application** and configure the setting Session timeout (ms). Choose a sensible value. Press Save to save the changes.
3.2.7. Check that External Charge Unit Management is Deactivated
Since the Genius MFP Ricoh SmartSDK Client does not support the external charge unit, it needs to be deactivated on the device. For this an authorized Ricoh technician is required. Usually this setting should be deactivated by default.
To check if the setting External Charge Unit Managment is deactivated:
Login as device administrator on the device. If the Genius MFP Ricoh SmartSDK Client is already installed, double tap the logo and then login with device administrator credentials.
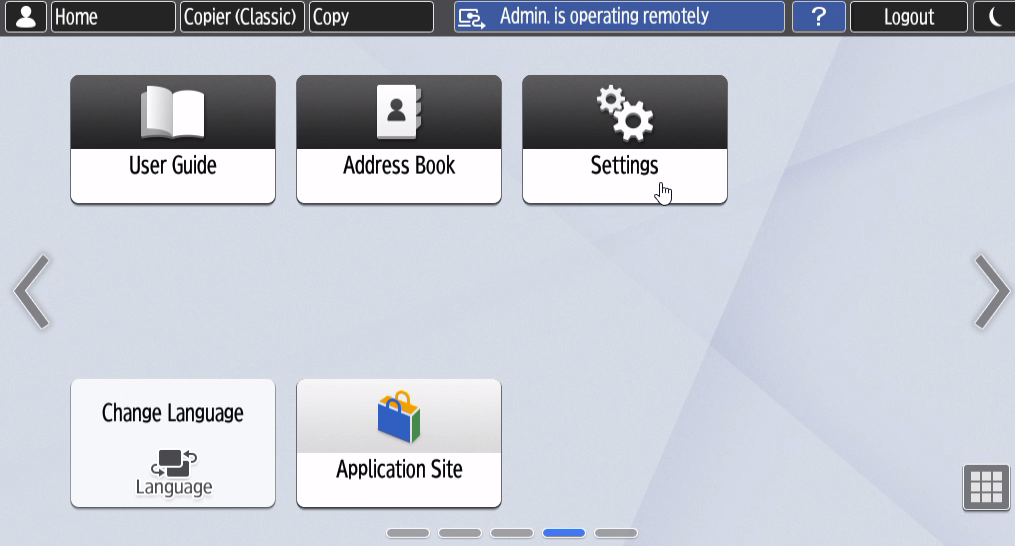
Click on Home in the top left corner and then on Settings.
Click on Machine feature settings.
Click on System Settings.
Click on Administrator Tools.
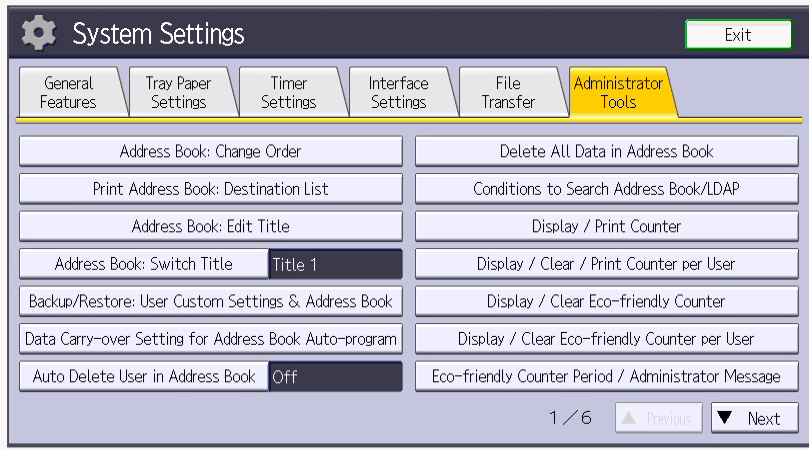
Scroll down to page two and check if the setting External Charge Unit Management is deactivated.